Why Today’s iPhone is Worthy of Your Camera Bag
The iPhone became a staple in my camera bag about nine years ago when I acquired my first iPhone, an iPhone 4. At the time, doing photography with one’s phone was a novel idea, and many photographers who relied on large (and heavy and bulky) DSLRs for their photography, didn’t pay it any mind, much less afford it any respect.
All images in this article are Copyright © Rade Drew 2019
But that was then! Today’s iPhone has matured to include features and technical specs that warrant giving the device a second look. This is especially true since the new series of iPhone 11s was just announced last week. But that’s another article for after we receive our new iPhones!
In this article, I’ll identify some of the things that I believe make this mobile device worthy of your camera bag.

Create RAW Files and Process RAW on the iPhone
Digital photographers have understood the power of RAW for many years. RAW files contain data that allow for the recovery of details in highlights and shadows not possible with JPG files. For this reason alone, shooting and processing RAW leads to better quality images. Until recently creating and processing RAW files on the iPhone was not an option.
Today there are many camera apps that allow us to create RAW files, and while there are a few that also support RAW processing, none is as robust and comprehensive as the Lightroom app for iOS and Android.
For those who subscribe to the Adobe Creative Cloud, Lightroom for the phone is a no-brainer. The “fully loaded” app is included in your Adobe Creative Cloud subscription.
But even if you don’t relish parting with your hard-earned cash each month for the Adobe Creative Cloud subscription, Lightroom is still free for everyone. The catch? If you aren’t a subscriber you don’t get these three tools in the app: Healing, Selective, and Geometry. But you do get the Lightroom camera for creating RAW files, and you do get all the tools necessary to process those RAW files on your phone. The tools you don’t get aren’t necessary for RAW processing and are easily replaced by other mobile phone apps, like SnapSeed and Touch-Retouch.
So, the bottom line? If you want the quality you can extract from creating and processing RAW files on your phone, you need Lightroom on your iPhone! Watch for more details and my workflow on an upcoming YouTube video. For now, there is this YouTube video which I recorded last December that reviews a simple 7-step workflow. Please ignore my comment in this video where I say if you’re not a subscriber to the Creative Cloud, don’t bother with Lightroom for the phone. I was flat out wrong about that! You definitely want to install Lightroom even if you’re not an Adobe Creative Cloud subscriber because you still get the RAW shooting and processing capability for free.
And for all who say, “RAW requires post-processing and I don’t have time for that!” You’re right. Unprocessed RAW files look, well, terrible! They require fundamental processing to set a white and black point and begin to extract the quality from the image. But the seven steps I propose for processing RAW in Lightroom take only a minute or two to complete. The quality you get for a minute or two of processing time is well worth the investment. Lightroom also allows you to create your own presets, so you can create a preset with all the things you do to every image, like setting the black and white point. With a push of a button, you can reduce those seven steps to only a few. It becomes a very quick edit.
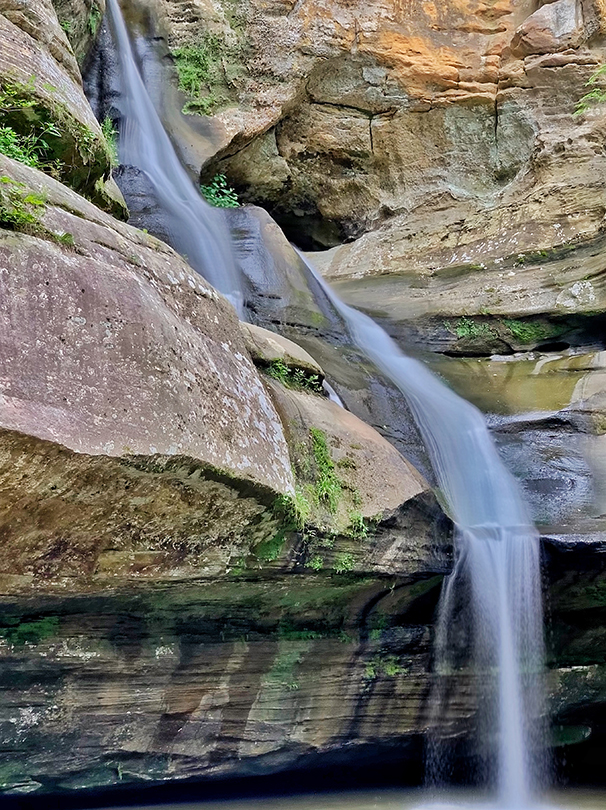
Create Long Exposures
Early iPhones didn’t possess the ability to create that “soft water” look characteristic of long exposures. This type of look was, previously, only possible with a “big” camera. Today’s iPhones, especially the later models, allow several ways to achieve the look of long exposures.
Live Mode in the Native Camera
Live Mode is turned on by tapping that little round bull’s eye at the top of the Native Camera interface. It turns yellow when it’s on. You know, the one you always turn on by mistake and end up with those annoying moving images! That’s what I thought for the longest time until I learned that the LIVE mode is really a great way to achieve a “soft water” or blurred people abstract without a tripod, a big camera, or neutral density filters.
How? Follow these steps:
- Open the native iPhone camera and tap the Live mode icon, turning the “bull’s eye” yellow.
- Select a scene with a stream or other moving object, hold steady, and tap the shutter button.
- Find and select the photo in your camera roll.
- Now swipe up on the image. Four options appear beneath your photo: Live, Loop, Bounce, and Long Exposure. I’ve found little use for the first three, but ….
- Select Long Exposure, and the parts of your image that are moving (like that steam or waterfall) become soft, while the remaining part of the image remains sharp. All this can be done while hand-holding your iPhone!
Lightroom Camera Long Exposure
Currently available in the Lightroom app for your iPhone is a beta version of a long exposure feature. Before you’ll see it in the options menu, you must turn on the feature in the camera’s settings. To turn it on, follow these steps:
- Navigate to the settings in the Lightroom camera app.
- Locate and tap on the app’s Technology Previews. You’ll see two: Long Exposure and Depth Map Support.
At the time of this writing, Depth Map Support is not available, but Long Exposure is. - Once Long Exposure is enabled in the settings, you can select Long Exposure from the options on the camera interface. Lightroom takes a series of images (in RAW) and combines them so that any moving parts of the scene are softened, while stationary elements remain sharp.The long exposure image below was created and RAW-processed in Lightroom on the iPhone and finished in SnapSeed.
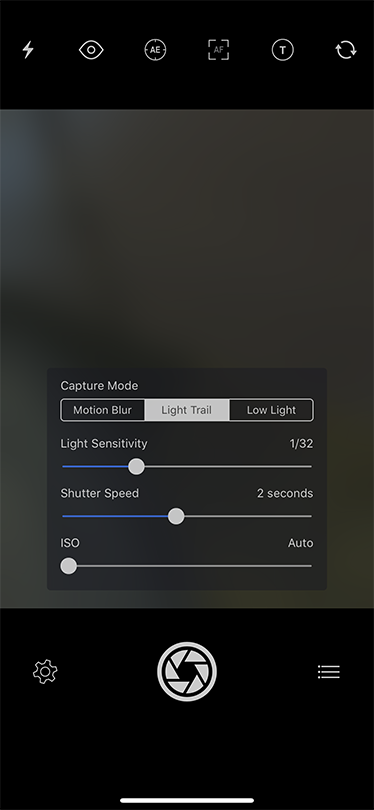
SlowShutter Camera by Cogitap Software
The SlowShutter App also allows making a long exposure. In the settings, you choose one of three capture modes: Motion Blur, Light Trail, or Low Light. Each mode captures motion in a unique way which you control by the Blur, Light Sensitivity, Shutter Speed, and ISO. For best results, I use a tripod, (unless I’m doing Intentional Camera Movement (ICM) discussed later in this article).
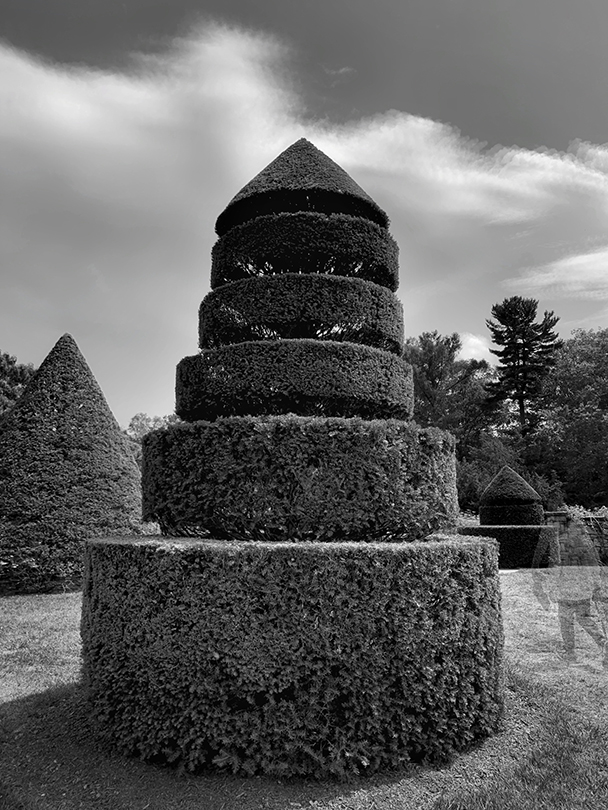
An Oldie But A Goodie, Average Cam Pro
The Average Cam Pro is an OLD app that I fear may disappear from the App Store at any time. It’s a fun app for creating long exposures. The app is very simple and allows from two to 128 exposures, blending them together in the app. With the camera on a tripod, one can get great light trails or cloud movement while all other elements in the scene remain sharp. In the image below, the topiary is sharp, while the moving clouds show motion, and, do you see the “ghost” created by a child running through the scene during the exposure?
Intentional Camera Movement (ICM)
ICM is nothing new. Photographers have long been creating images with blurs of many kinds created by moving the camera during a long exposure.
What’s new for many is doing this technique with the iPhone. One nice thing about doing ICM on the iPhone is that you don’t need to worry about over-exposing and blowing out parts of an image exposed to too much light. While a traditional camera might necessitate the use of neutral density filters to prevent overexposure, they aren’t necessary with the iPhone; it’s very forgiving in this regard.
My two favorite camera apps for doing ICM are SlowShutter Camera and Average Cam Pro, which I describe below.
Slow Shutter Camera by Cogitap Software
Use the Slow Shutter Camera to create swipes of colorful objects (e.g. flowers) or of people moving through a crowded area, like a train station.
I recommend starting with the settings shown in the screenshots below. The first screenshot of settings are the main camera settings; once set, you don’t need to change them with every shot.
The second set of settings are the settings for each shot. Like your big camera, if the light changes, the settings like shutter speed or light sensitivity may also need to be changed, although the app is far more forgiving than our big cameras.
and
Use these settings as a starting point, then experiment with different settings and capture modes. The result you get depends on your settings and the rate and direction of the movement you make. There are no rules for how to move; it’s all up to you!
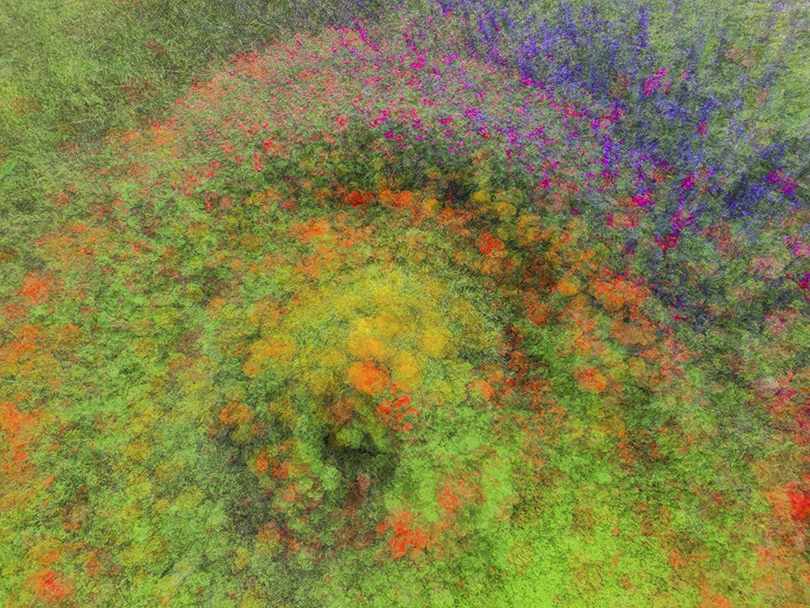
Here are a couple of images I created using Slow Shutter Cam. Bonus points if you guess what the first image is! No? Would you believe, this is a mature cornfield being thrashed about in the wind. I put the iPhone on a tripod and set it for a four-second Light Trail and this wild abstract is the result.

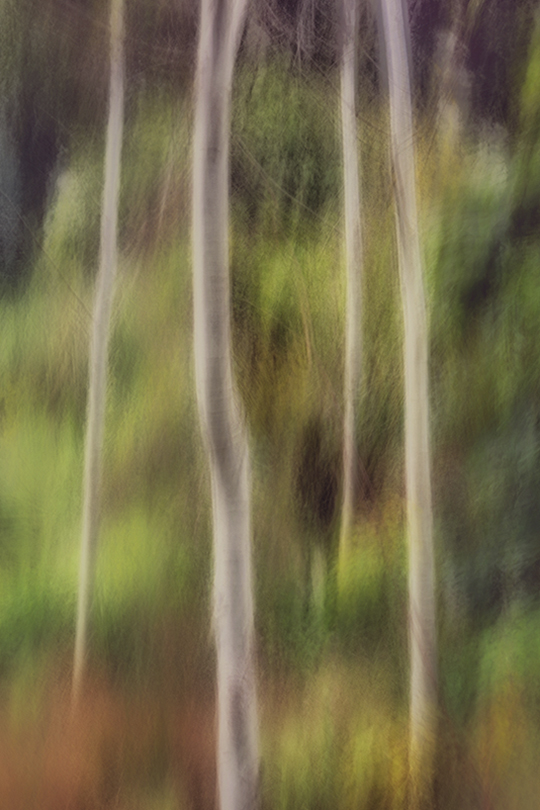
The image of the trees (below) was made by moving the camera in a vertical swiping motion from bottom to top.
Average Camera Pro
This app is wonderful for creating intentional camera movement (ICM) photos. Here’s a brief set of instructions:
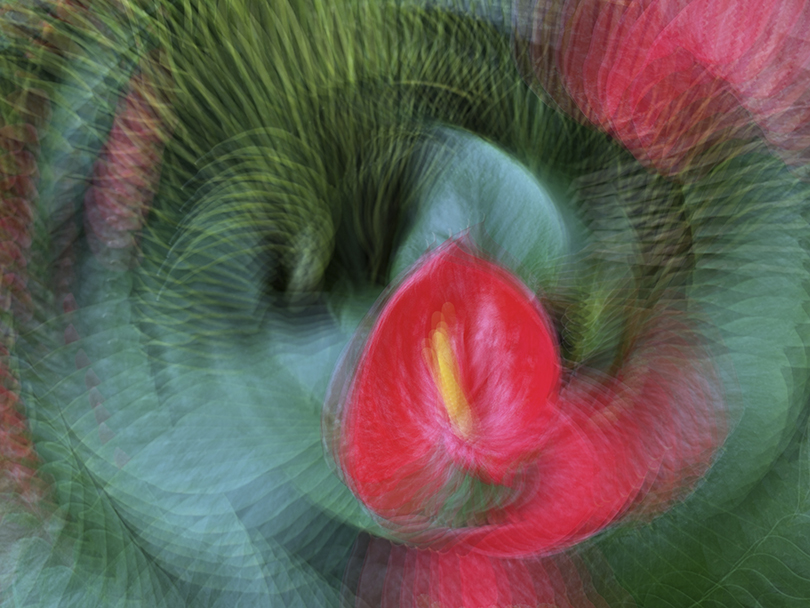
- Choose a colorful flower bed. I like to look for a variety of colors with one dominant color like white, yellow, or red.
- Open Average Cam Pro’s settings.
- Set the “number of pictures” to 4 or 8.
- Leave Shooting interval and Pre Start Timer set to 0.
- Tap the shutter button and twist the phone as the shutter fires.
Here’s another example of an impressionistic image, created by twisting the phone while the shutter fired eight times.
Now get creative.
- Set AvgCam Pro for a different number of photos,
- Move-in different directions (twist, swipe, push, wave)
- Process in SnapSeed and turn into a painting with the app, Artista Impresso, by Jixi Pix.
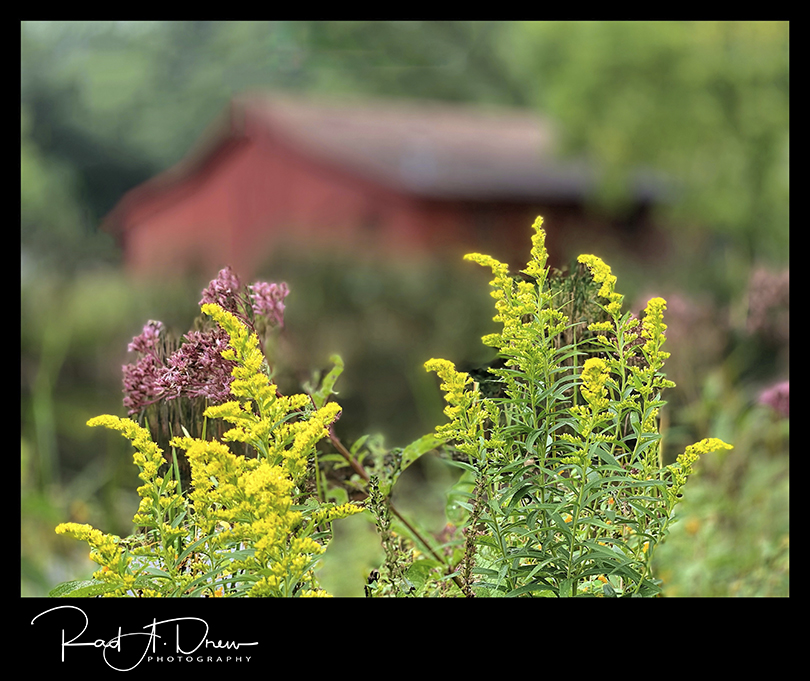
Dual Lens and Portrait Mode for Narrow Depth of Field
Before the first dual-lens iPhone, the 7+, creating a narrow depth of field was something reserved for our “big” cameras. Today, with the phone’s dual lenses and depth effect technology, we can focus on an object (e.g., a flower or a face) and have that object in sharp focus, while the background goes soft. In the iPhone XS, not only does the camera produce a narrow depth of field, but also allows the depth of field to be adjusted by providing a simulated f/stop slider that goes from f/1.4 for the maximum blur, to f/16 for a fully sharp image.
Combining the Portrait Mode with the Portrait editor in SnapSeed is a great way to fine-tune portraits for great appeal. SnapSeed’s portrait editor has adjustments for face spotlight, skin smoothing, and eye clarity, all of which can take your image up a notch.
The native iPhone camera’s Portrait Mode isn’t only for portraits. You can use it whenever there is a part of a scene that you’d like to have sharp, while the background trails off to a soft blur.
It’s a great way to create a story in your images, like in the image below.
Another feature of portrait mode is the ability to select different light modes after the image has been recorded. One of those modes is called Stage Light, and creates a spotlight on the subject. Under the right conditions, this can produce a wonderful image, like the Amish cap below.

[NOTE: There is some good news for those who are not able to move to a dual-lens camera at this time. There’s a great app called Focos by Xiaodong Wang. The app takes any image, selects the subject, and allows for the creation of a background and foreground blur (bokeh). It’s different from the feature built into the native iPhone camera, but if this is an effect you appreciate, you can achieve a great result with Focos. One problem with portrait mode in the iPhone’s native camera is that you must be eight feet from your subject when there are times you’d like to be closer. Using Focos, you can get closer to your subject and then use the Focos app to help you get the narrow depth of field effect.]
Process Big Camera RAW files on your iPhone or iPad
With the advent of Lightroom for the phone, we can now send RAW files made with our traditional camera to our iPhone and process them using the Lightroom app with RAW editing tools. I use my Fuji’s wireless system based on BlueTooth to send RAW images to my iPhone.
If your camera doesn’t support wireless transfer of RAW files, you can use one of many devices available today that accept a camera card and also has a lightning connector. This allows you to insert your camera card into the device and download files that can then be uploaded to your iPhone or iPad for processing in Lightroom.
Print Large With Integrity
There’s no denying that the iPhone has a small sensor relative to traditional “big” cameras and this means, generally, smaller prints. I’ve been printing iPhone images at 20 x 30 inches for years, but to go much bigger the quality begins to suffer.
Enter Topaz Labs desktop software powered by artificial intelligence and machine learning! These tools came out in the summer of 2018 and continue to get better and better allow for several kinds of improvements making it possible to print iPhone images very large with integrity.
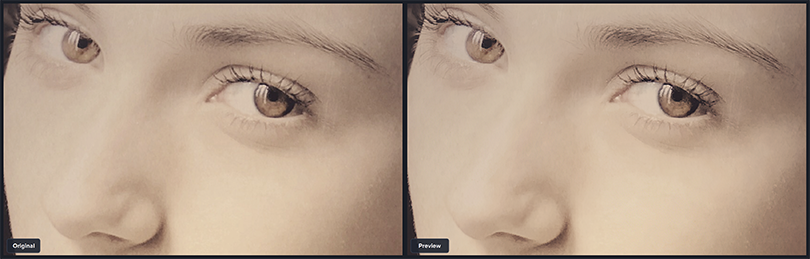
The desktop apps, Gigapixel AI (which allows a small iPhone image to be enlarged up to six times) and DeNoise AI (which eliminates noise for low-light or other iPhone images to an unbelievable degree) have both been game changers for iPhone photographs. Armed with these tools, iPhone photographers never have to tell a prospective customer that they can’t print the image at the size the customer wants. These new desktop applications from Topaz Labs allow enlargement with integrity that is mind-boggling.
The image on the left is the original at 2583 x 3875 pixels or about 10MP resolution. On the right is the same image enlarged 4 times to a resolution of 10332 x 15550, about 160MP! The quality of the image on the right is equal to or better than that on the left, but the size is 150MP larger!
High-Quality Lens Systems
It’s often said that the best way to zoom with an iPhone is with your feet. Getting close to your subject is not something that can be accomplished easily with just the iPhone. Today, however, several aftermarket companies are producing attachable lenses for most iPhones that make wide-angle, macro, and telephoto images possible. Among my favorite lenses are Moment, Ztylus, and OlloClip.
Moment produces the best glass of the bunch and their prices reflect that as one of the most expensive lens systems available. Their 60mm lens gets twice as close (and up to four times as close when using the Moment app in combination with the lens). The wide-angle lens is a favorite for recording small areas like rooms in a house or other areas that require a wide-angle for context. It’s also good for landscapes and images with dramatic foregrounds.
Olloclip is another quality lens that has been around a few years and offers a similar wide-angle, telephoto, and fisheye lenses.
Ztylus Lenses are new on the scene and they’ve produced one of the most convenient and easy to use systems for a great price ($59 dollars). I’m referring to the Revolver 6-in-1. It’s easy to attach, accessible, and affordable. No, the glass isn’t quite as good as Olloclip and Moment, but for images that are going to be textured and processed to paintings (which many iPhone photographers do), it is quite adequate and, to me, worth it for the convenience.
Portable Editing (on iPhone or iPad)
Apps on the iPhone have gotten better and better over the years. The main staple for many iPhone photographers is SnapSeed, with 28 tool kits for editing and stylizing images. Equipped with a histogram, curves, and levels tools, along with selective adjustment tools, there isn’t much that can’t be done with this software.
And Lightroom on the iPhone isn’t just for RAW files. I often take JPG files into Lightroom to use the Color adjustment tool which allows me to isolate specific colors and adjust saturation, hue, luminance, and vibrancy for just that color. These editing tools go anywhere when traveling!
Because It’s Small, Lightweight and Portable, It’s Often The Camera You Have With You
Its small size not only makes the camera easy to carry, but it’s also often less intrusive when taking portraits or shooting in areas where big cameras may not be allowed. When traveling, an iPhone, lenses, and an extra battery fit easily into a purse or small bag for easy accessibility.
Summary
That’s my list! Today’s iPhone is truly worthy of any camera bag because of the many things it does well. It deserves respect as a “real” camera, as many photographers have come to appreciate.
Still the bottom line for me? iPhone photography is about as fun as it gets!
Thanks for taking the time to read this article and for all you do to support what I do! Watch for a review of the new iPhone 11 Pro Max next time around. Until then, keep on creating!
Postscript: Full disclosure, I’m an affiliate rep for Topaz Labs. I love their software and use it every day. If you are interested in Topaz products or have questions, email me at [email protected]! And if you’d like to purchase Topaz products, use this link (https://topazlabs.com/adjust/ref/8/) and the discount code RAD15 for a 15% discount on all products, including those on sale!
If you’re interested in acquiring the Ztylus Revolver 6-in-one Lens System for iPhone and Samsung mentioned in this article, follow this link for 15% OFF.
Rad Drew
October 2019
INDIANAPOLIS, IN
Photography has always been synonymous with fun and magic. As a kid, it was fun to compose, fun to capture, magic to develop and process, and fun to share. It was fun to seek out photos and to engage people, and magic to travel to new lands or find the unusual in familiar places. It was magic to convey an emotion or make a point and touch others through visual imagery that I created. As an adult, photography continues to be more fun and magical than I ever dreamed! Despite changes in technology that have occurred during my lifetime, the esthetic of photography remains much the same. The creative mind of the photographer is still the most important element in a great photo. The camera doesn’t create a photograph any more than a hammer designs a building; it’s merely a tool that allows us to create our vision. Today, my camera bag holds two mirrorless cameras, an infrared camera, a point-and-shoot, and an iPhone. Of these tools, I credit my use of iPhones since 2010 with providing more opportunities to practice the esthetics of photography, making me a better photographer regardless of the camera I'm using. And photography has never been more fun and magical!