Self-Made Photo Books with Dual Coated Papers
As a long-time user of Adobe Lightroom (LR) I have used LR’s Book module to create photobooks printed at Blurb. It’s fast, easy and offers numerous layout options, providing a direct link from Lightroom to placing a Blurb order. The quality of this product is considerably better than I had expected in terms of color gamut, color appearance, and quarter-tone gradation; but when using their highest quality paper to achieve the best gamut they can offer, these books are not cheap, and decent as the appearance may be, their print-on-demand machinery is second-best in all three respects compared with well-made original inkjet prints.
Therefore, I started looking for ways of making reasonably priced photobooks consisting of original inkjet prints. I wanted to see whether one could offer a combination of quality and price that could be marketable. There were four main steps to this exploration: (1) papers, (2) layouts, (3) bindings and (4) costing. In this article, I shall explain what I’ve learned so far about each.
Papers
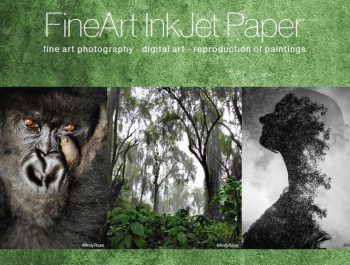
The choice of paper, as usual, should partly depend on what best suits the subject matter. In my case, for these photographs of street art having highly saturated colors, I wanted gloss or luster media for their superior color gamut and black density. The paper should be coated on both sides so that four prints could be economically accommodated on one sheet of paper. 13 x 19-inch sheets folded in half create a book dimension, in portrait orientation, 13 inches tall by 9.5 inches wide and fit four photos per sheet having print dimensions of 11 x 7.5 inches assuming a one-inch surround. It turns out that only a few papers are available on the North American market meeting these specifications.
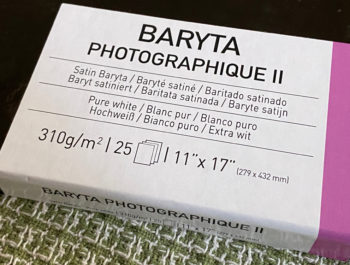
Ilford produces a Semi-Gloss Duo product (ISGD), Legion Paper (Moab) had one, but it’s discontinued, Red River Paper has two: Arctic Polar Luster (APL) and UltraPro Satin Duo (UPSD) and Inkpress has a Luster Dual-Coated (ILD) paper (abbreviations mine). All of them are resin-coated (RC) papers and all of them are rich in OBAs. This means that books made with these papers cannot be sold as “archival” products, notwithstanding the slow rate of OBA fading or the deterioration of the RC coating that can occur even with the papers enclosed in book form. They could, of course, be marketed as custom-made books of original inkjet prints likely to last many years, but not archival.
I had an extensive discussion with one major manufacturer about the idea of creating a dual-coated archival luster paper (lignin-free, acid-free, OBA-free) that would be suitable for folding into a book format. That company expressed interest but raised some technical quality issues about dual-sided coatings (especially without an RC layer) that would need to be addressed, and they haven’t indicated when they may consider taking it up. So, for the time being, we have what we have.
Nor does it seem that the major custom book-making services provide archival quality products either. The most often quoted reference on the longevity of prints made using HP Indigo presses, which most of them use, is to be found here: http://www.wilhelm-research.com/HPIndigo/WIR_HP_Indigo_2011_03_07.pdf. There is no reported data there measuring the risk of OBA fading of prints within photobooks kept in quasi-dark storage on a bookshelf, yet most if not all of the papers used for these books do contain OBAs and the paper, in book form, is exposed at the edges unless fitted into a slipcase. There is, hence, a reason to believe that over an undetermined number of years, one could see the effect of OBA fading at least at the edges of the pages.
Turning to the key characteristics of the four above-mentioned inkjet papers, I created profiles for each of them, analyzed the profiles and did a series of evaluation target prints for each. All four papers profiled well and the evaluation results (Figure 1) all indicate satisfactory performance, within a narrow range of outcomes.
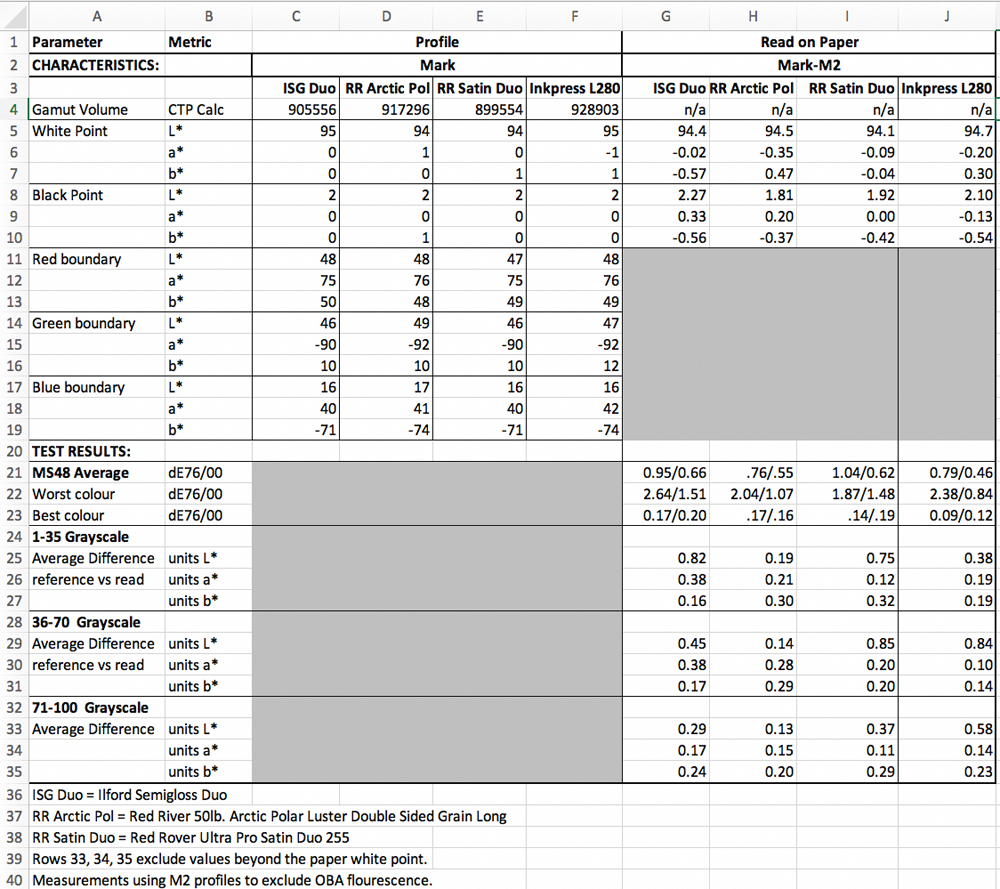
The gamut volume of all four papers in an Epson SC-P5000 printer is high, in the range of 900~928 thousand (calculated in ColorThinkPro). This narrow range would not be sufficient to drive noticeable impacts of gamut differences between the papers.
All four papers have White points in the range of L*94~95, and they all exhibit good neutrality (M2 profile – UV excluded). All four have Black points within a range of L*1.8 to 2.3, also exhibiting good neutrality. All these values for the grayscale would indicate that on this parameter the papers are virtually indistinguishable.
Looking more closely at the test results for accuracy of color reproduction, all four of them produce remarkably accurate color on average. (As usual, by accuracy here I mean measurement of the extent to which the printed values of color patches on paper correspond with the color values for those same color patches in the image file, including gray-scale patches as colors per my 48-patch evaluation page. The metrics I use are dE(76) and dE(2000).
The results for all four papers are on the whole impressive. All of the average dE(2000) values are well below 1.0, and three of the four dE(76) values are also well below 1.0, the one exception being UPSD at 1.04, which is still quite OK. The worst performing color for each paper did not exceed dE(2000) of 1.5, while the best performing colors were all below dE 0.2. This means that with a well color-managed imaging system, including a calibrated well-profiled monitor, one should expect predictable high-quality results from any of these papers.
The three zones of the detailed grayscale test also produced impressive accuracy, with good linearity of tonal gradations and near-neutrality of grayscale values. As there are twelve sets of results (4 papers by 3 tone zones per paper), I decided not to burden this article with graphical reproduction of the whole set, but rather show one set (APL) as an example at the end of the article. I can make the graphs of all the test results available on request.
The appearance and handling of the papers have some subtle differences. Red River does not recommend using UPSD for folding into books but highly recommends APL for this purpose. ILD and ISGD also both appear to fold well for bookmaking. The UPSD has the smoothest and shiniest finish of the four; the other three are so close to each other that it’s very hard to distinguish between them.
Based on objective evidence alone, there isn’t all that much to differentiate them other than price, to which I shall return further below where I discuss costs.
Layouts
There are options and choices to be made in respect of layouts. The most basic choice involves a trade-off between maximizing viewer convenience or maximizing print size. Before showing that trade-off, however, I’ll cover one comparatively expensive option I’m not sure I would recommend – but it is an option: make the book square such that the long edge of horizontal and vertical prints could be the same length and all prints would have the same orientation. Hence, a US Letter size sheet could be cut to 8.5 by 8.5 inches, or a 13 by 19-inch sheet could be cut to 13 x 13 inches. Both sizes involve wasting paper and they mean placing only two prints per sheet (one on each side of the sheet) instead of four as done with the options shown below. But a square sheet does allow for all the photos to have the same long dimension (say 11 inches with a one-inch border on a 13×13 inch sheet) presented in one orientation without turning the book.
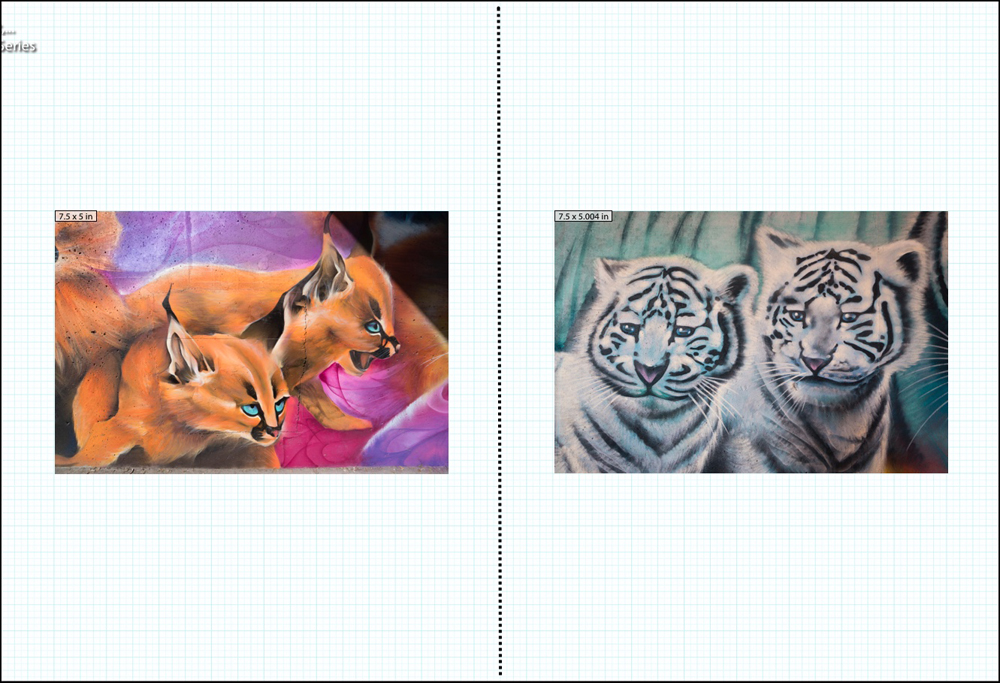
The options with a rectangular aspect ratio, as noted above, involve folding the long edge of the sheets in half. For example, working with 13 x 19-inch sheets, folding them in half on the long edge would produce a book dimension of 13 x 9.5 inches, which is a good size – not too big, not too small. The options for rectangular dimensions are whether: (i) all the photos should face the same way so the viewer never needs to turn the book, meaning that, in our example, if the book were meant to be used in vertical position, the large dimension of a horizontal photo would be 7.5 inches when allowing a 1-inch margin on each side of the 9.5-inch width and there would be considerable empty space above and below the photo; or (ii) printed space on the page should be maximized (always largest possible photo size) by always printing the long dimension of the photo consistently with the long dimension of the page, in which case the long dimension of a horizontal photo could be 11 inches when allowing a one-inch margin at each end; then the viewer would be turning the book vertically or horizontally to properly view vertical or horizontal photos respectively. Figures 2 and 3 illustrate these choices for options (i) and (ii) respectively.
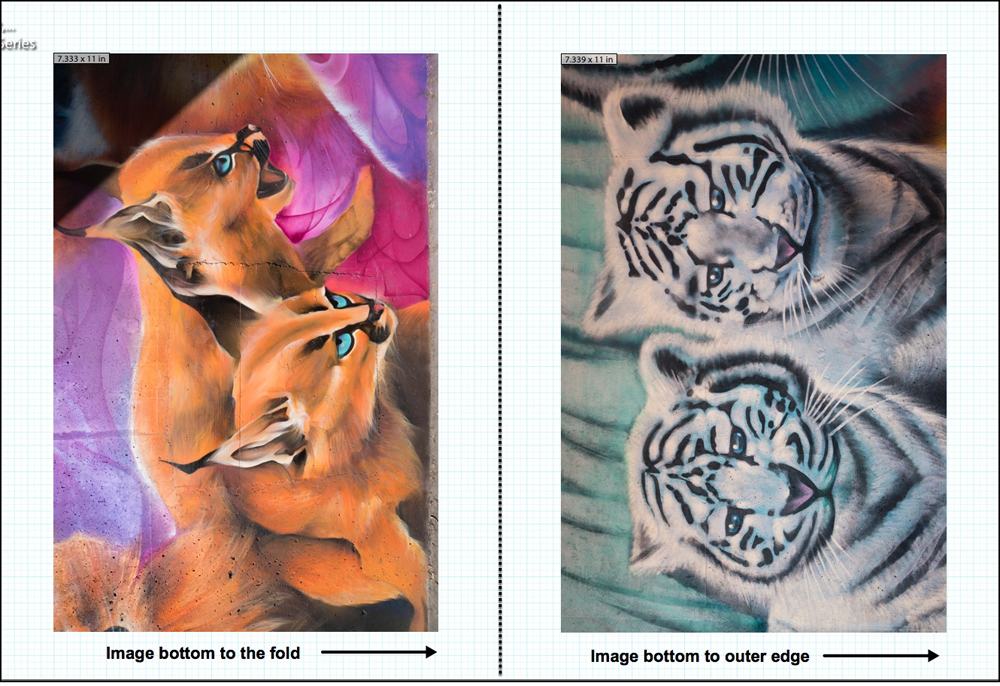
Publishers of numerous photobooks from Germany and Switzerland in the 1920s/1930s did use option (ii), but perhaps it would be considered anathema for book design today. Nonetheless, I like it because I like the much bigger photos it allows without paper waste and don’t mind turning the book 90 degrees to see the horizontal photos. Figure 3 also illustrates for option (ii) how the bottom of the horizontal photos should always face rightward, whether toward the binding (left side) or the front edge of the page (right side), so after turning the book once, adjacent photos display upright.
Not shown in these illustrations, for those who own printers that can print borderless, another layout option is to print borderless.
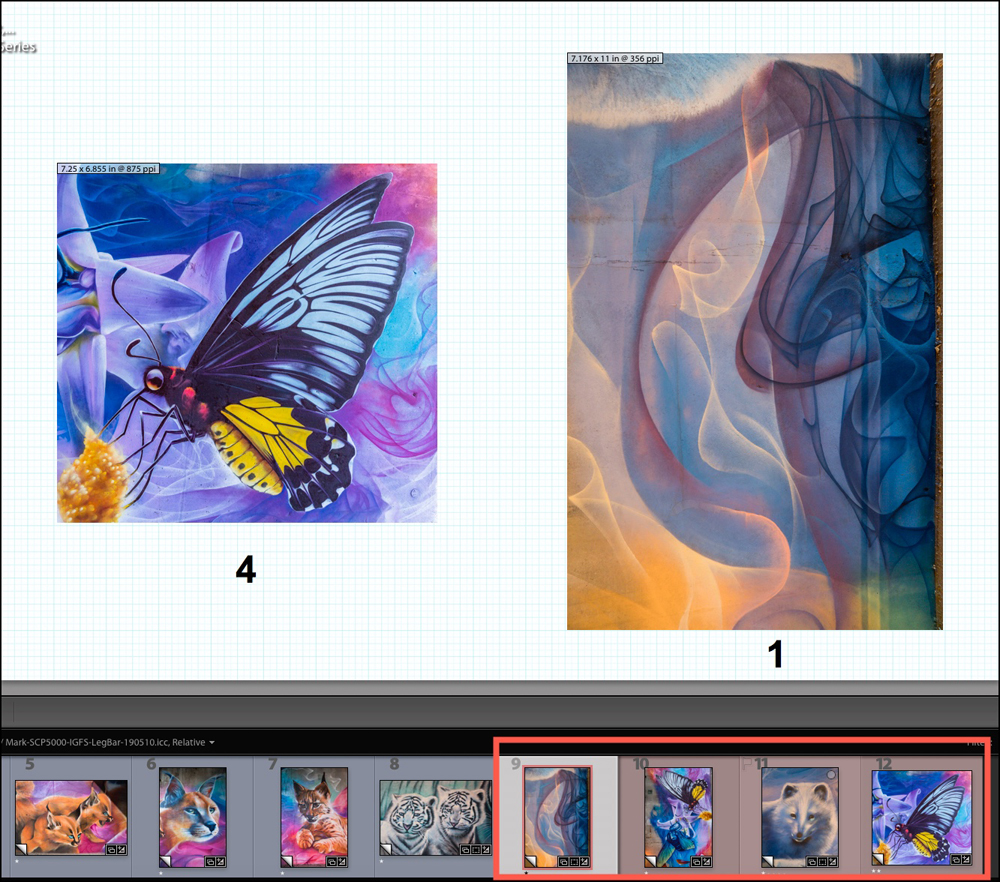
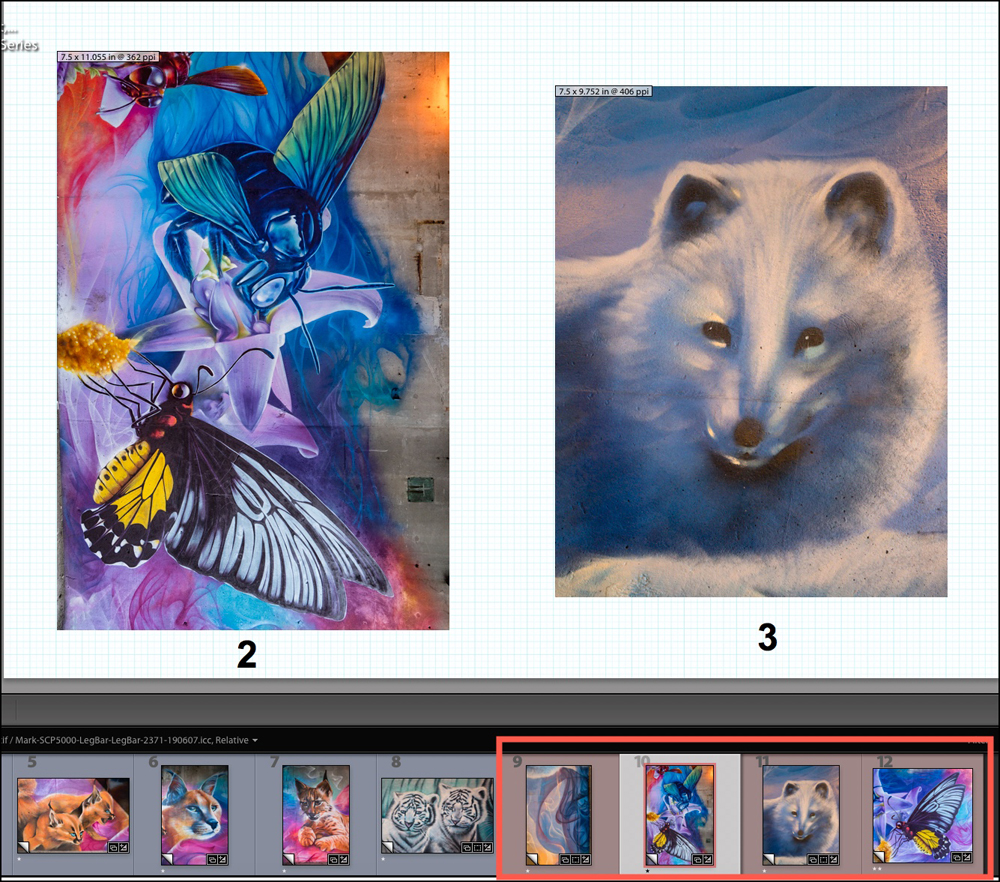
Some people – in fact more than some – may find the procedure for sequencing and laying out the photos on the sheet somewhat confusing, in terms of getting it all correctly done – remember, we are working with sheets that fold, and when folded we want the prints to be in the correct order and with the correct orientation (i.e. the top and bottom of the photos should be facing consistently for either vertical or horizontal orientation on every page). Most of us may incur some paper waste in getting there, so I’ll share two rules for resolving this issue. Figures 4 and 5 deal with the ordering of the prints on the sheet.
Rule 1: In our system of book presentation, pages open from right to left, and when the sheet is folded to work this way, side 1 of your print layout on the computer display should have photo 1 on the right side and photo 4 on the left side (Figure 4). Then on the other side of the sheet (Figure 5), to assure that photo 2 comes after photo 1 and before photo 3, photo 2 should be on the left side (where it will print on the backside of photo 1) and photo 3 should be on the right side (where it will print on the backside of photo 4). Then when the page is folded, the sequence of the photos will be 1, 2, 3, 4 as you open the fold from the front page to center spread and then to the back page.
Rule 2: The paper feed on all professional printers I know of accept the paper in its vertical position. To preserve correct and consistent orientation of the photos, when running the sheet through the printer, after printing side 1, flip the sheet vertically for side 2 (Figure 6) – DO NOT flip it horizontally.
(Note: I haven’t tested these procedures for printers that turn the page around to face the printhead, as I do not have such a printer.)
Bindings:
The usual choices are hard-bound or soft-bound. Custom hand-made hard binding can be costly – in the range of 70 to 90 dollars or more in Toronto, depending on the materials used). A softcover binding with the photographer providing the cover would be much less expensive, as it involves only “perfect-binding” the folios against the spine portion of the cover page. “Perfect binding” fuses the folded edges of the folios to the spine using a durable and flexible gluing material. The cover should be the width of the spine larger than the long dimension of the sheets to ensure the covers fit flush with the inside pages (Figure 7). This would not provide the newer kind of “lay-flat” binding increasingly available from the commercial book production services, possibly at an extra charge. I received a $30 (CAD) quote for perfect binding, but that may not be the final estimate.

Costs:
It turns out that when the accounting is done, the numbers add up to a somewhat expensive end-product; but it has to be remembered that these are no ordinary mass-produced offset volumes – rather, they are hand-made sets of original inkjet prints, the potential quality of which no offset process can exactly replicate.
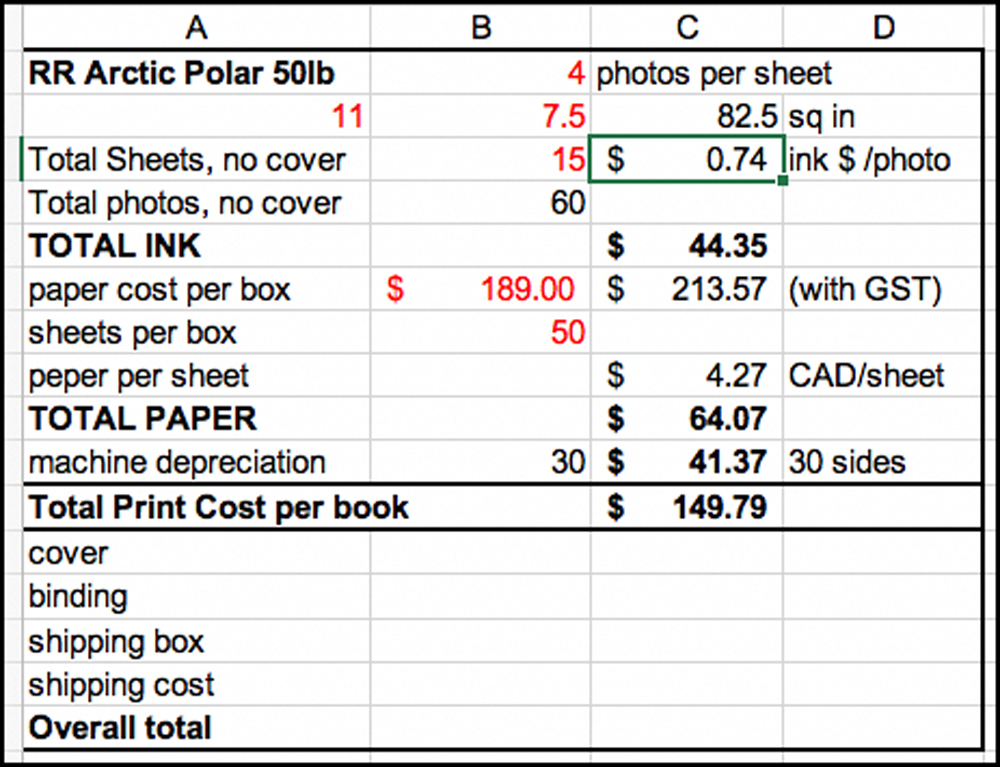
I had previously developed a print-costing spreadsheet configured to perform print cost calculations once the prices of materials are entered. It is useful for book costing too. The cost of ink includes an estimate of maintenance ink, but it may be prudent to increase the ink cost by some 15% or so in case this is under-estimated. Neither Epson nor Canon provides estimates of ink used for maintenance. The costs for the four paper options in Figures 8 to 11 include paper, ink, printer depreciation, sales taxes, shipping of paper where relevant and conversion to Canadian dollars. The costs do not include binding, packaging and shipping, marketing costs or any other overheads and profit margins. To convert these costs to US dollars using exchange rates prevailing at the time this article is published, divide by 1.35, or multiply by 0.74.


Having seen how these costs build-up, I’m not sure what market one could attract for these books. It could help a lot being able to claim archival properties, but we cannot with the current crop of available papers. It could also help making them limited editions and to emphasize that these are collections of hand-made original inkjet prints. Finally, and most importantly, the subject matter and its quality must appeal to an audience large enough to take-up the edition. One saving grace of this approach over a more mass-market offset press production is that there is no inventory risk. When publishers take on a larger offset operation producing say 1000~2000 copies or more, the per unit production cost may allow retail pricing in the $50 ~ $100 range, depending on the details, but the most usual contractual arrangement provides for the artist earning a rather small percentage of the selling price and reimbursing the publisher for the costs of inventory that remains unsold after a contractual time period. This, of course, is a very different product – it is a mass-market product, (as opposed to a custom-made edition of original prints). There would need to be a relatively high volume assured market for the artists and the publishers to make money going this route. Artists end-up with inventory risk and may be fortunate enough to break even financially from offset book publication, but there is always the reward of the record created and the recognition.
I also composed a Blurb Option from within Lightroom. This has to be the easiest way of producing a photo book and getting a quick estimate of the price. Blurb within Lightroom offers many layout possibilities, but a more limited range of size and cover options. For example, with their 12 x 12-inch square and 11 x 13-inch large rectangular options, only hardcover bindings are offered, raising the price substantially relative to the smaller options with soft-cover bindings that are less expensive. These latter are confined to 7 x 7 inches or 8 x 10 inches. Using their top-quality Pro Line Pearl Photo paper, the large square hard-covered book costs CAD 113 for 60 photos before taxes and shipping, while the softcover 8 x 10 inch book, same paper, would cost CAD 53 before taxes and shipping. Blurb offers discounts based on volume, and their base prices appear to vary from time to time. As mentioned at the outset of this article, I did test a 20-page book from Blurb and the results were considerably better than I expected.
The final option I’ll mention in passing, not part of the subject matter here, is to make portfolios of original unbound archival prints stored in archival portfolio boxes. These would be the most luxurious high-end products, and the pricing, say for 60 photos, would go into the hundreds of dollars, depending on the details. For me to produce a box of 60 original archival inkjet prints on high quality 13×19 inch inkjet paper and laying them in the most economical archival presentation box on the market would cost at least CAD 500 in paper, ink, printer depreciation, and the box before shipping charges, before marketing costs and before a profit margin for all the effort involved. I should add, in conclusion, that we are now seeing the impact of production problems at one major coating mill in Europe, which has upended much of the paper production involving the use of barium sulphate (Baryta). It remains to be seen what new paper costs will emerge from the solution to this issue.
I welcome comments especially on marketability from those who’ve had the experience with such ventures. Please see the forum topic.
Annex
Red River Arctic Polar Luster Grayscale Test Results (UV- excluded)

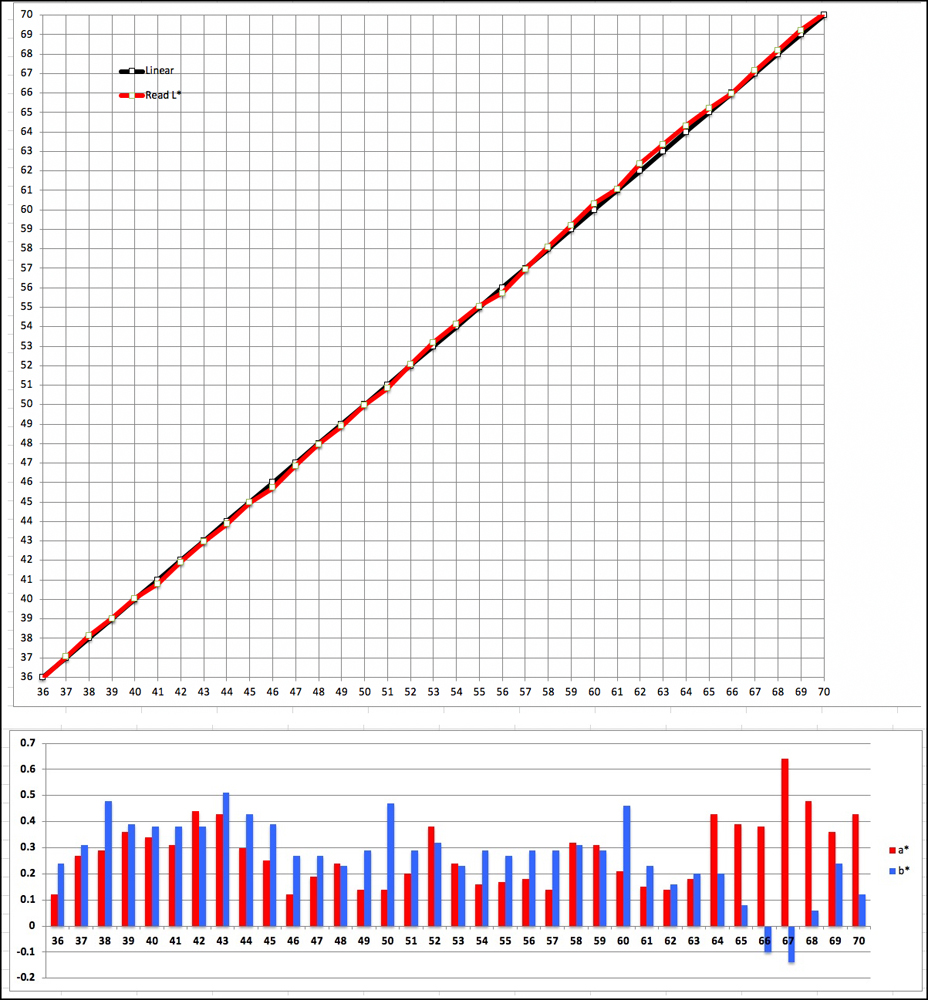
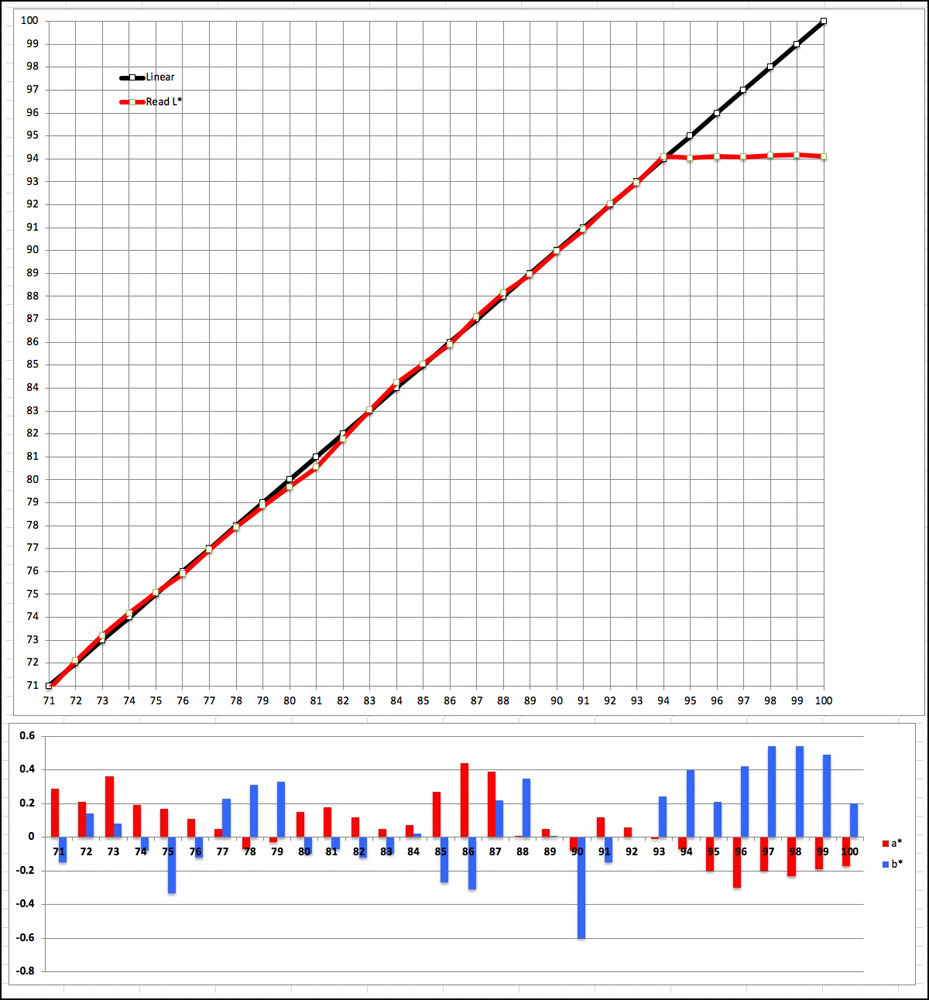
For each figure, the upper portion tracks linearity of tone reproduction – L* (closeness of convergence between read values (red line) and reference values (black line); the lower portion tracks each Level’s departure from gray for each of the a* and b* channels; values below 1.0 would not be normally detectable as non-gray. All three zones here are very satisfactory.
Mark D Segal
January 2020
Toronto, ON
Mark has been making photographs for the past seven decades and started adopting a digital workflow in 1999 first with scanning film, then going fully digital in 2004. He has worked with a considerable range of software, equipment, materials and techniques over the years, accumulated substantial experience as an author, educator and communicator in several fields, was a frequent contributor to the Luminous-Landscape website and now contributes frequently with in-depth articles on the PhotoPXL website. Mark has contributed over 75 articles to the two websites up to Q1-2024, with a particular emphasis on printers and papers, given his view that a photograph printed on paper remains the epitome of fine photography, as it has been from soon after the medium was invented and started gaining momentum in the 1830s/1840s. Mark developed a particular interest in film scanning and authored the ebook “Scanning Workflows with SilverFast 8, SilverFast HDR, Adobe Photoshop Lightroom and Adobe Photoshop” (please check our Store for availability). In his “other life” (the one that pays for the photography), Mark is a retiree from the World Bank Group and was a consultant in electric power development.