Panoramas & Other Stitched Images
Part II – Stitched Images from Two-Dimensional Arrays

Part I dealt with single row stitched-panoramas, like the preceding image, with the objective of creating classic high-aspect-ratio images. However, modern stitching software can stitch in both horizontal and vertical directions. In 2013, I read about creating huge digital files by stitching together a large number of overlapping images arranged in both horizontal rows and vertical columns. Of course, the purpose of this was not to create a high aspect-ratio panorama. Instead, it was driven by dedicating all of the camera’s resolving power to smaller segments, which collectively resulted in large high-resolution files. In most cases, this meant using a high-quality short to medium telephoto lens to maintain sharpness and also to bring the ultimate image closer.
To facilitate what would otherwise be a tedious and error-prone manual process of moving the camera to each precise position necessary to maintain proper overlapping, the exposure process would become automatic by using a programmed motor-driven positioning device to securely hold the camera, and automatically position it and then depress the shutter button before moving to the next position. This process would be repeated until the pre-programmed array was complete. The positioning device was, and is, called “Gigapan”, and is offered in three models covering the spectrum of photographers from amateurs to pros. The Epic model accommodates small point & shoot cameras, while the Epic 100 model will accept mirrorless cameras and small DSLR’s. The Epic Pro is made to hold heavier DSLR’s.
I was intrigued by this but knew that such images would require high-quality sensors. Earlier, I had purchased a Sigma DP3 Merrill camera that used a C-size Foveon stacked-sensor and had a fixed Sigma 50mm lens equivalent to a 75mm short telephoto in 35mm format. This sensor technology was limited in many ways but did produce very high color accuracy and fewer artifacts than most mainstream Bayer-array sensors at that time. Sigma claimed that their sensor produced image quality comparable to medium format sensors in the 40 to 50 MP range, despite its small physical size, because of the higher data generation produced by three stacked arrays. This was somewhat overstated. Most gurus agreed that the number was closer to 28MP equivalent, although technically, the sensor’s two-dimensional array was still 15MP.
Despite having to use the Sigma RAW development software which was overly contrasty and saturated, and then having to tone it down in Lightroom, I liked the results and thought that the final images conveyed a higher sense of reality. It seemed to be a perfect fit for use on a Gigapan. And so, I bought a Gigapan Epic 100; and launched a project to photograph Sedona’s best known red rock formations to enable highly-detailed large prints.
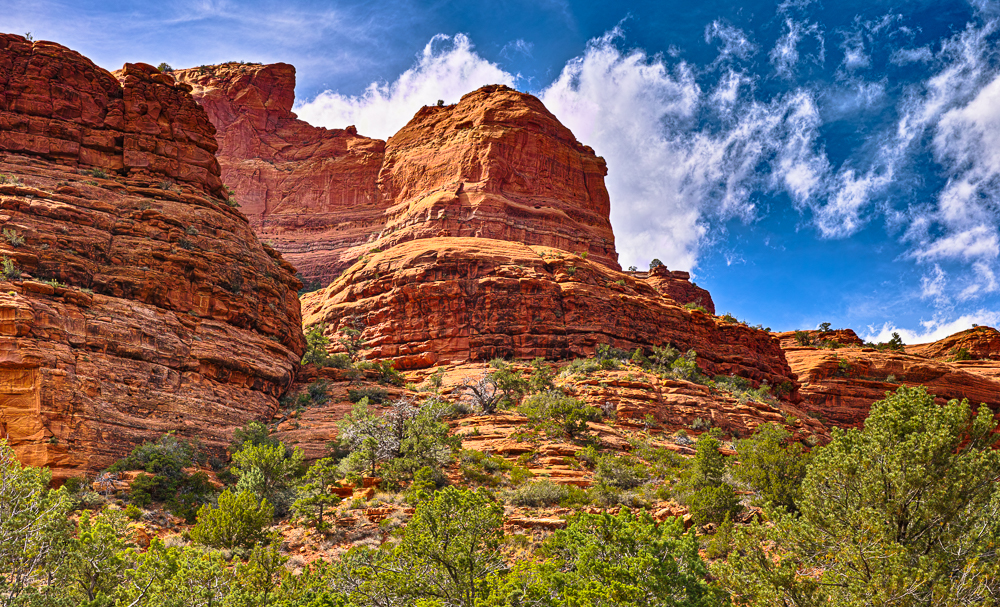
The thrust was to have these landmark formations fill the frame as much as possible, allowing for compositional adjustments. All of the images below were made using the Sigma DP3 Merrill. All of the segments were horizontal exposures. The first trial run produced the following image. The next nine images followed this format and were made in 2014.
Large-Scale Stitched Arrays
The above vista is always beautiful, especially with dynamic skies. However, over the years a small number of houses were built that are clearly visible on the forested slope leading up to Cathedral Rock. My intention was to recreate the view that existed fifty years earlier. In the final stitched image consisting of six segments (3 X 2), I painstakingly replaced the houses with trees.
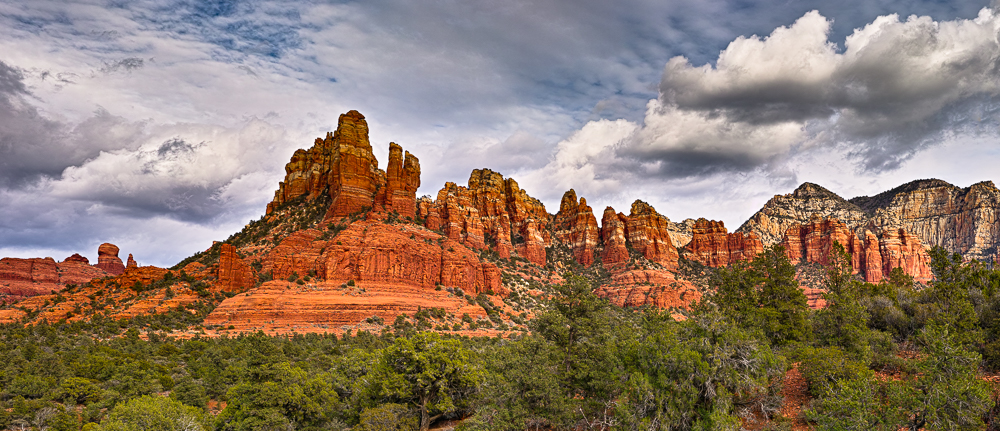
This was the first 2-axis stitched array that I created. Though it resulted in a large file, this image wasn’t intended to be part of my red rock formation series. However, the experience helped me to refine the concept and get used to working with the Gigapan.
The next nine images are the end-product of this project.
(Insert caption:) “Crimson Cliffs from the Marg’s Draw Trail, Sedona, 5 x 3 Array”
I had photographed the West-facing end of this formation many times. But, creating the above panorama of the formation’s entire length revealed a need to further refine my objective. The goal was to make large 2-axis stitched images with visibly greater fidelity. But, if the subject was too wide or too high relative to my viewing position, there would be noticeable falloff in subject scale from the image center to the image extremes.
This suggested a need to select subjects that were of reasonable scale, and that the distance from the subject had to be in the optimal proportion to the width of the subject to avoid this diminishing perspective. Through both trial & error, and through simple geometry, it turned out that the optimum distance from the subject was 87% of its width, though a few feet either way would not have a noticeable effect. Also, focal lengths in the short telephoto range from 75mm to 90mm with a horizontal coverage angle ranging from 32 to 26 degrees would help reduce angular distortion in large-scale subjects of 100 yards to 400 yards in width. (Small scale subjects ranging in width from 12 to 30 feet would be best captured by using 110mm and 135mm lenses at distances of 10 to 25 feet as will be discussed later.)
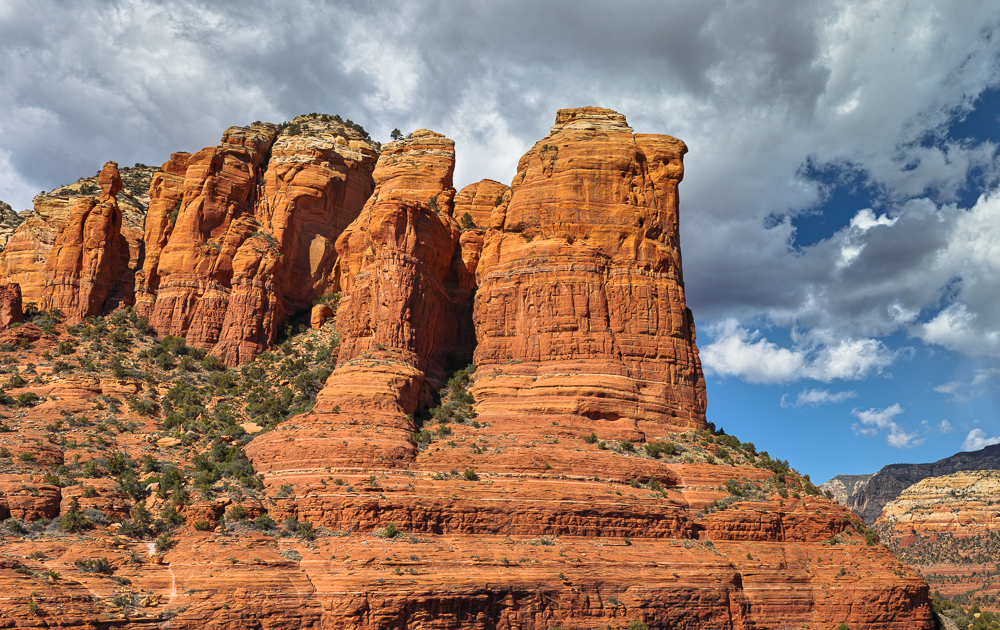
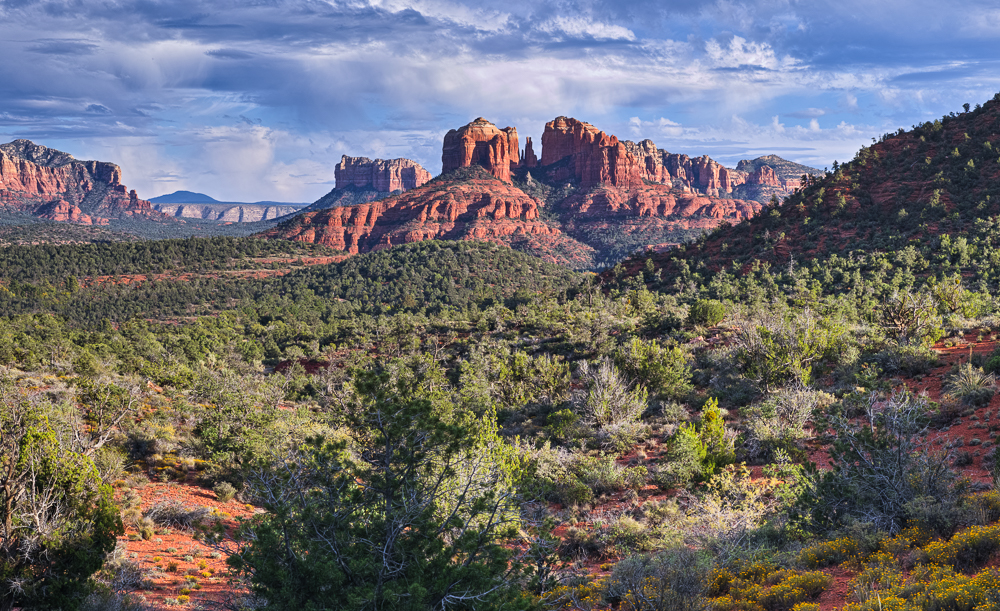
The above-stitched image of Coffeepot Rock was taken from a distance of about 520 feet, or roughly 87% of the width of the formation, which was on target. The proportions of the formation in the final image are close to what human eyes see.

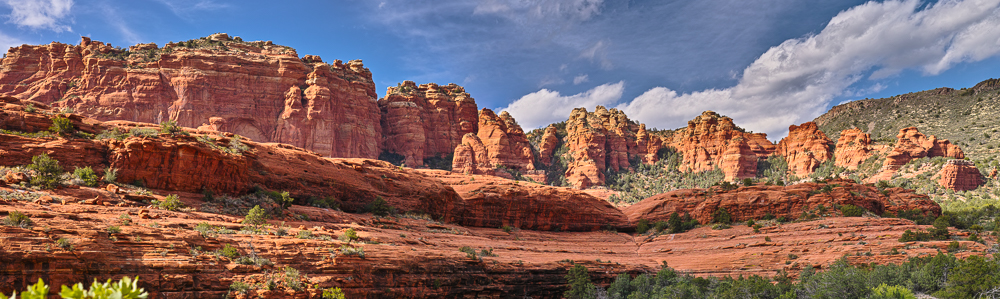
The vista in the above image is wider than either of the first two vistas. But, the distance from the camera to the subject was proportionate, maintaining the same angular coverage. This ridge is the most scenic view from Route 89a as it winds through Oak Creek Canyon.

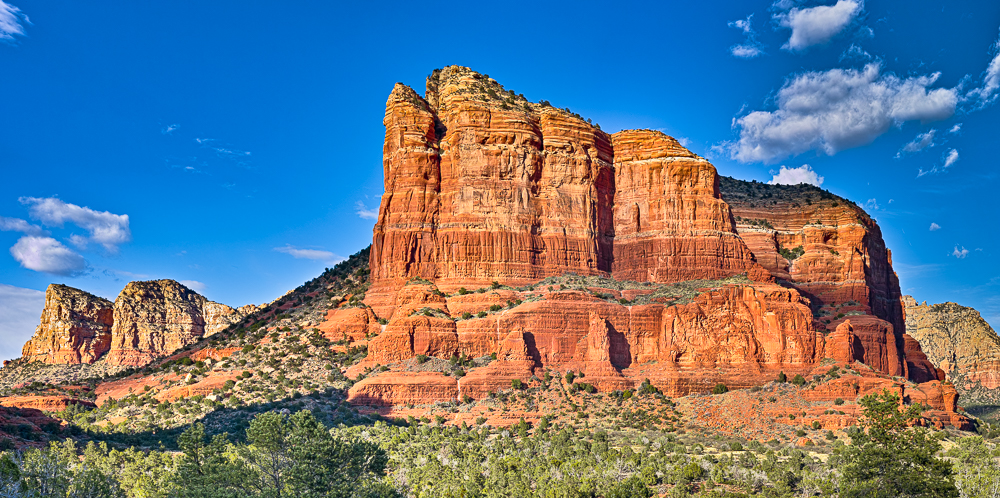
Next to Cathedral Rock, Bell Rock is the second best-known rock formation in Sedona. Although the above image has a 2:1 panoramic aspect ratio, this largely results from a decision to crop out an excess of sky.
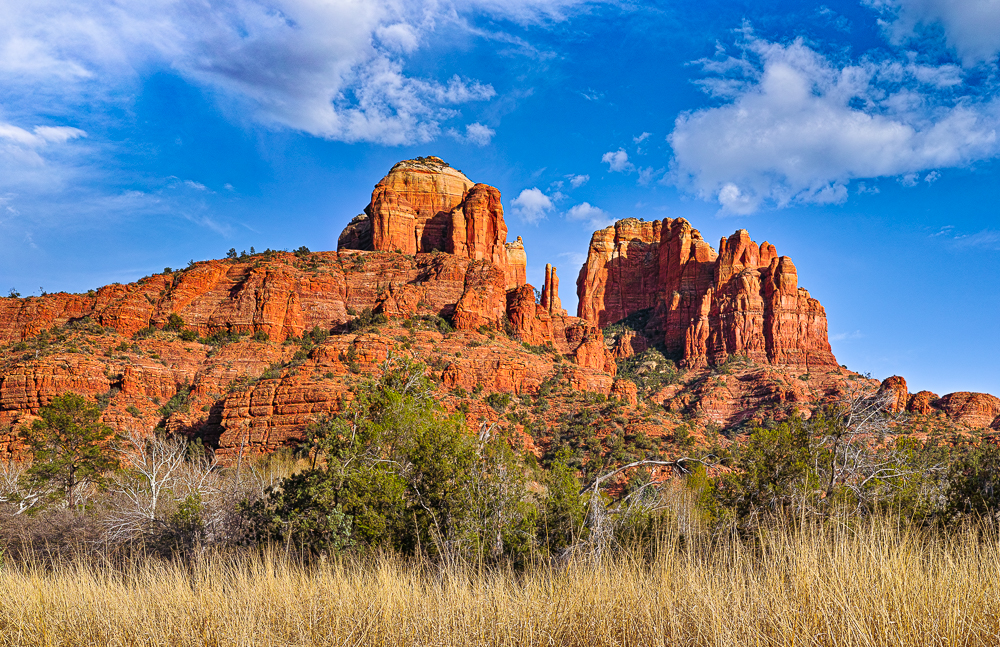
The above image is also panoramic with an aspect ratio of 2:1. However, this was a deliberate decision to widen the scope of the final image to include more distant formations of similar shape to enhance the composition. This type of composition provides reinforcement, or an “echo”, of the main subject. The relative proportions of this formation have been preserved.
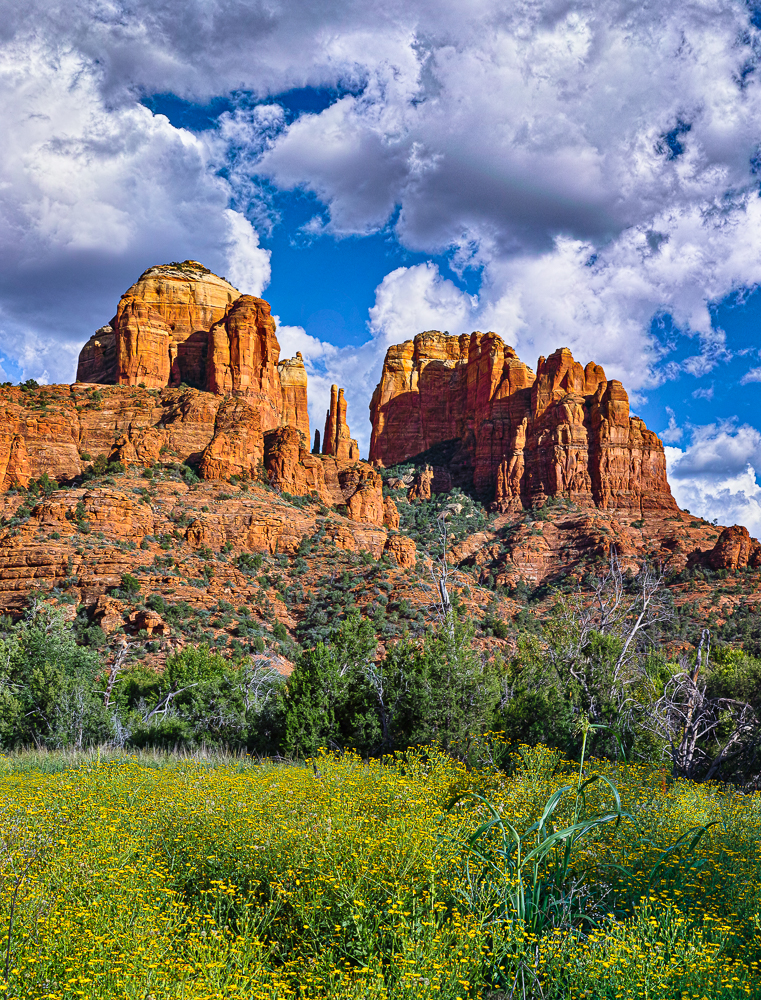
Cathedral Rock is the most photographed red rock formation in the Sedona Area. It has been in countless western movies and is well known worldwide. This perspective was taken from Crescent Moon Ranch in early Spring before wildflowers emerged.
Schnebly Road is a historic dirt road that was built by local farmers to take their produce to Flagstaff from Sedona. The first 1.5 mile-stretch has long since been paved. But, most of the road is still rough-graded dirt and is frequented by hikers, off-roaders, and tourists. Some of the red rock vistas from this road are both dramatic and beautiful. The above-stitched image and the following one show two of the most scenic views in this location.
The preceding image taken in the Schnebly Hill area is a wide panorama and shows the perspective distortion on the right side that I generally try to avoid in my stitched-image photographs. Because of the narrow roadbed and close canyon walls, it is impossible to achieve the ideal perspective to minimize distortion. However, I included this image in my project because of its beauty and its popularity.
The 16 image segments comprising the preceding stitched image were taken from the same location as the earlier one, but five months later in late Summer. The dense yellow blooms add more life to this perspective. Whereas the earlier image consisted of a 4 x 3 segment grid yielding a horizontal image, this 4×4 segment image was cropped to make a vertical image.
Although the preceding images were stitched from segments taken precisely by the Gigapan, it is possible to take reasonable handheld images for later 2-axis stitching, particularly at substantial distances from the subjects. The following image was stitched from four overlapping handheld captures, using a Sony A7rM4 camera and a Sony 135mm f1.8 GM lens to produce a 2×2 grid. A shutter speed of 1/1000 s along with the camera’s 5-way image stabilization kept all segments sharp. However, It takes concentration to maintain the right amount of overlap between views, and much more in the case of larger assemblages such as 3×3 and 4×3.
Small-Scale Stitched Images
Technically, there are no limitations to subject size in creating 2-axis stitched panoramas. However, as the subject decreases in size, while the number of segments to be stitched remains the same, two constraints increasingly detract from image fidelity.
One is the decreasing depth of field that is intrinsic to using longer lenses to decrease the field of view to maintain the same number of stitched segments. For example, if the objective is to produce the same large file size by taking 9 overlapping exposures in a 3×3 grid, but the subject is only 12 feet wide, it becomes necessary to use a 100mm to 110mm telephoto at a distance of 9 or 10 feet to take three overlapping segments with minimal cropping. The depth of field of these lenses at that distance is between 7 and 12 inches for f-stops of 5.6 to 8.0 (for maximum sharpness). If the subject depth is greater than that, portions of the images will be out of focus. And for some stitching apps, it is important to have more uniform sharpness requiring an even thinner depth of field.
The following image of a 12-foot wide rock face was assembled from a 4×4 grid of segments taken from ten feet away with a Voigtlander 110mm f2.5 APO-Lanthar Macro lens. Since I no longer have the Gigapan positioning device, these exposures were made handheld. Despite shooting at f11 and 1/200s, only this one assemblage was successful out of seven attempts to produce uniformly sharp stitched images.

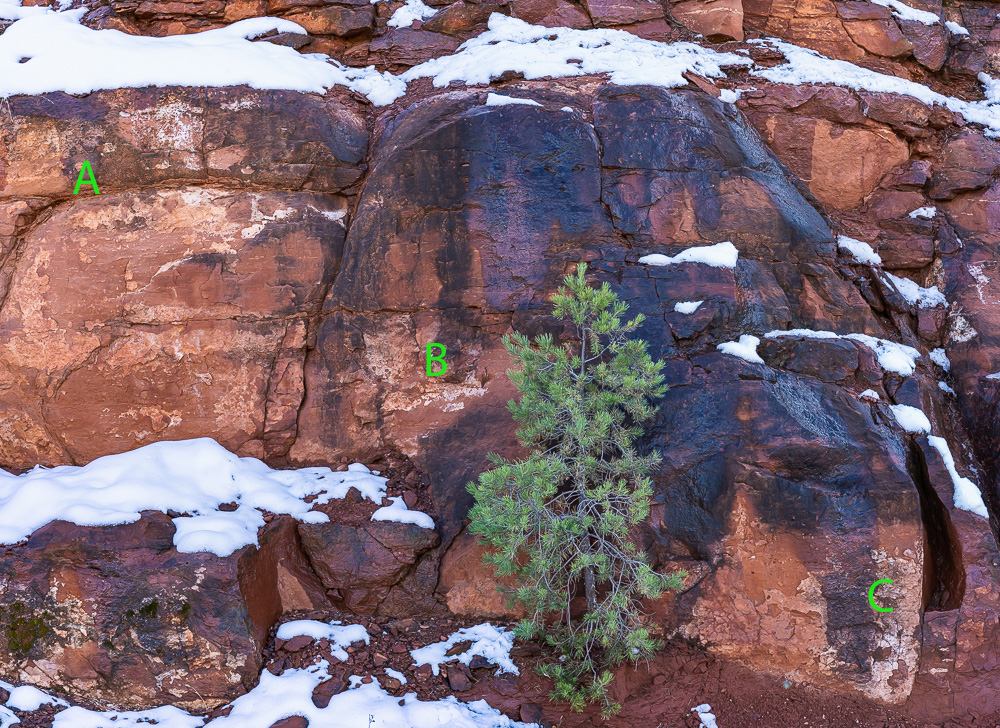
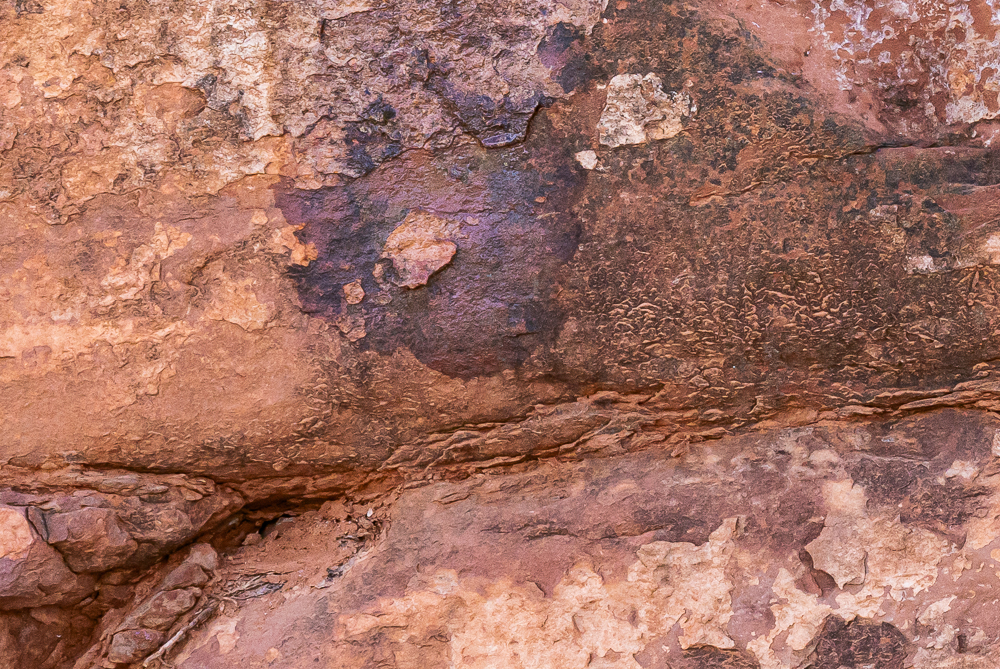
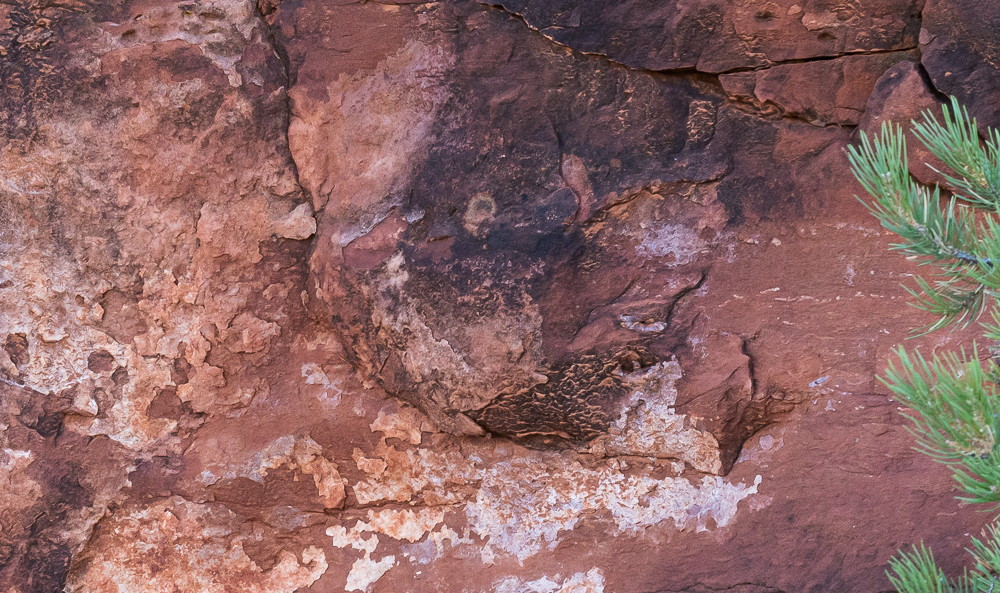
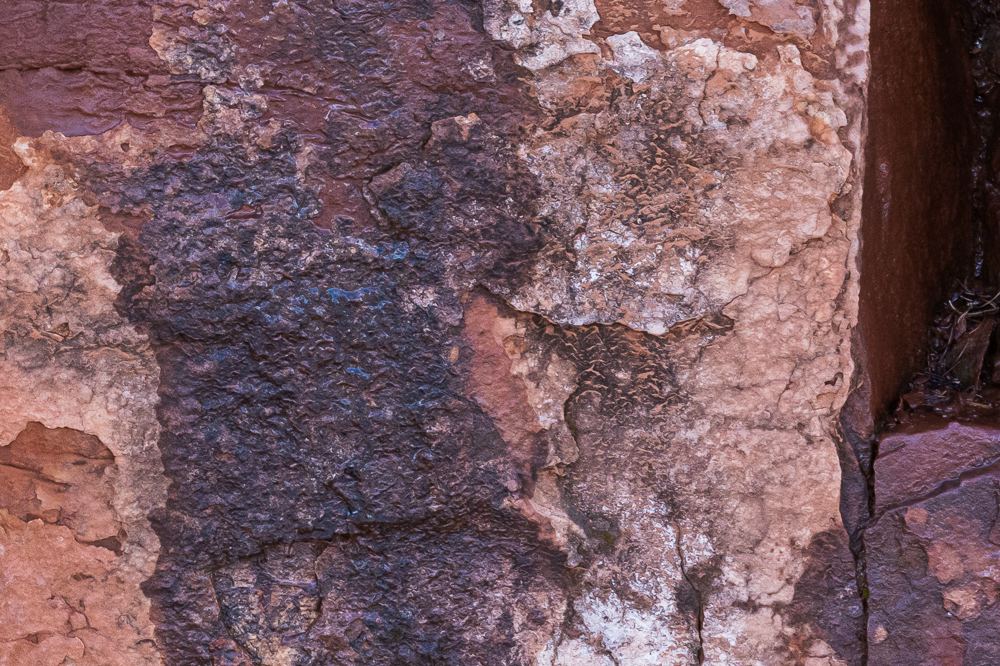
For smaller subjects like a gnarled tree trunk or a cave wall with crystallized minerals, where the subject is about one foot wide, the depth of field is less than an inch for a 3×3 grid. This makes it even more difficult to achieve a uniformly sharp final image. However, the second limiting factor of camera angle to the subject’s plane will vary if the camera is rotated to take some of the overlapping segments. Not only will this cause some of the segments to be out of focus; but, it will introduce angular distortion resulting in curved lines.
For close-ups of small subjects to produce ultra-high resolution multi-stitched images a specialized positioning device that holds the camera lens at right angles to the subject plane and which generates precisely positioned overlaps is critical. This is what was used recently to photograph extremely small precise segments of Vermeer’s famous painting of “Girl with a Pearl Earring”, so that the brushstrokes could be studied in extremely fine detail. It also helped that the painting has a very shallow depth. Read about the 10 gigapixel final image HERE.
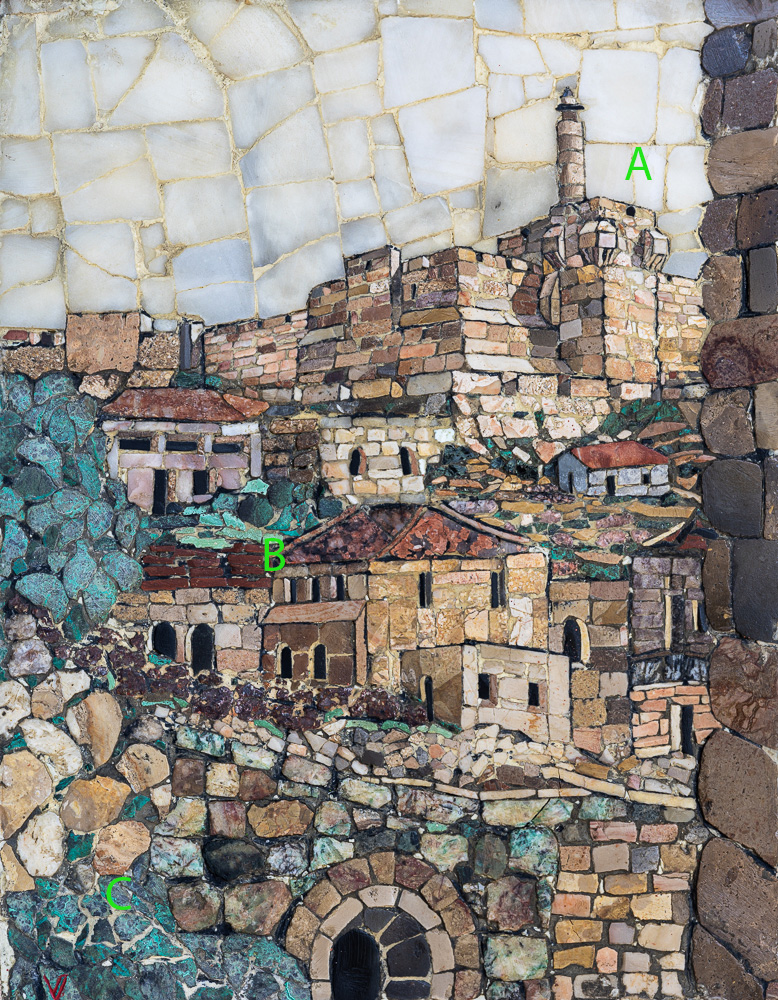
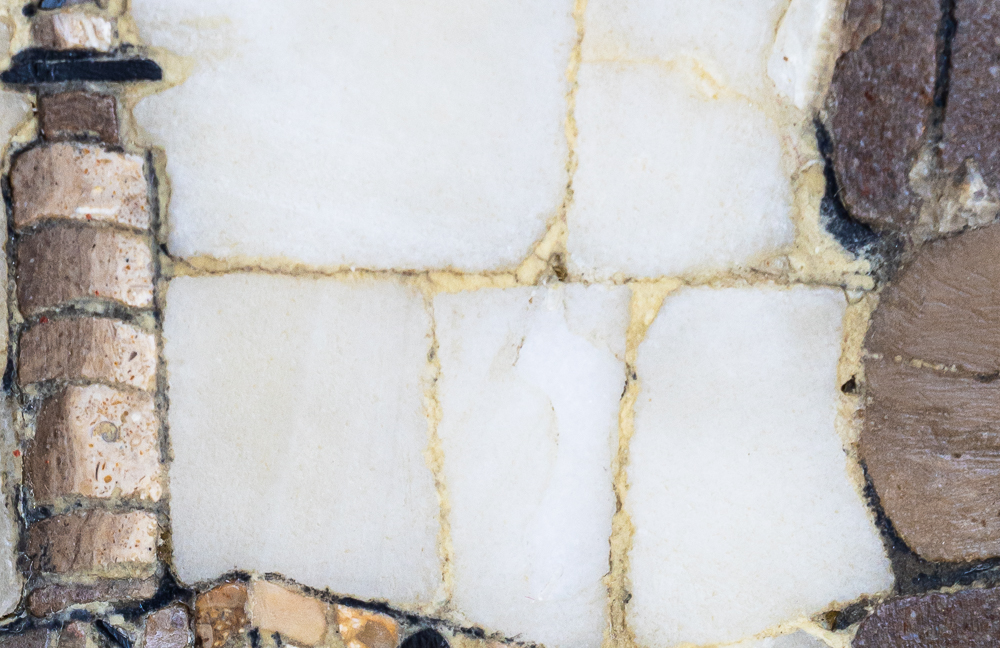
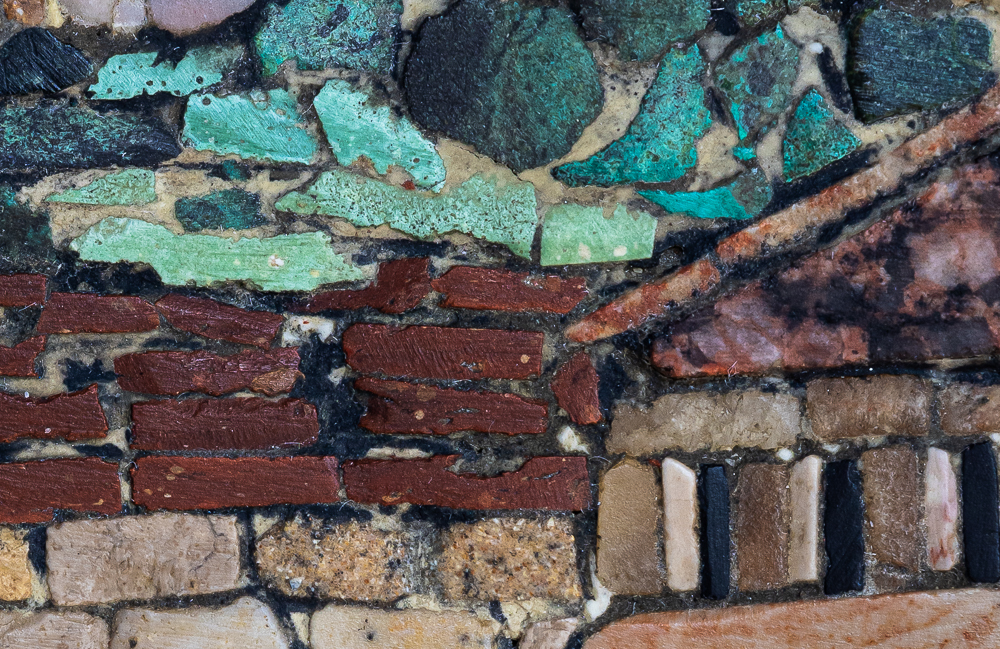
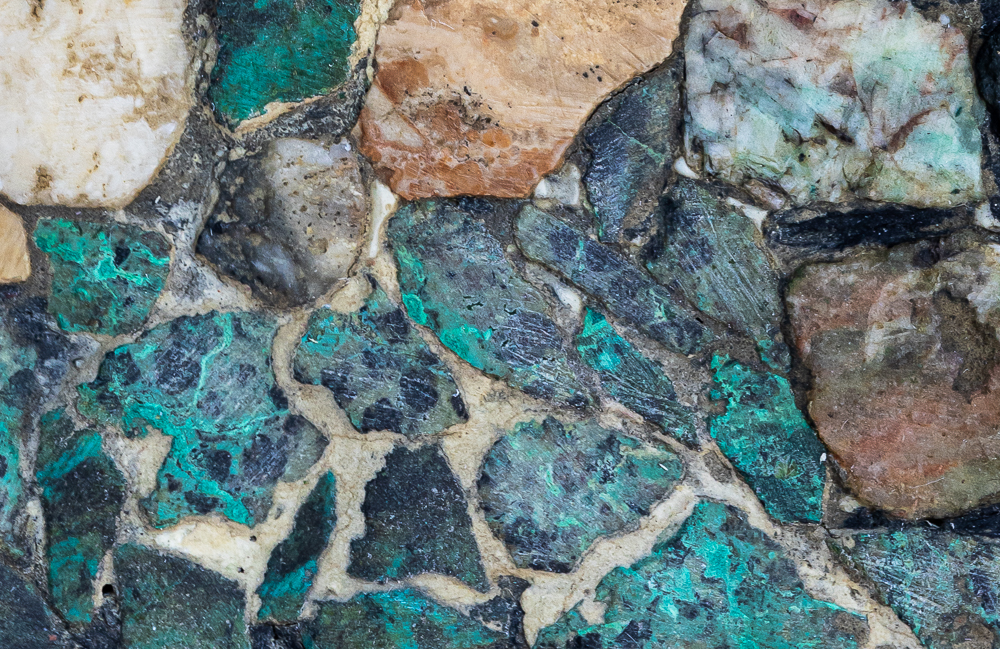
Of course, lacking a proper positioning device didn’t stop me from trying to produce a simple 2×2 grid of a mosaic artwork I bought 57 years ago in Haifa, Israel. I used a tripod this time. However, trying to manually keep the lens axis perpendicular to the plane of the artwork, while maintaining a precise distance from the camera to subject, gave me a backache. That I achieved one consistently sharp image out of six tries is a minor miracle. At least it’s sufficient to illustrate the thrill of seeing a sharp life-size image of a colorful object, and then be able to see sharp macro-detail of any small part of that image. This is shown below with several 100% cuts from different parts of the image. The artist was quick to point out that all of the stones used in the mosaic were local to Jerusalem, including the pale limestone which was used for veneers on ancient buildings.

The last important comment to make about 2-axis stitched images is that they quickly increase file size as the grid becomes larger. This is all well and good, except anyone attempting this type of photography will need a fast computer with ample data storage and fast read-write speeds, (preferably in the form of external SSD hard drives), and also a compelling reason to make more than a few of these super-large files. This is acutely true if you are using a high-resolution camera to start with.
I use a Sony A7rM4 with a 60 MP sensor, and I can almost hear my computer creaking to merge the segments. Well, maybe it was just the fan trying to keep my MacBook Pro from overheating. And it’s a highly upgraded 2020 computer. In a perverse way, one of the best things about the new Sony Alpha 1 that I ordered is that it’s “only” 50 MP. But, in any case, it really is a lot of fun to knock out a few of these super-high-resolution merged files just to see what it looks like.
Give it a try.
Postscript
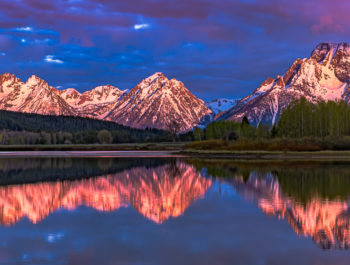
In Part I of this series, I wrote about classic stitched-panoramic images. Remember to consider this among your shooting alternatives, even when shooting during rapidly changing weather conditions. Following is a simple stitched image of two handheld overlapping horizontal images taken in quick succession during a fast-paced clearing storm. Not having to use a tripod allowed the two successive and overlapping frames to be taken quickly enough to avoid significant cloud movement during the interval, thereby capturing a great moment in Nature.
Harvey Stearn
February 2021
Sedona, AZ
To see the scope and essence of Harvey Stearn's photographic art please visit www.CameraStops.com. Mr. Stearn began photographing Western landscapes and wildlife at the age of 13, spent 50 years pursuing his passion in the field and in the darkroom before fully converting to digital photography in 2002. He developed color prints as well as monochrome, but switched over to digital capture and editing in 2002. Though he was a top executive for two large scale land development and home building corporations, he always found time for his fine art photography which won many awards. His work was exhibited in art museums in Southern California and Arizona, and was also featured in billboard advertisements and published in magazines. Mr. Stearn served on the California Arts Council for nine years, including two years as Chairman and another two as Vice Chairman. In addition, he was the founding Chairman of the John Wayne Airport Arts Commission in Orange County, California. Mr. Stearn’s work was sold through Arizona galleries for 15 years. In recent years he wrote 33 illustrated articles for PhotoPXL.com and 14 articles for Luminous-Landscape.com. In 2013 he published a book entitled “In Search of the Old West” which has been widely acclaimed. He was a guest lecturer on photography on a cruise ship visiting Chile, Argentina, Uruguay and the Falkland Islands. His work was among the top 100 images printed in NANPA's Showcase publications in 2019 and 2020. Images have been edited and selected for two new books on Landscape photography which will be published in late 2024 and early 2025.