From Colour Negs to BW Positives With Negative Lab Pro (NLP)
A PhotoPXL video in April 2022 featuring Jeff Schewe and Kevin Raber treated the subject of converting from colour raw files to B&W in Lightroom. This useful video responds to the interest in the subject amongst many who continue to appreciate the perennial value of the B&W esthetic in photography, regardless that the original images were from colour-enabled files. Stripping away colour can remove much distraction from essential line, form and composition, and give the photo a distinct artistic mood.
As I’m now digitizing a photoshoot that I did in Angkor Wat back in 2004 using colour negative film (Fuji Reala Superia, now discontinued), their video got me to thinking about workflows to convert from colour negative film to B&W positive, allowing enough process control to achieve the B&W effects I wanted. If I were to convert my processed raw files to TIFF or PSD, I could simply follow Jeff’s Lightroom workflow and be done. But part of my interest in the Lightroom (LR)-NLP approach is to keep the files in raw format from ingestion to print, mainly because it uses one-third the storage and provides seamless workflow integration from ingestion to print within one application (Lr) and the NLP plugin to Lr.
The processing sequence shown here takes account of the circumstance that once having triggered a conversion with NLP, most of the colour adjustment must be done in that plugin, because not many of LR’s colour editing tools work well on these files.
The photo I selected to demonstrate this workflow (Figure 1) has the kind of structure, contrast, and atmosphere that make it a good candidate for a B&W rendition.

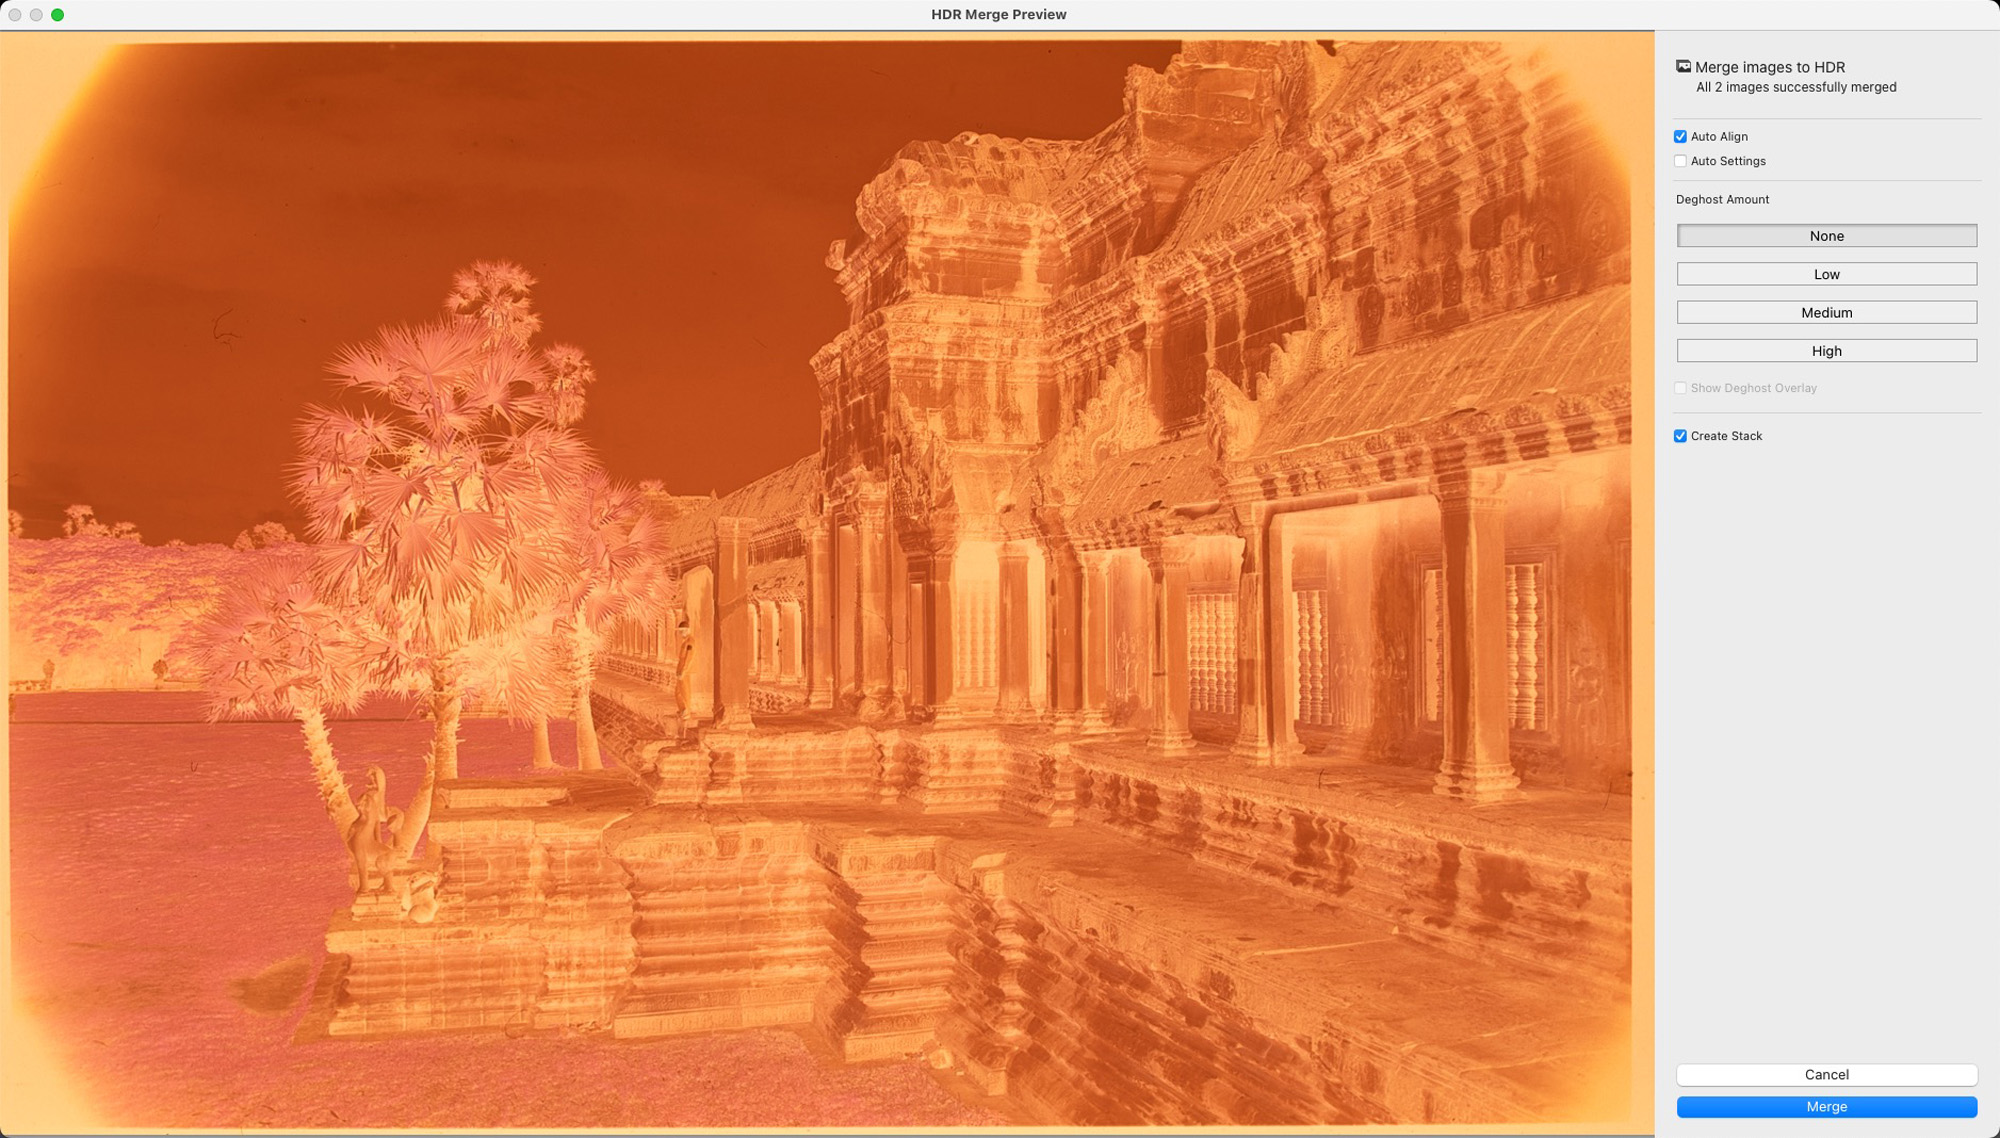
I photographed the negative using the Sony A7R4 set-up described in my January 2022 article on this website. I often make two captures of the negative, one protecting the highlights and another the shadows (Figure 2) – indeed providing much more effective control over luminance at the capture stage than available from any conventional scanner software. Seen in a true raw file viewer such as FastRawViewer, multi-exposure is not strictly necessary to protect from clipping, but producing an HDR using LR’s Merge to HDR tool provides a negative with less data concentrated at both ends of the histogram, and therefore easier to properly adjust shadows and highlights in post-capture editing.

The two candidate captures are opened in LR-HDR (Figure 3) and merged to HDR.
Once the merge is completed, the next step is to neutralize the orange mask by clicking the LR eyedropper on an unexposed bit of film surround (Figure 4).

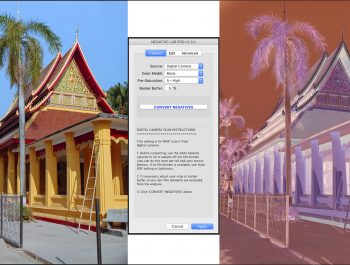
After using the surround for this purpose, one crops it out, so that there remains only the photo itself. This creates the correct tonal distribution for NLP analysis. One then opens NLP and makes sure the selected Color Model is B&W (Figure 5). This is essential.
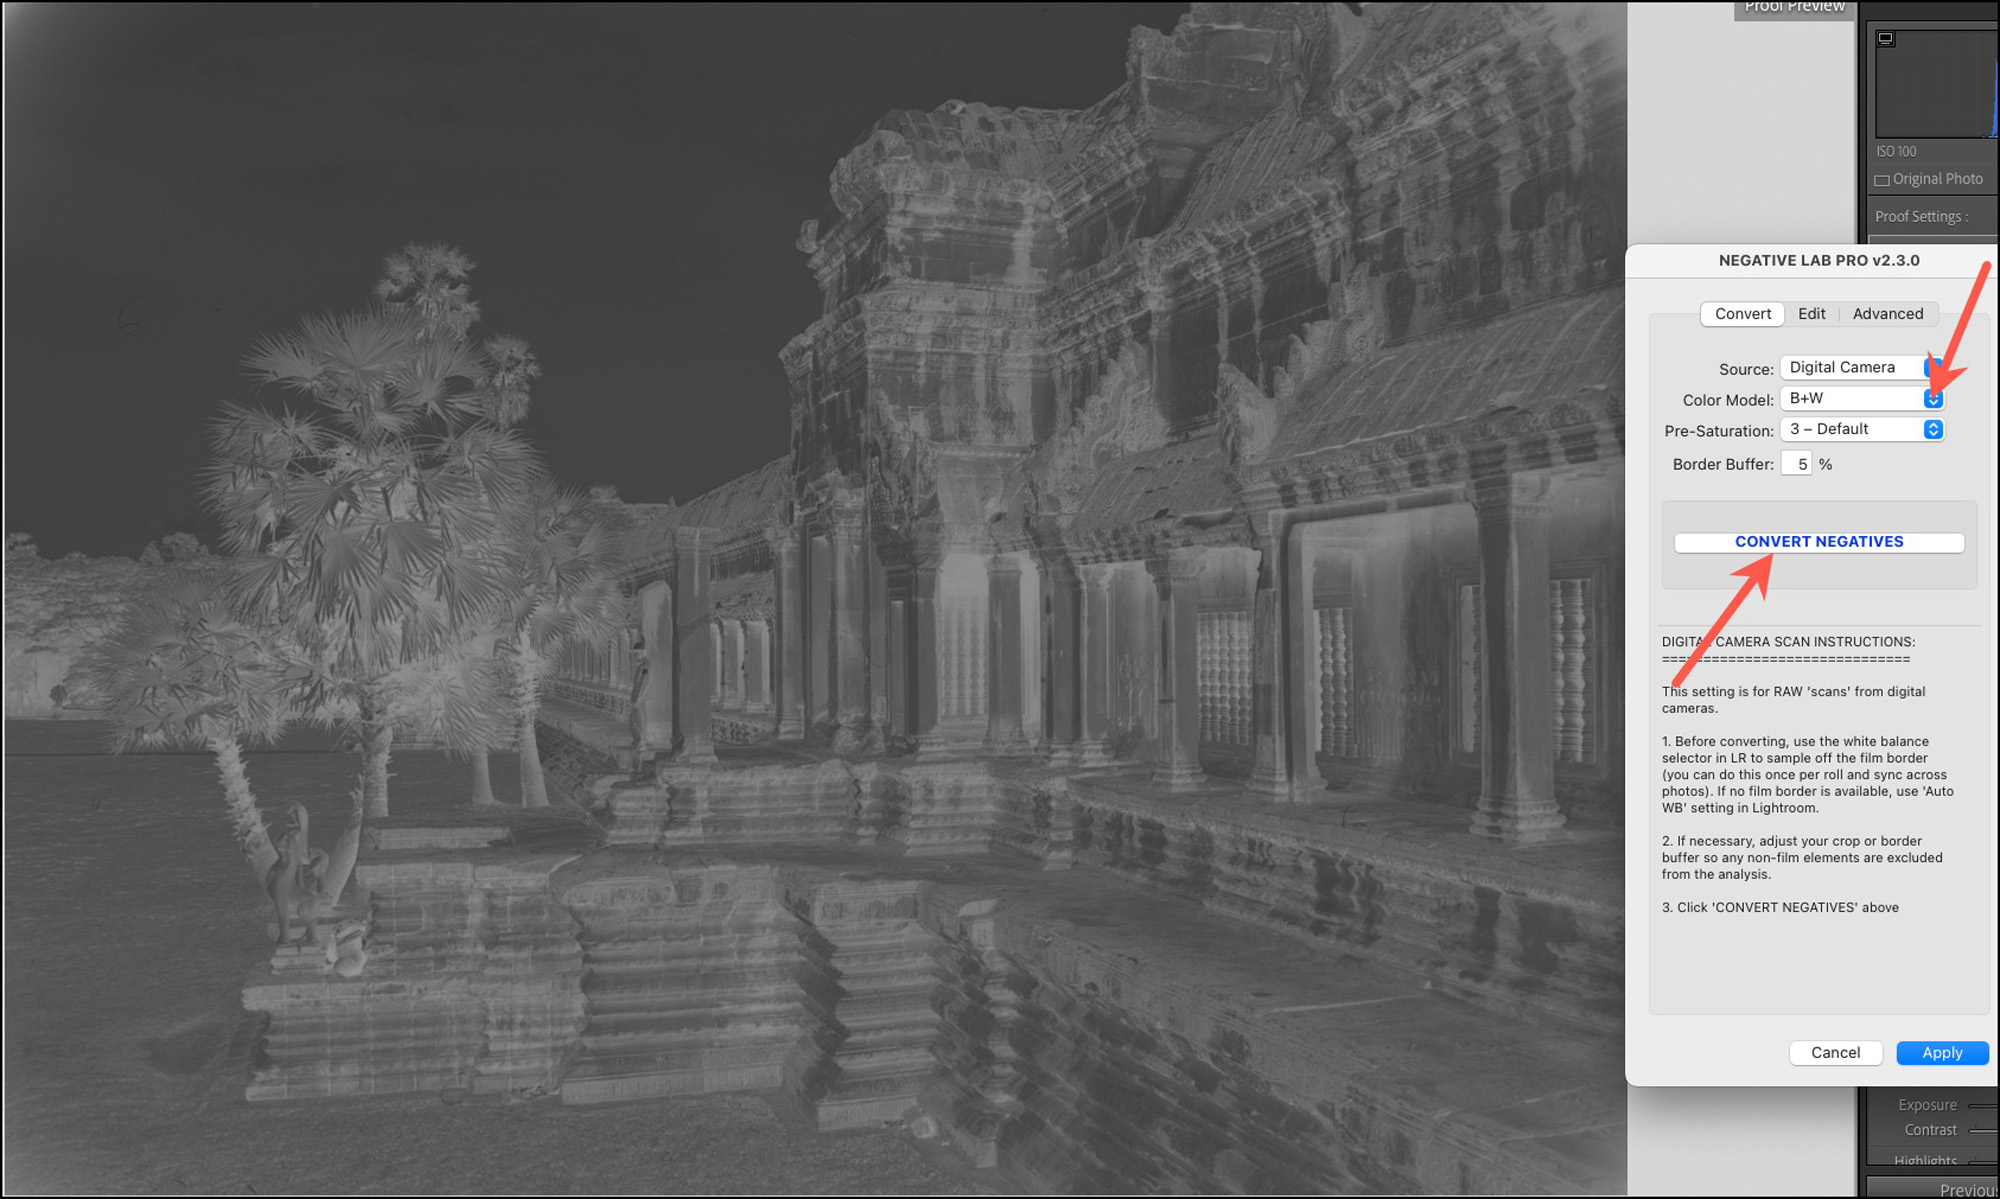
It looks kind of dark and dreary at this stage, but not to worry. NLP has yet to analyze it and render the positive tonal distribution. After clicking on “Convert Negative” (Figure 5), one obtains the initial conversion result before any further editing (Figure 6). Notice the good gray neutrality achieved between LR and NLP.
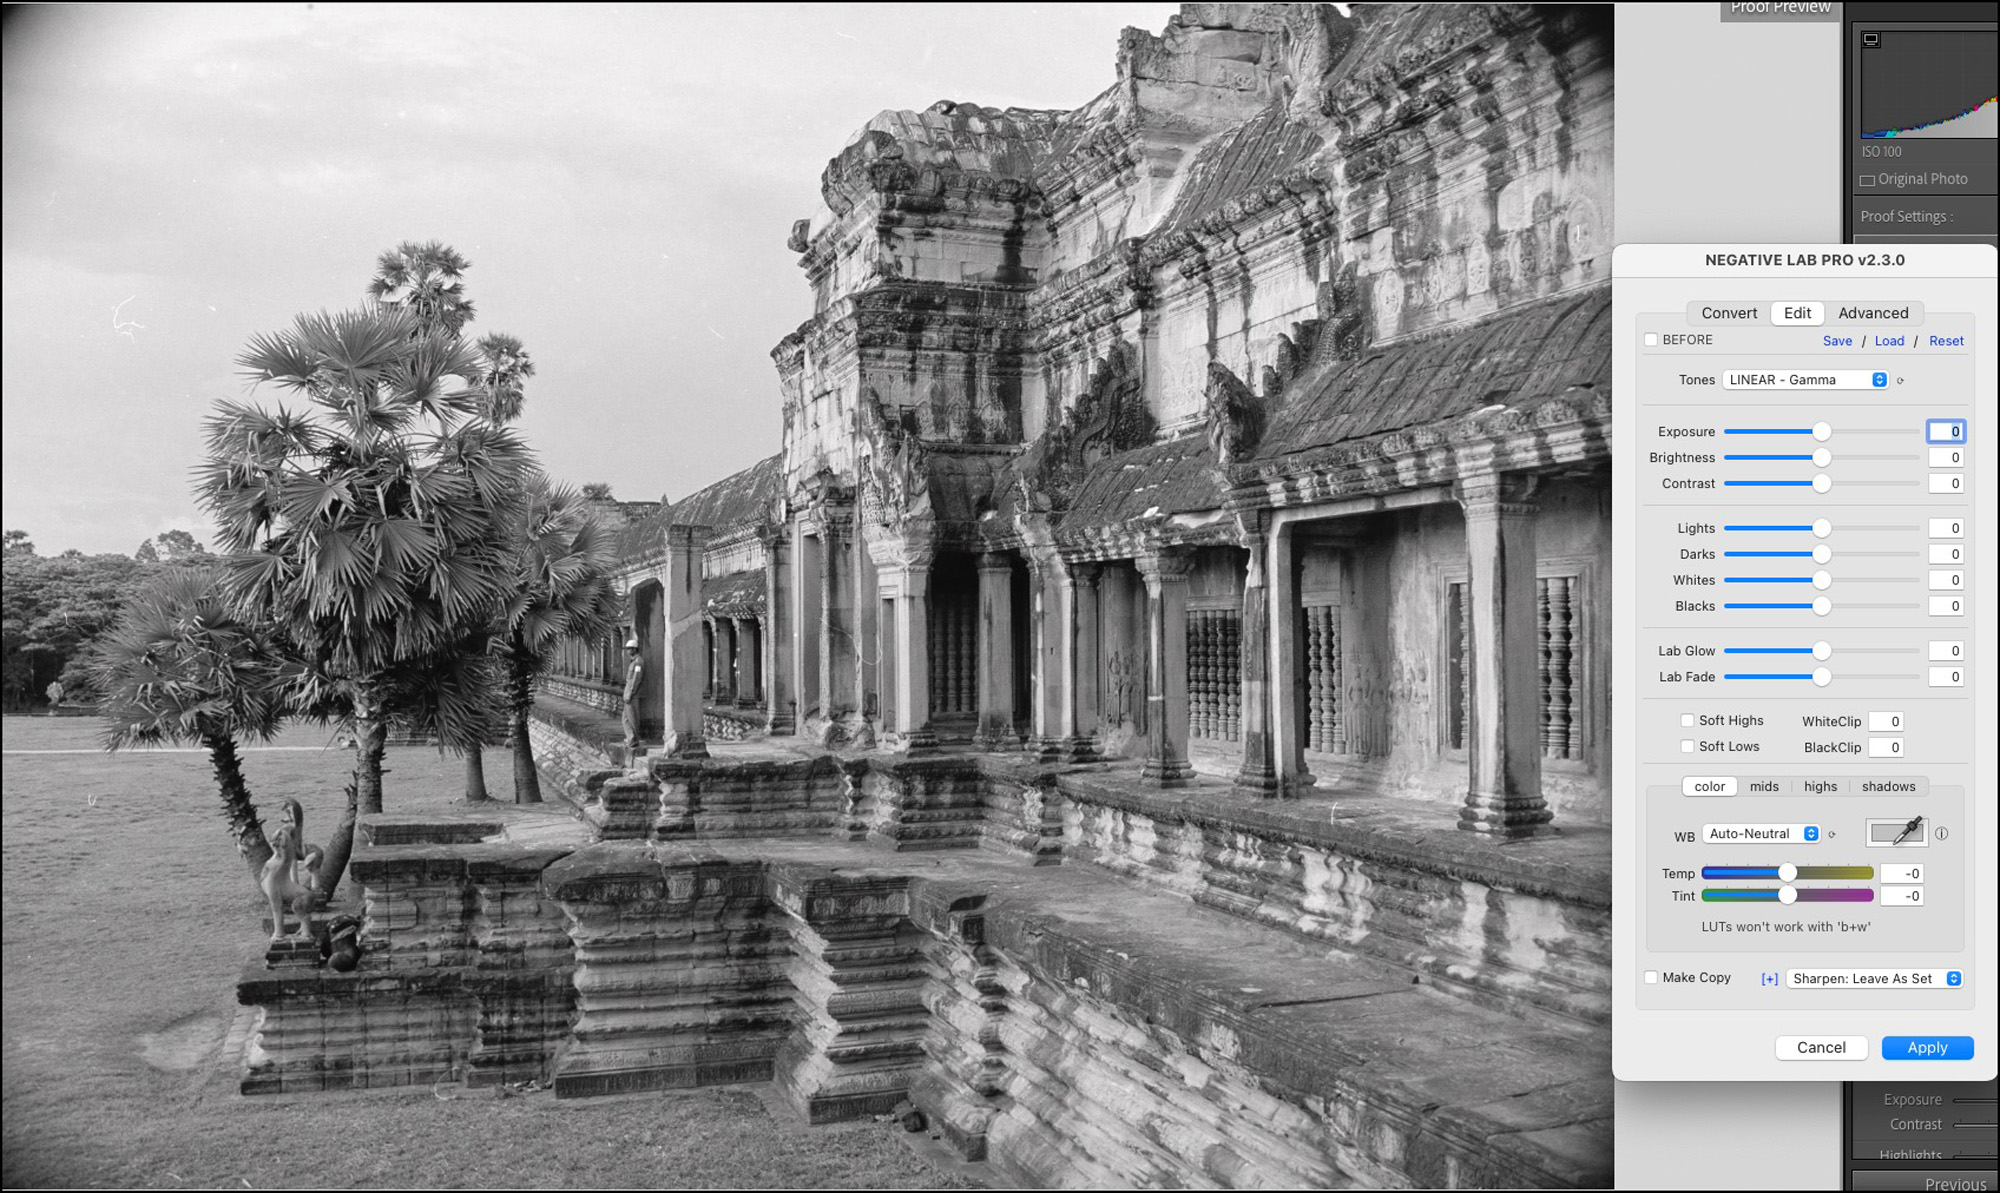
As you can see, it’s pretty good from the get-go, but we can make it more dramatic with some tone edits (Figure 7).
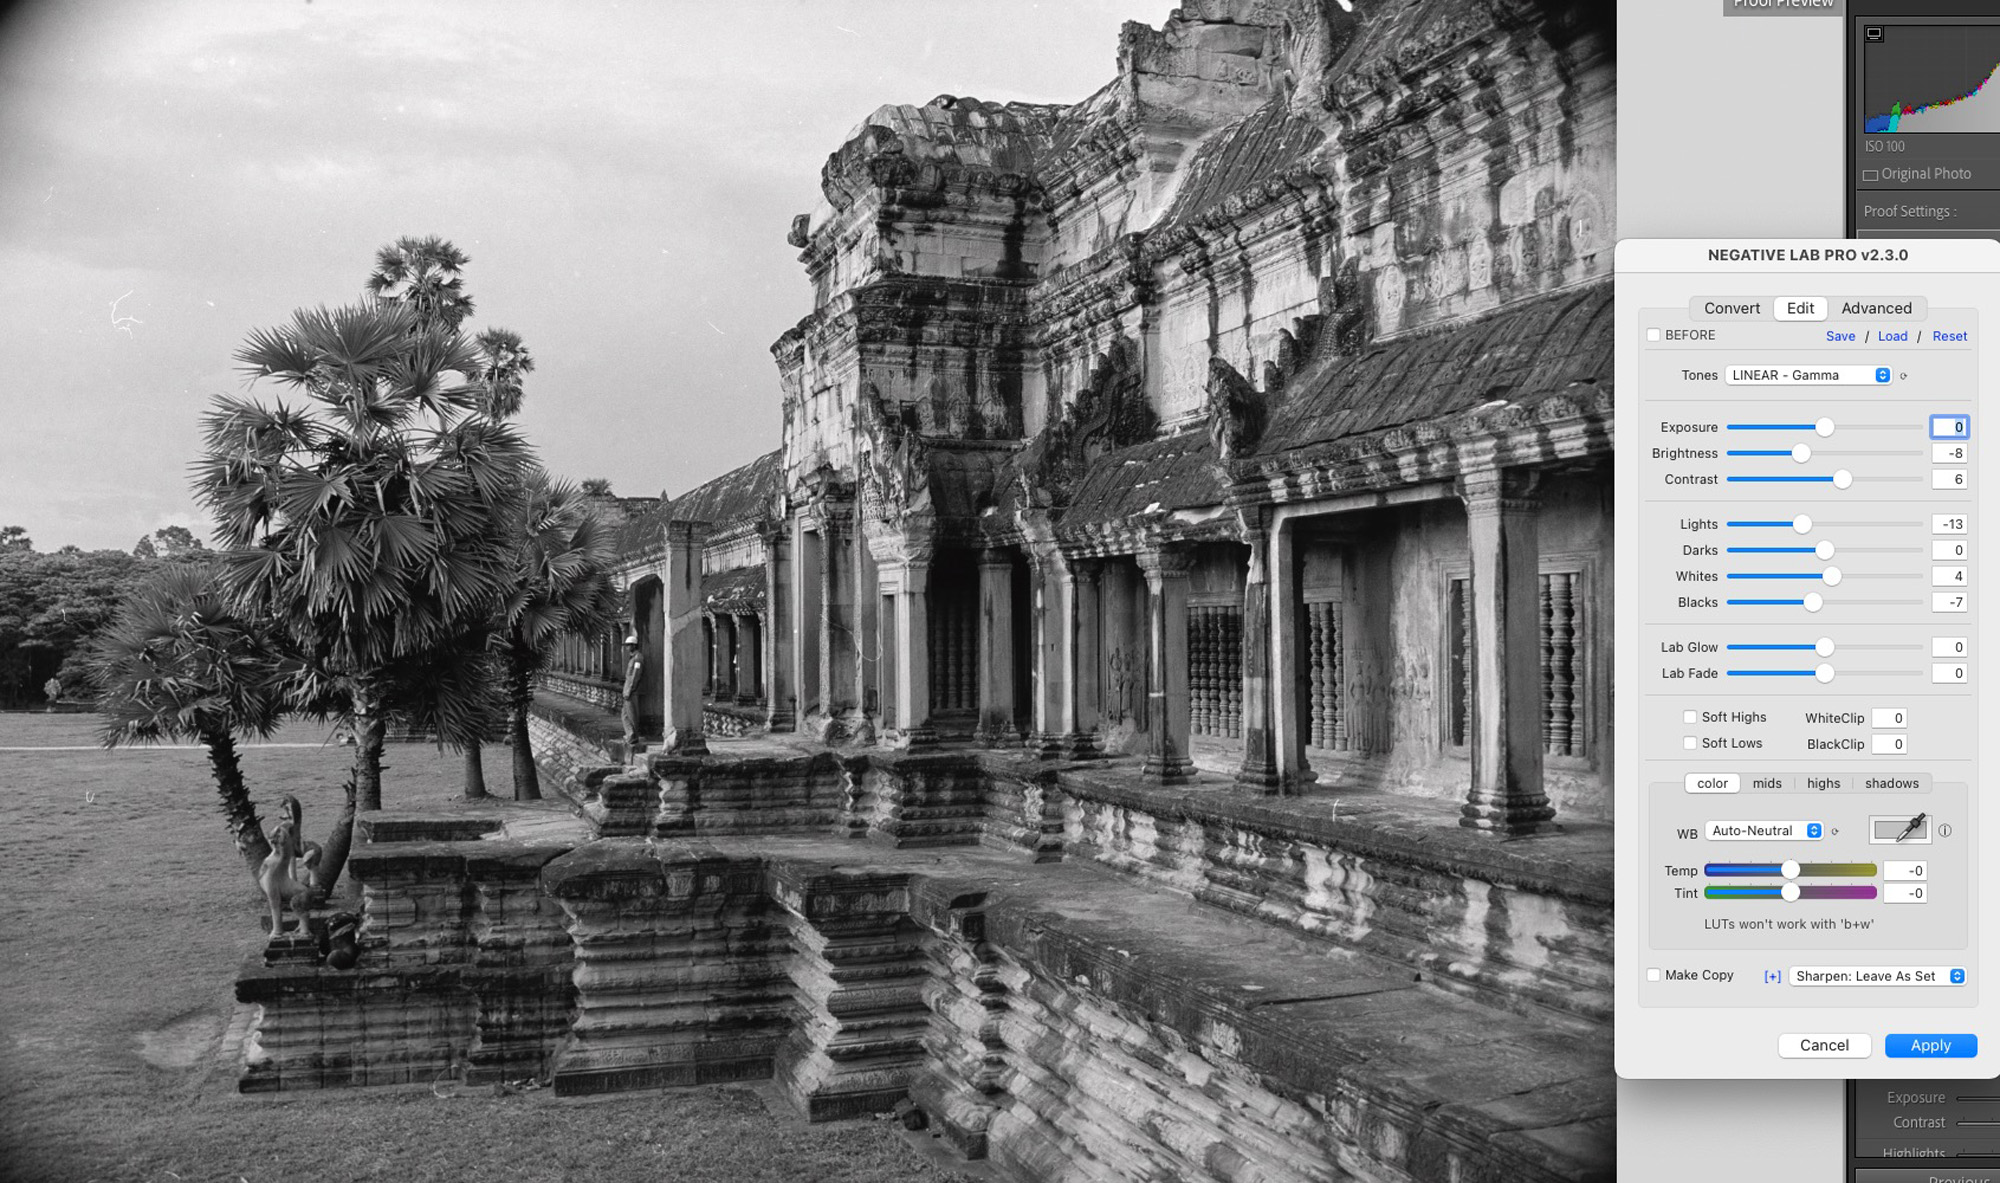
Examine the positions of the tone controls, and you will see that everything I did aimed at increasing contrast and mildly reducing brightness. However, I wasn’t happy with the mood of the sky – it needed darkening and more contrast, without however doing the same to the building. NLP is not structured to allow local editing of this kind, but LR is, so I used the new and improved masking features in LR to select the sky (Figure 8).
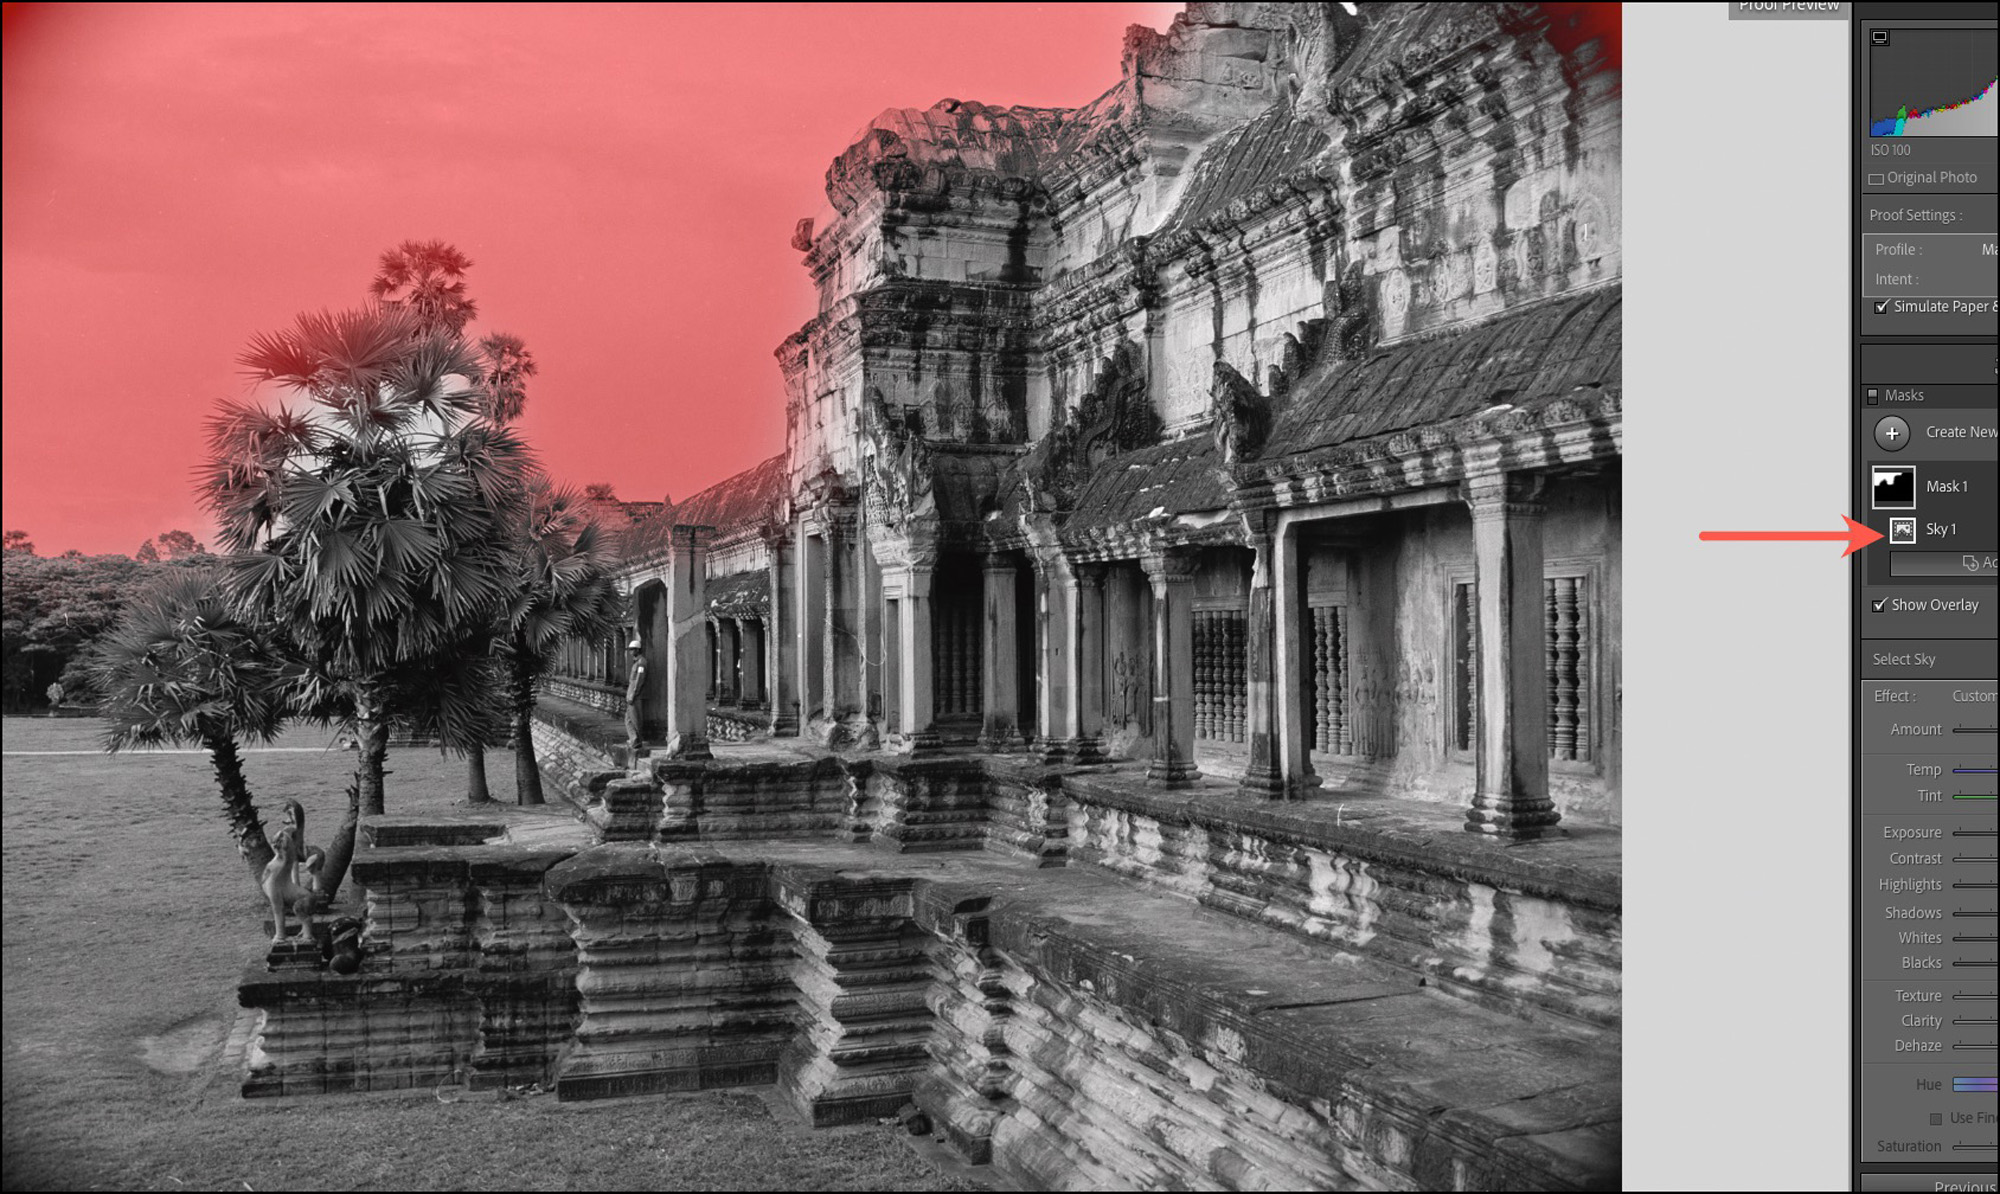
You can see from the “ruby-lith” mask overlay that the selection is quite good, but not perfect, so I improved it by using the Brush tool to erase the mask from places where it should not be, and added mask to areas that should have been masked. Then I adjusted the tonality of the sky (Figure 9).

Working an NLP-converted file in LR using LR tools (not NLP’s), please remember that all the tone controls work in reverse. This takes a bit of acclimatization, but it’s pretty easy: brightening Highlights darkens shadows and darkening Shadows brightens highlights (and vice versa). That’s all you need to remember, whether you do this with luminance sliders or the tone curve. You will not have joy using the B&W Mix sliders in the LR B&W panel on this kind of file, so stick with the other basic luminance controls.
Save for the vignetting (which came from the original photo), Figure 9 is a completed result. The building has strength without being exaggerated, and the sky has more heft than it did in Figure 6. But we’re not quite finished yet.
It is possible to tone the finished neutral B& W photo, say to give it a historical character, as kind of befits this subject matter. Remembering what I’ve said about the problematic nature of LR’s colour controls used on NLP-converted files, we revert to NLP for doing this. One nice feature of this plugin is that having made an initial conversion, one can re-open it as often as one wants thereafter to implement further adjustments. So the first alternative rendition I tried was to make a gold-toned carbon print reminiscent of the late 1800s/early 1900s (figure 10). One does this by moving the Blue-Yellow Temperature slider in the direction of Yellow (NLP White Balance section).
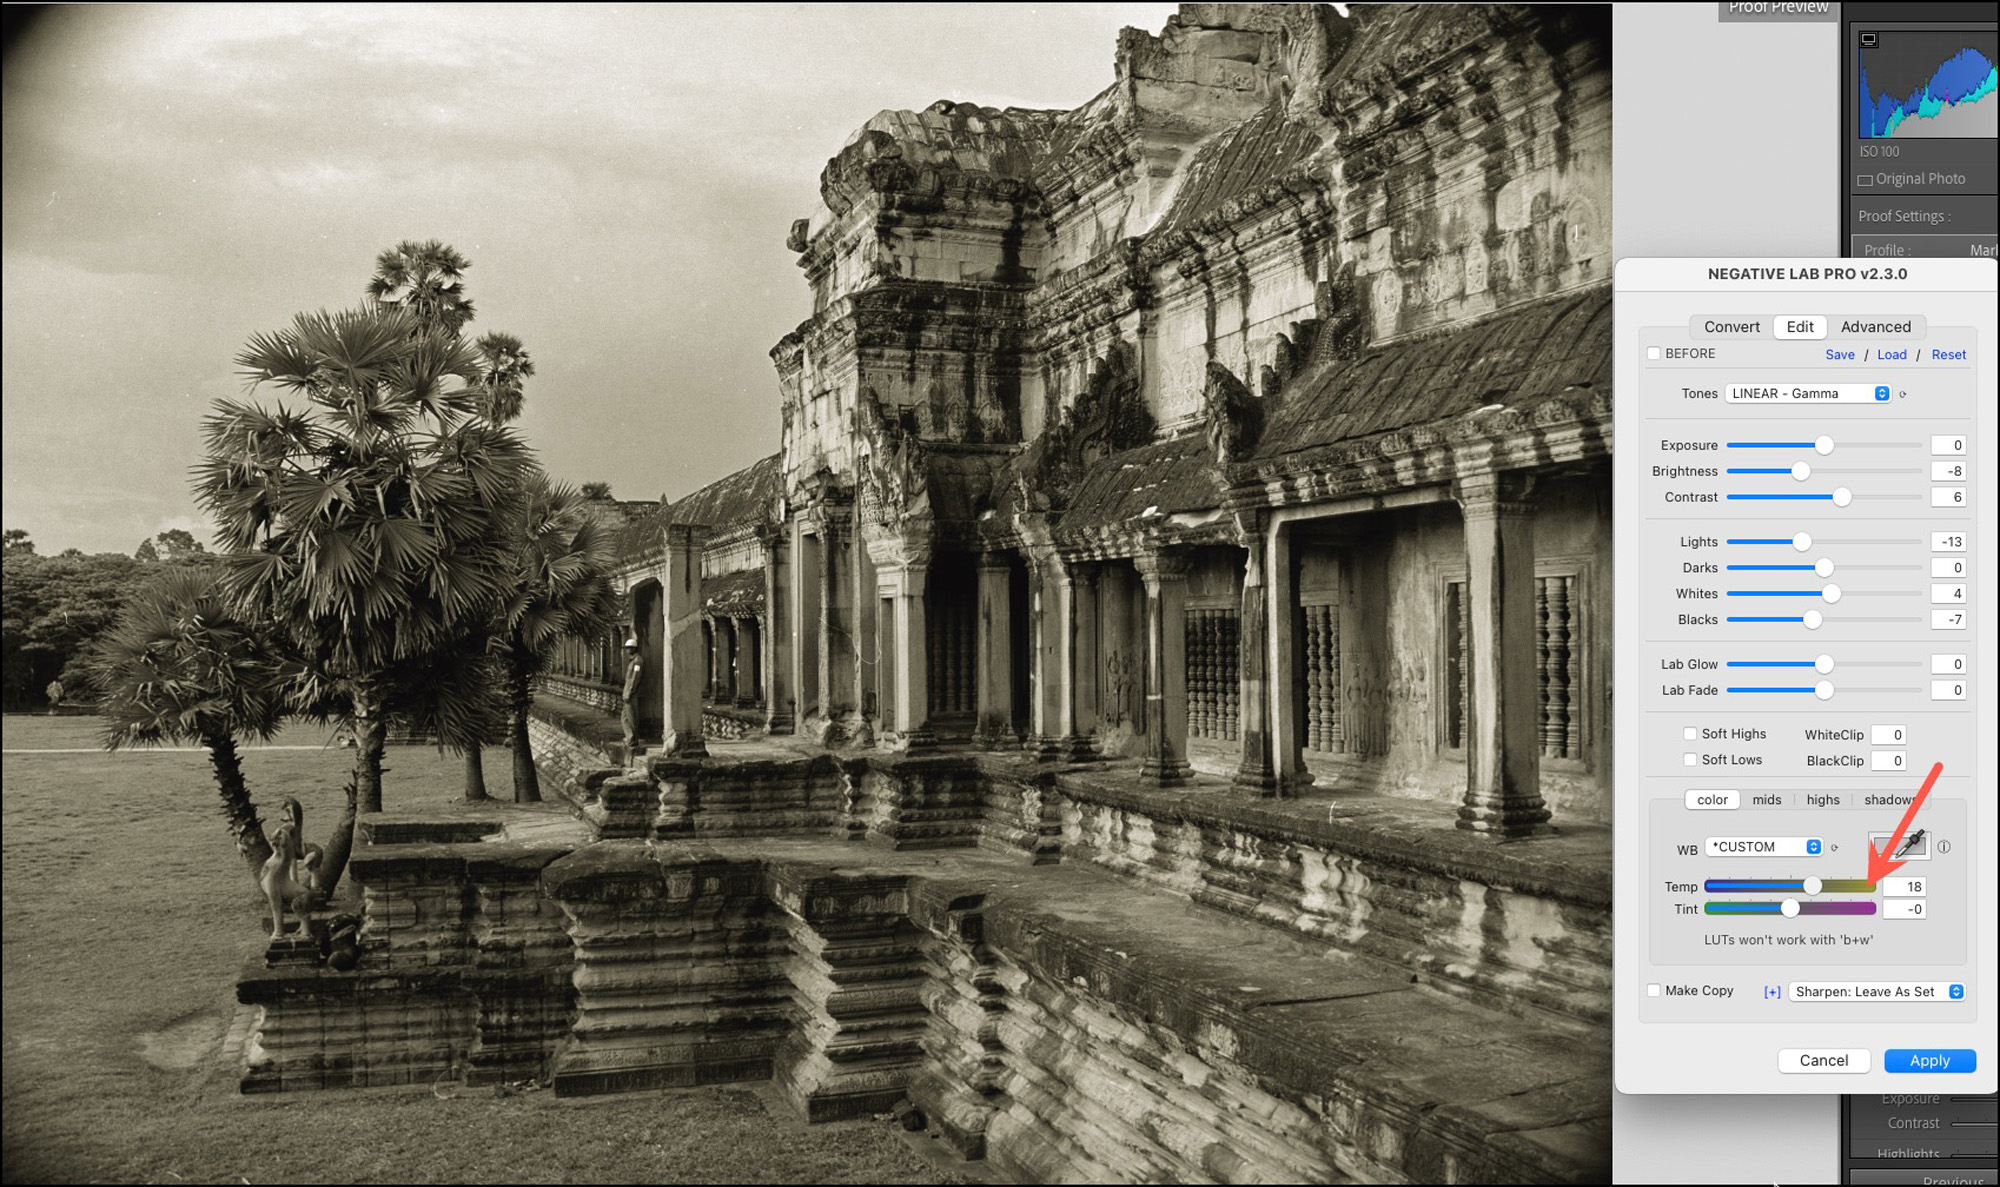
Alternatively, if one prefers a Sepia result reminiscent of the 1930s, it is only necessary to add Red to the Figure 10 result using the Tint slider in NLP (Figure 11).

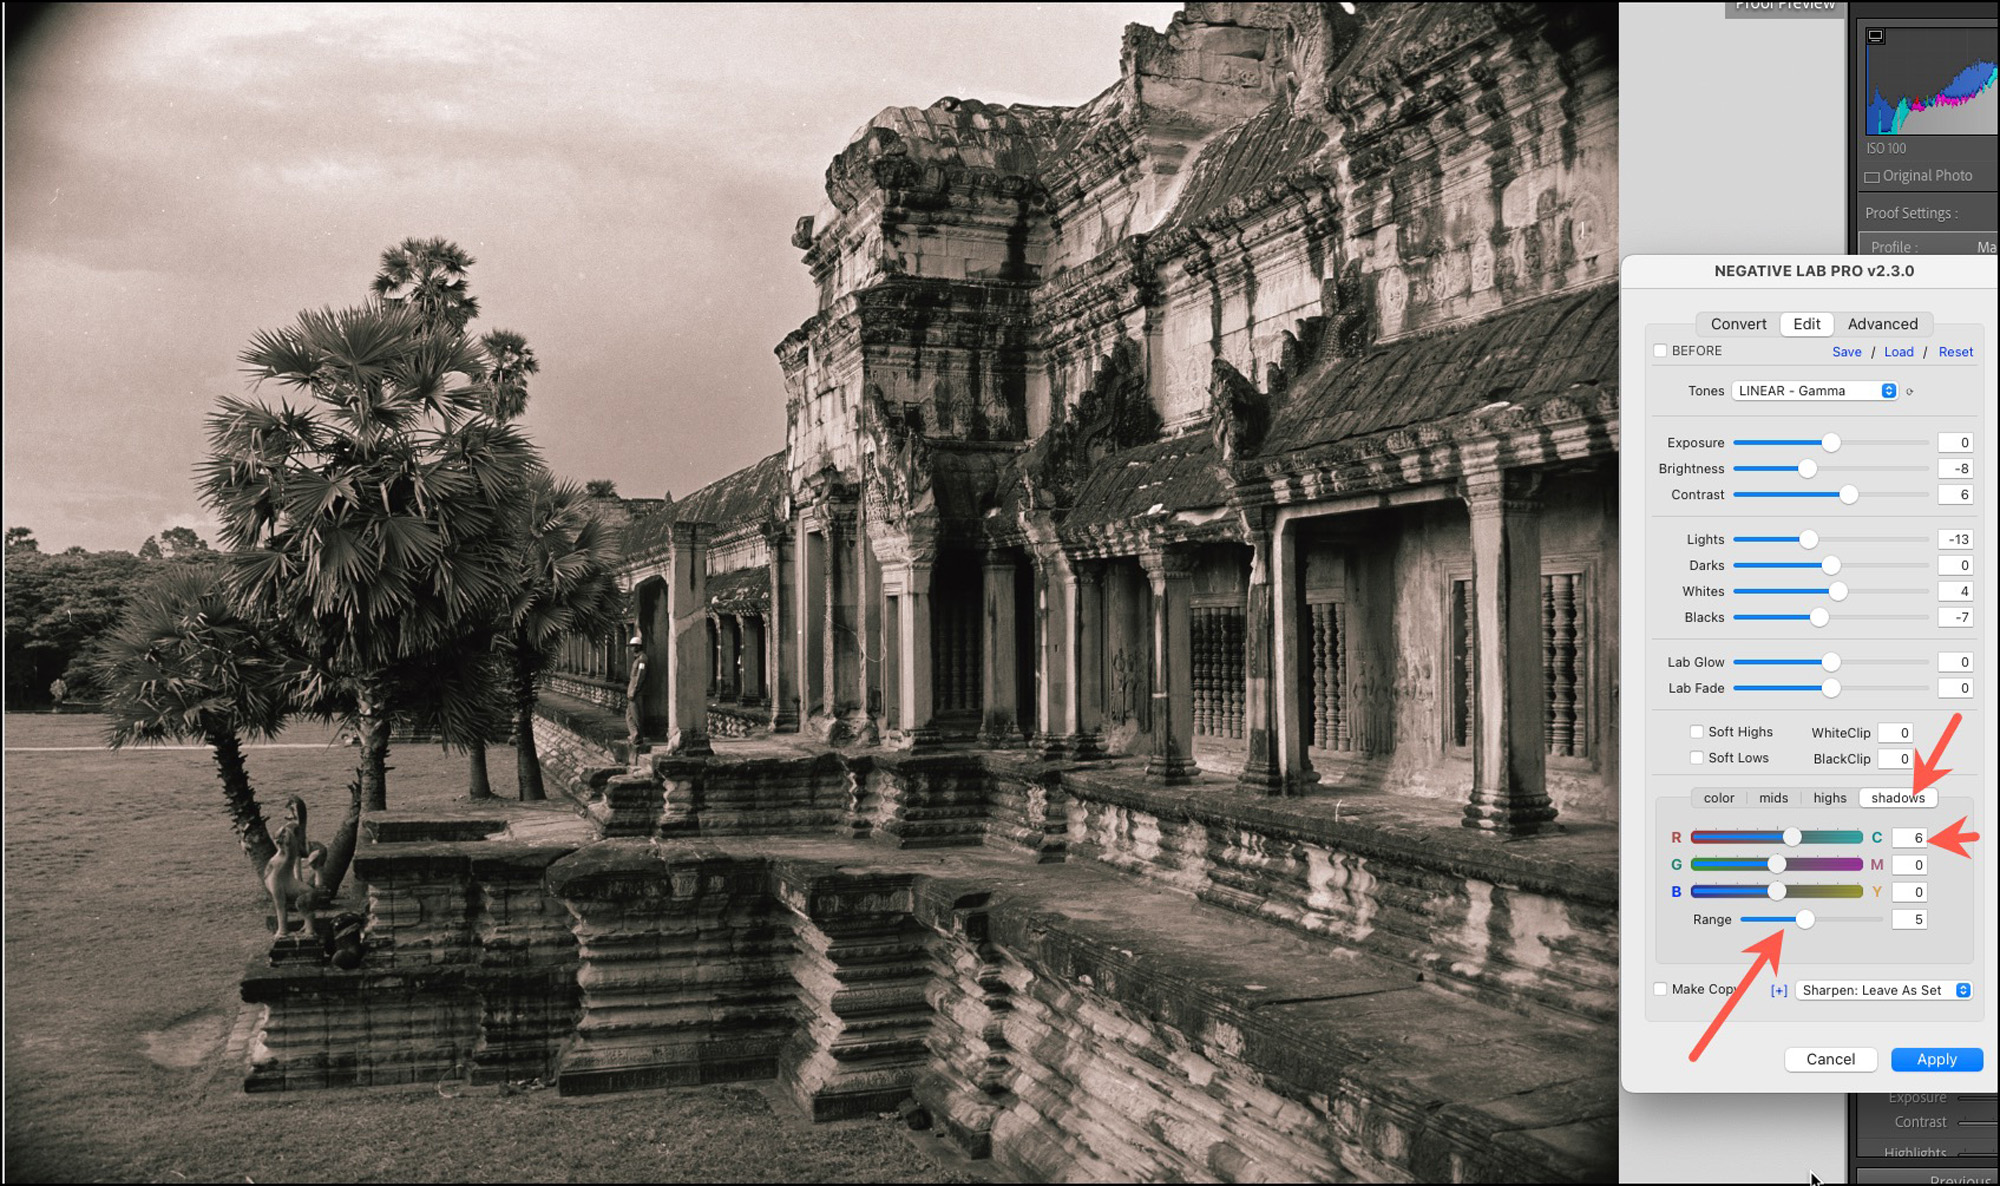
Finally, we can also implement split-toning from NLP which I used to more or less neutralize the dark areas, while leaving the brighter areas Sepia-toned (Figure 12). This is done by selecting the shadow zone in the White Balance area and adding Cyan to the previous result. The range slider adjusts the reach of this adjustment along the tone scale.
Annex
Additional Adjustment Options in NLP – The Advanced Tab
NLP opens with “Convert”, “Edit” and “Advanced” tabs. Users would be especially familiar with the “Convert” and “Edit” tabs, but perhaps some less so with the options in the “Advanced” tab. This tab holds optional settings (Figure A0) which have distinctive impacts on image appearance. This Annex shows some of the possibilities; six suffice to demonstrate the value of experimenting with them before deciding on the finished version of a converted photo.
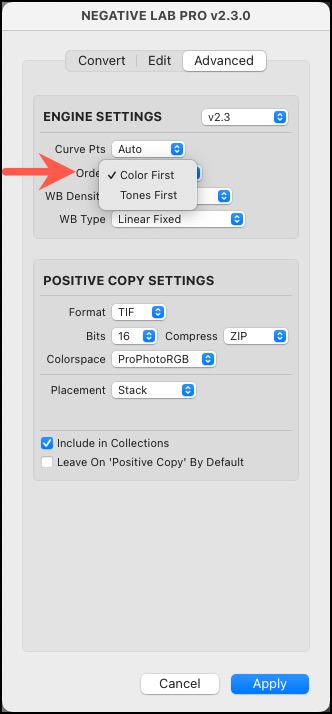
The first row of interest is “Order”, (by the Red arrow I placed). It allows us to select whether the Color or Tone edits are calculated first in editing the image. Leaving this setting on “Color” preserves color balance and is the recommended option. The Tone option is only useful for compatibility with a previous NLP version.
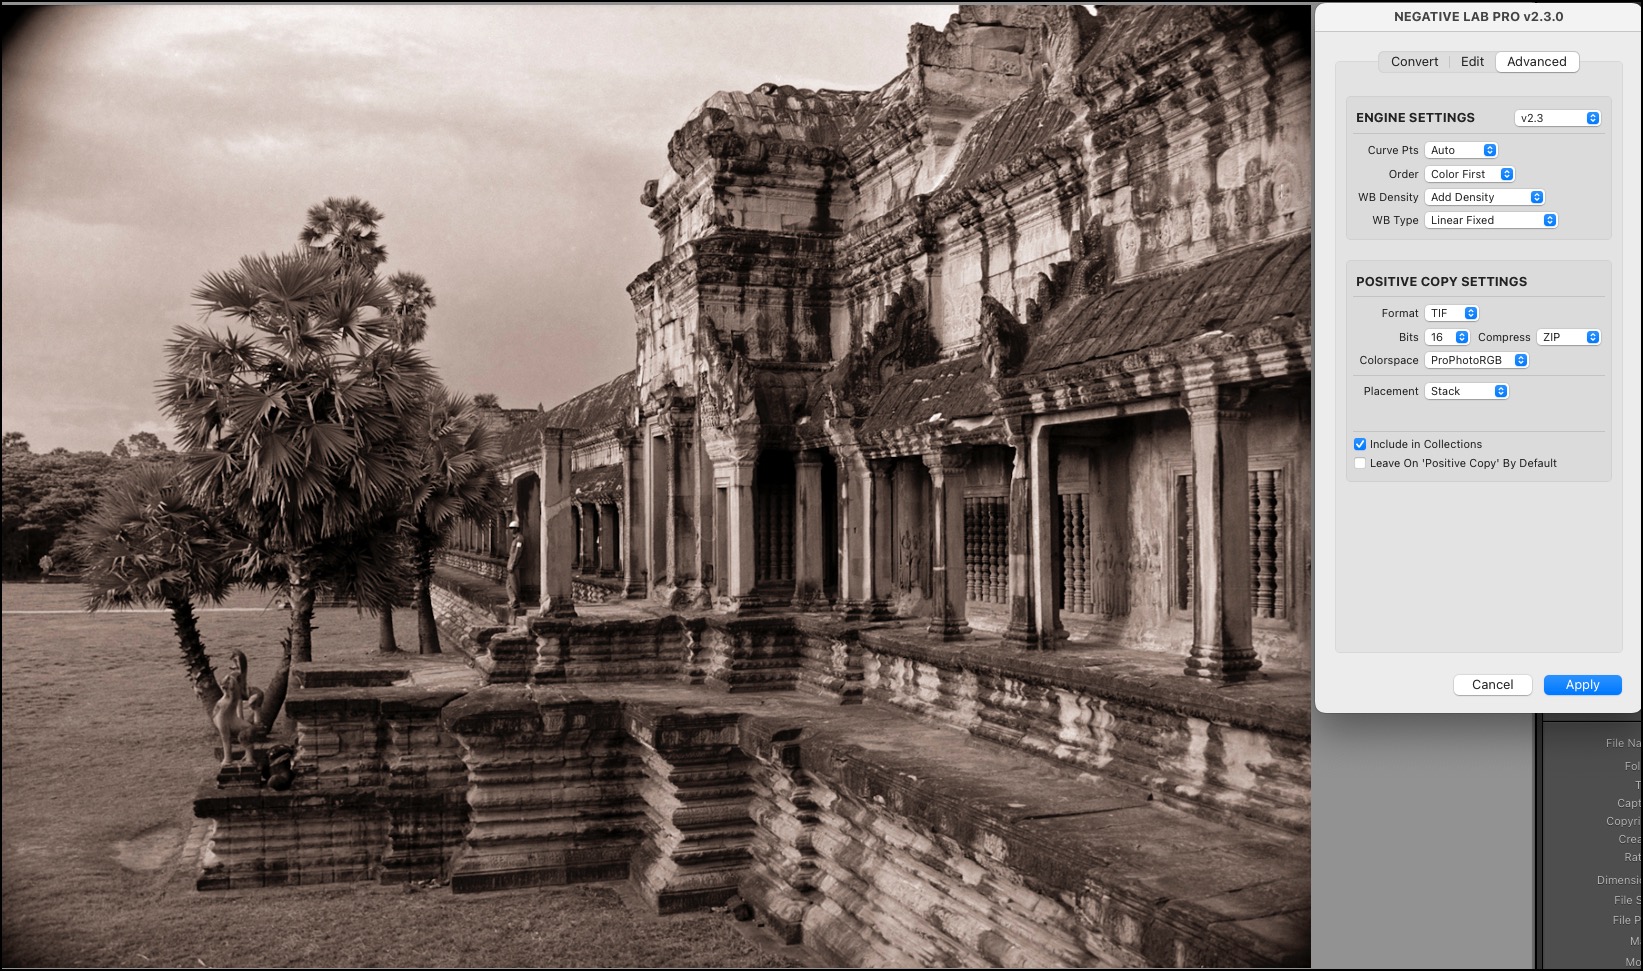
The next two rows, “WB Density” and “WB Type”, give us real choices. The default settings for these two rows of options are Neutral Density and Linear Fixed White Balance Type (Figure A1).
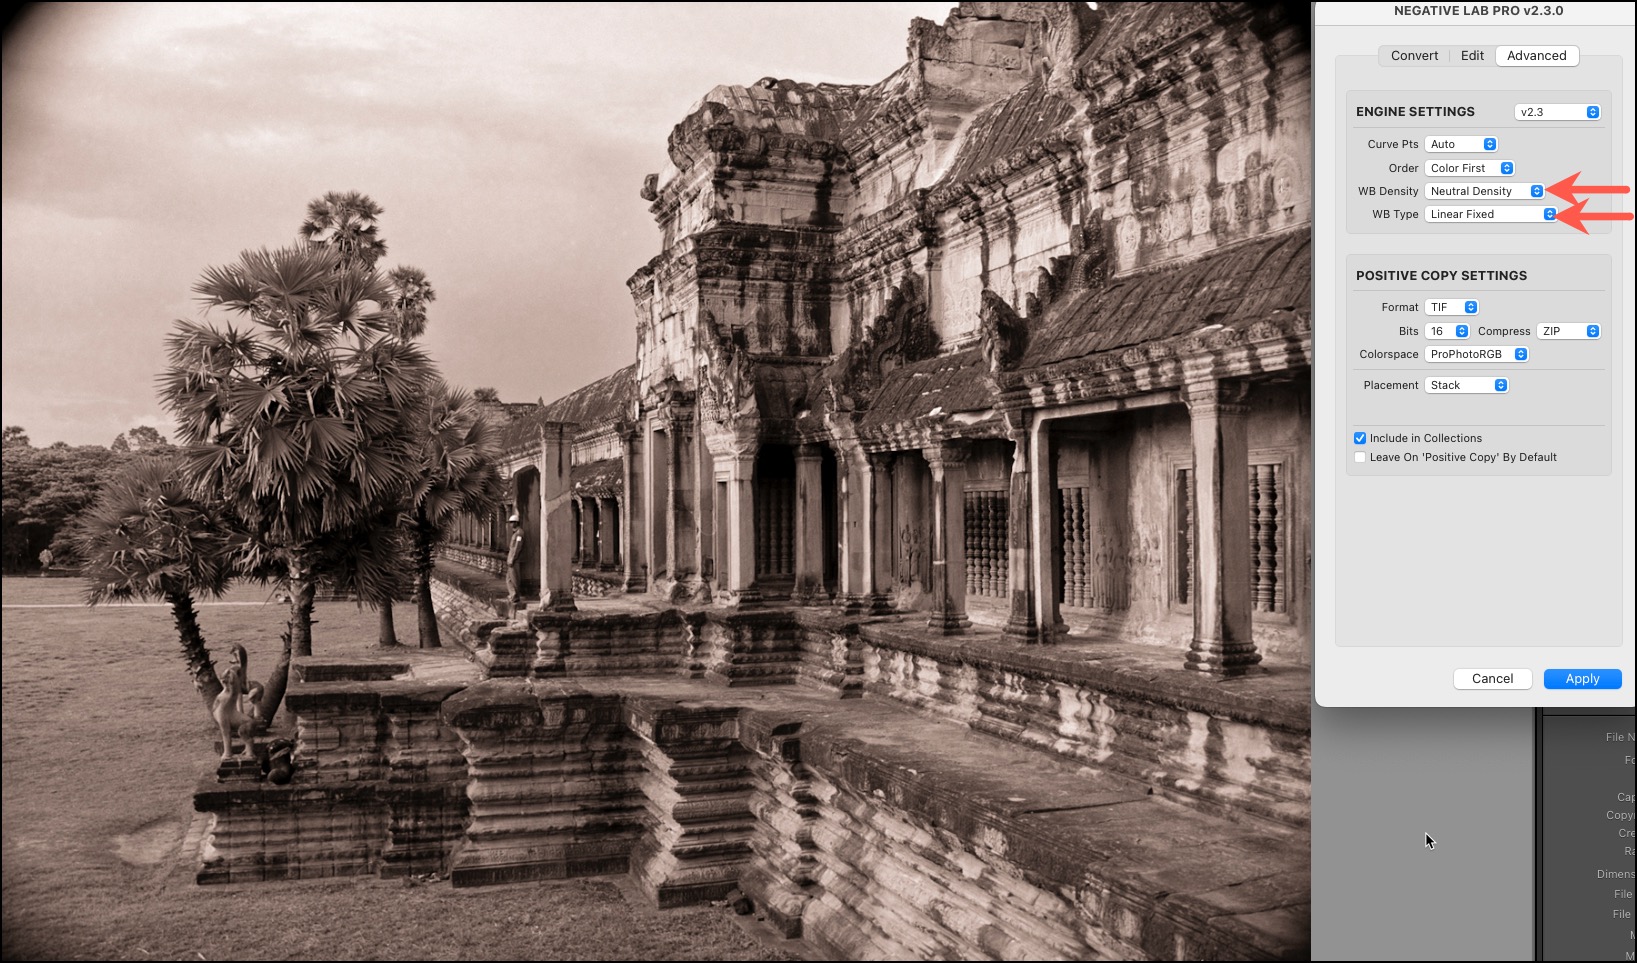
I shall compare five alternative combinations of these two groups of settings with that of Figure A1.
Leaving WB Density set at Neutral, Figures A2 and A3 show the effects of setting the WB Type to Highlight and Shadow-weighted respectively.
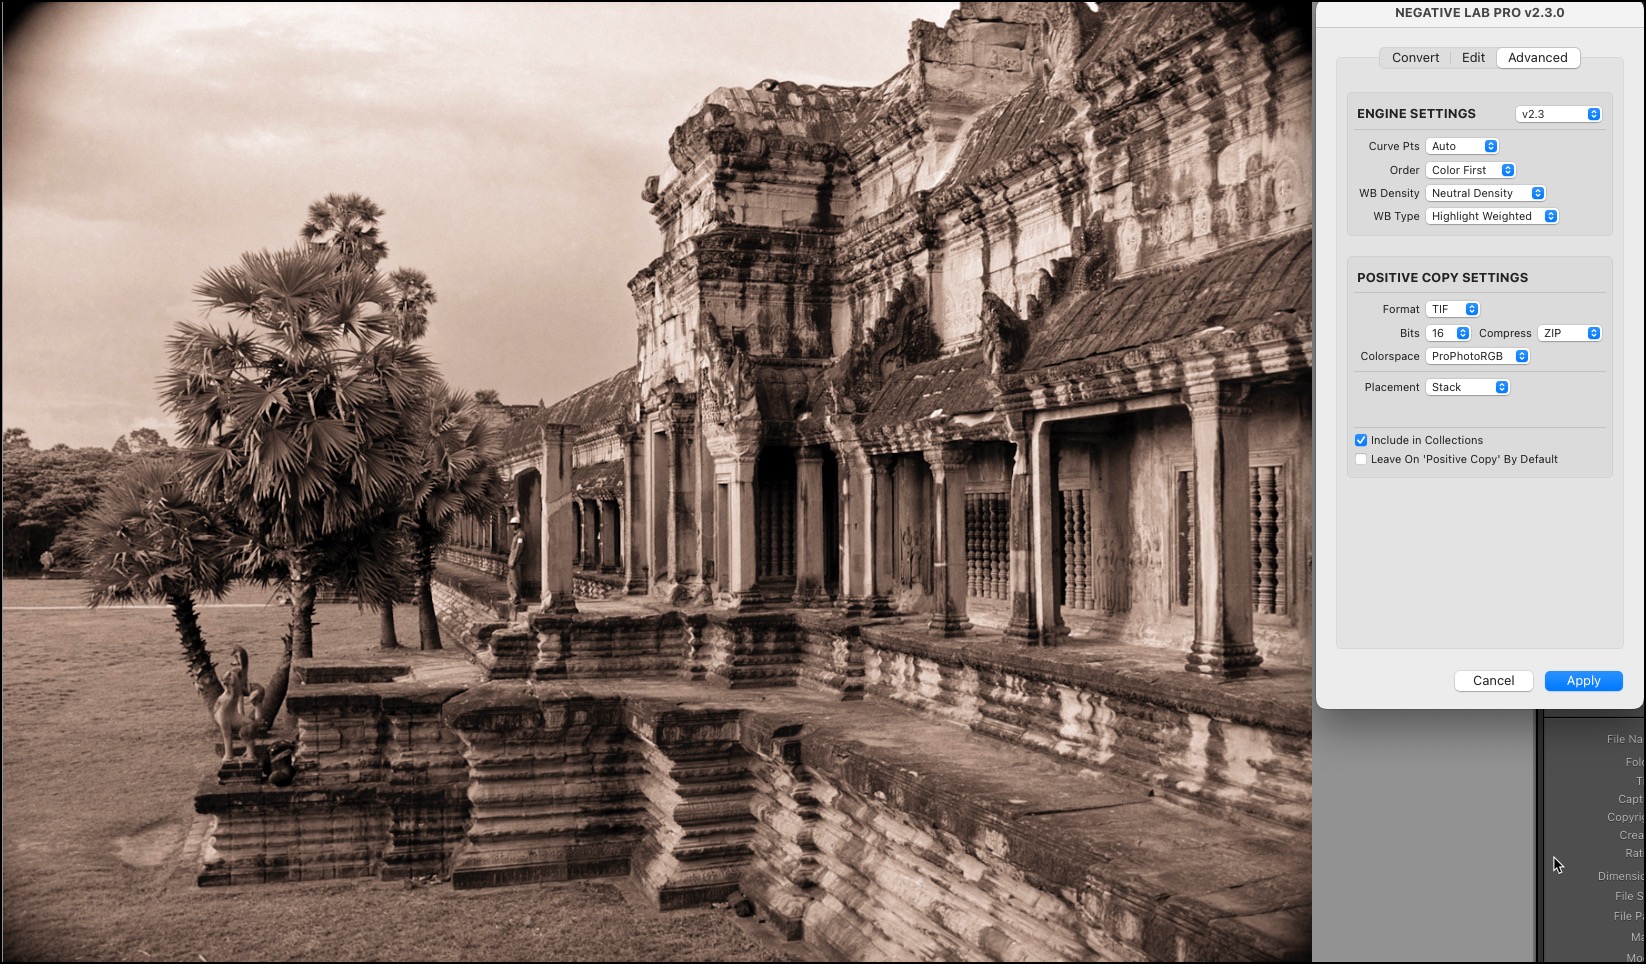
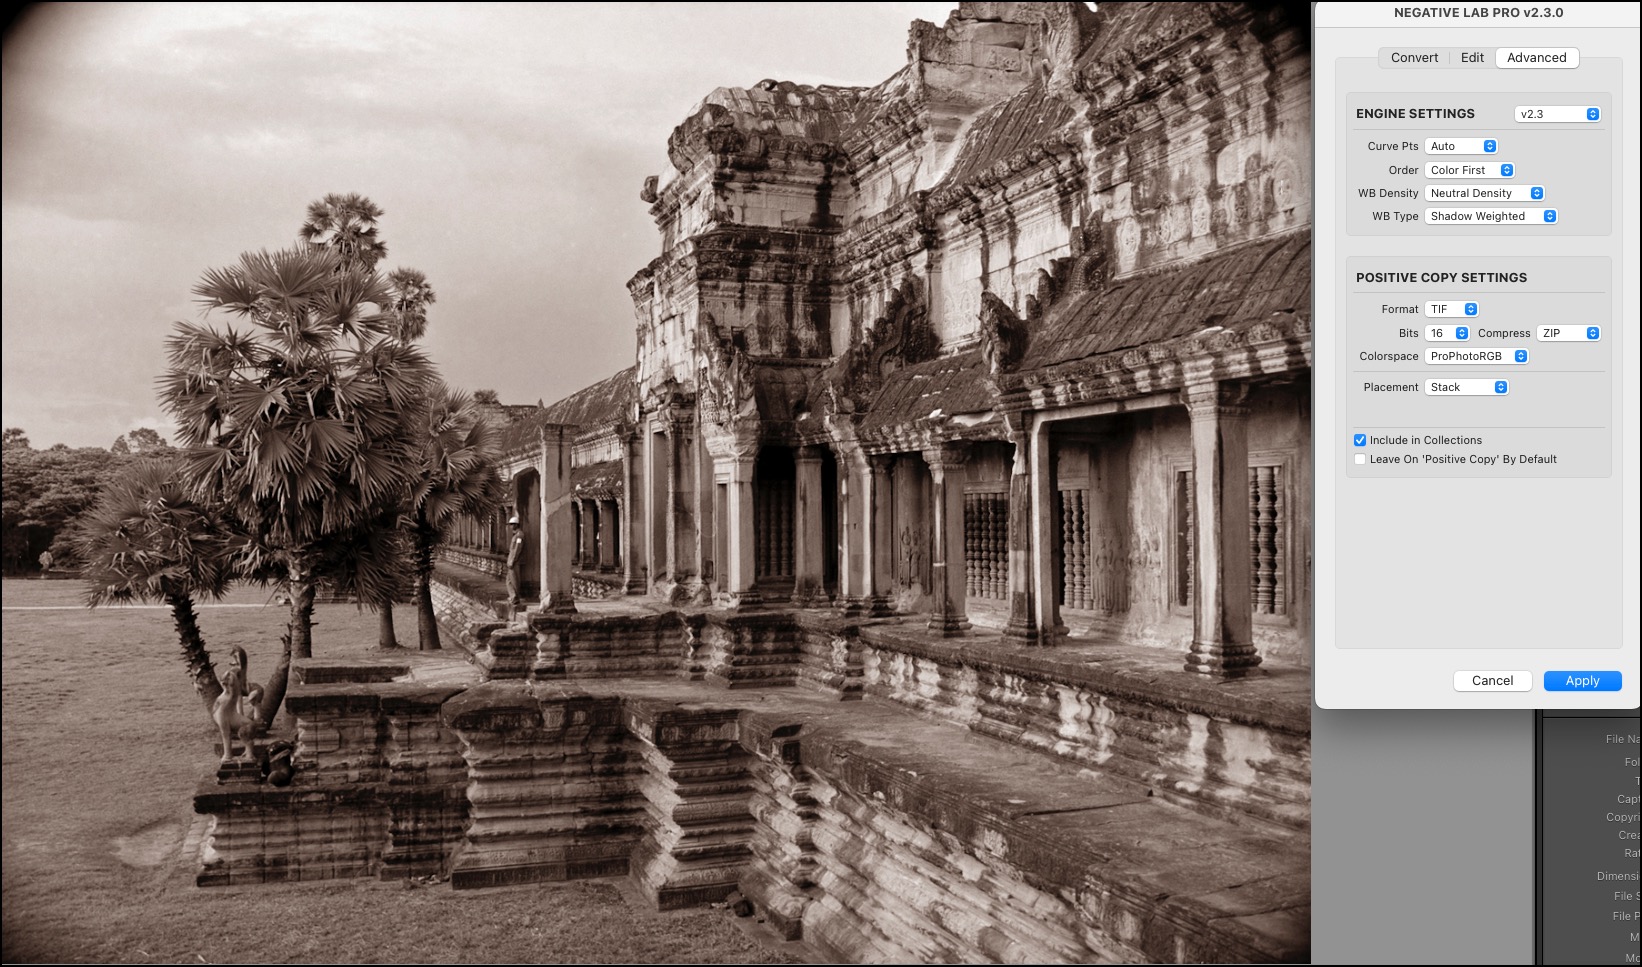
For this photo, the Highlight Weighting of the WB produced a more pronounced toning effect than either the default setting in A1 or the Shadow Weighted in A3. A3 is the mildest toning in this set of examples.
Selecting the “Add Density” option in the WB Density group does exactly what the name of the group suggests it should: it adds density. Compare Figure A4 below with its counterpart A1:
“Add Density” appears like a generalized saturation enhancer. With “Add Density” set, we can now compare the effects of selecting either “Highlight-weighted” or “Shadow-weighted” WB Type (Figures A5 and A6 respectively).
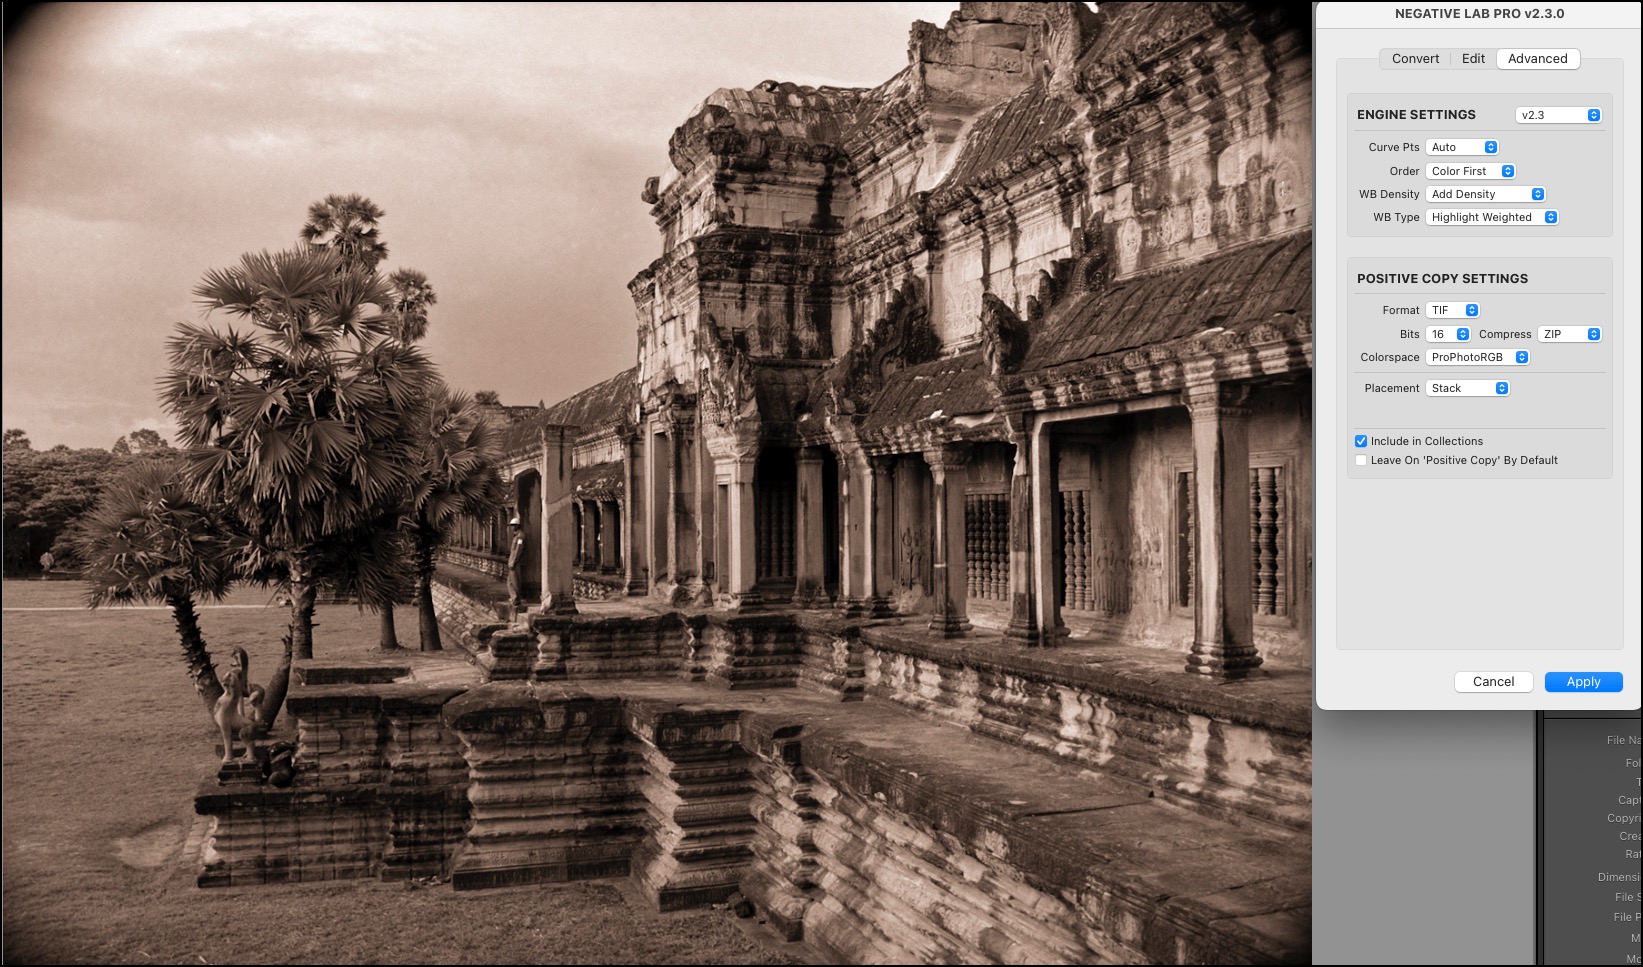
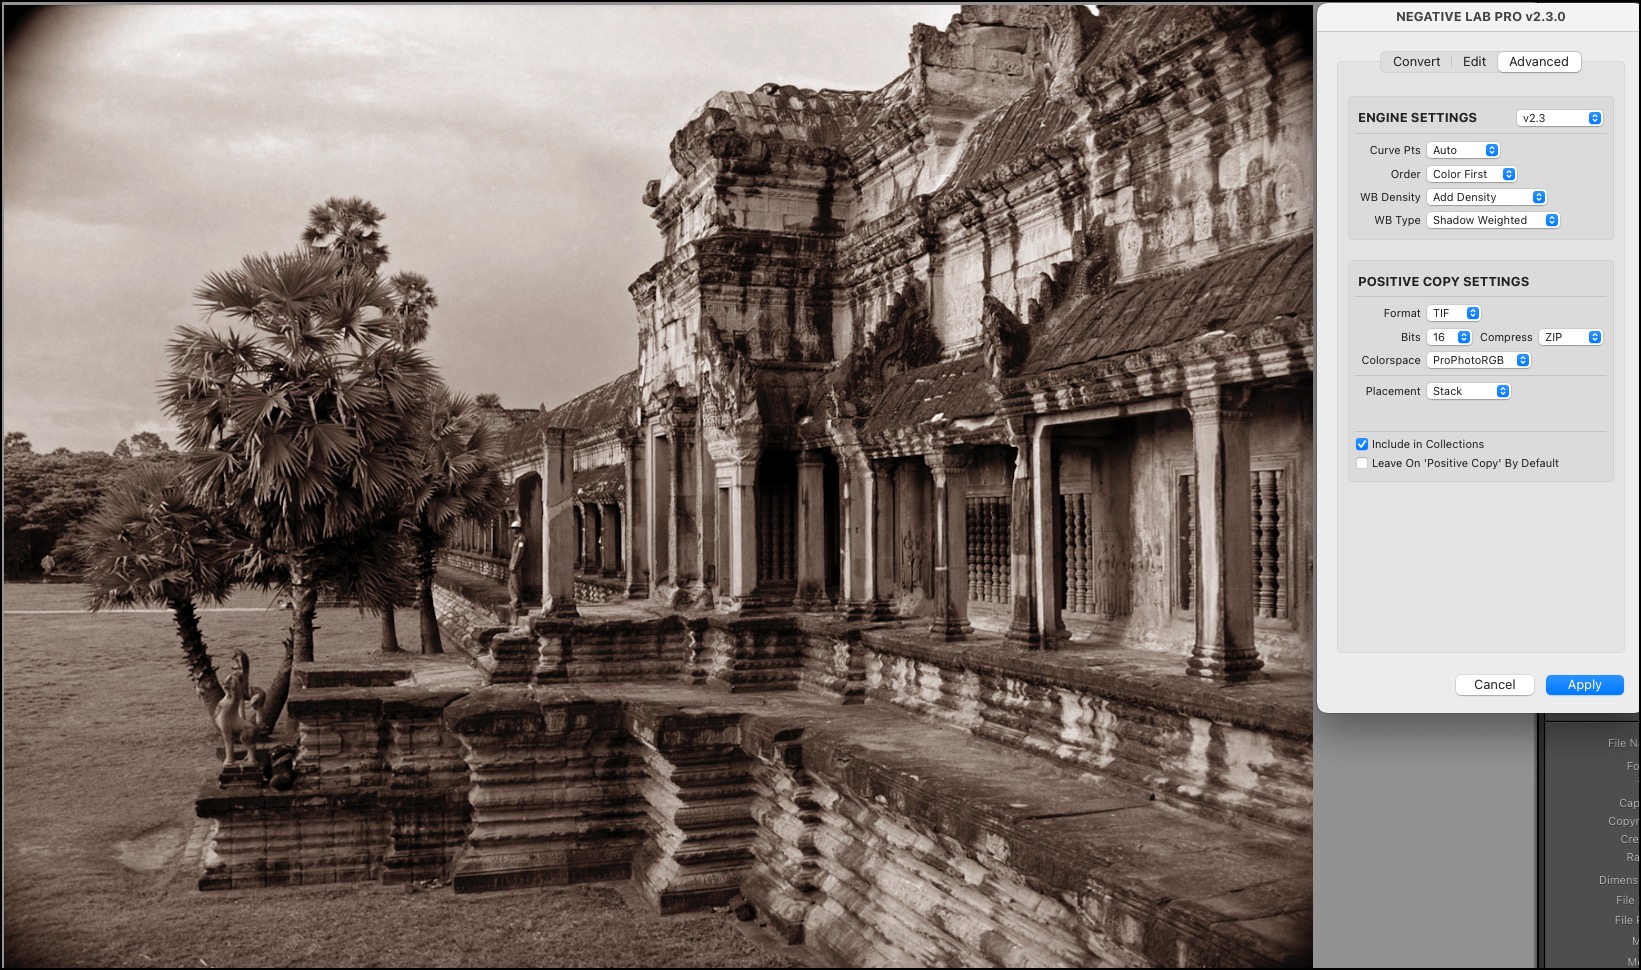
Figure A5 shows the most pronounced toning effect of the lot sampled here, while again, A6 has a lesser toning impact compared with A5; both A5 and A6 are more dense than their counterparts A2 and A3.
I hope this little foray into the Advanced Options has whet your appetite to experiment with options in the NLP Advanced tab.
Mark D Segal, Director, Imaging 91.com
July 2022
Toronto, ON
Mark has been making photographs for the past seven decades and started adopting a digital workflow in 1999 first with scanning film, then going fully digital in 2004. He has worked with a considerable range of software, equipment, materials and techniques over the years, accumulated substantial experience as an author, educator and communicator in several fields, was a frequent contributor to the Luminous-Landscape website and now contributes frequently with in-depth articles on the PhotoPXL website. Mark has contributed over 75 articles to the two websites up to Q1-2024, with a particular emphasis on printers and papers, given his view that a photograph printed on paper remains the epitome of fine photography, as it has been from soon after the medium was invented and started gaining momentum in the 1830s/1840s. Mark developed a particular interest in film scanning and authored the ebook “Scanning Workflows with SilverFast 8, SilverFast HDR, Adobe Photoshop Lightroom and Adobe Photoshop” (please check our Store for availability). In his “other life” (the one that pays for the photography), Mark is a retiree from the World Bank Group and was a consultant in electric power development.