basICColor display 6 Pro
Introduction
My article on basICColor display 6 appeared on this website on May 3, 2020. Since then, basICColor has been working hard to develop advanced features that make the Pro version of this software arguably the most sophisticated monitor calibration and profiling package available. Quite apart from features, it produces excellent profiles, which for most of us will be exactly what we need. Insofar as I have already reviewed the version without these extended Pro features, this article concentrates on the latter.
Why the Bother?
The bother is – especially if you make prints – that you really should want a color management chain from monitor to printer that provides a reliable perception on the display of what will come out of the printer. This just avoids tons of disappointment and waste over issues such as prints that are persistently too dark, too light, too saturated, not saturated enough, and so on. The front-end of this color management chain for image processing is monitor calibration and profiling.
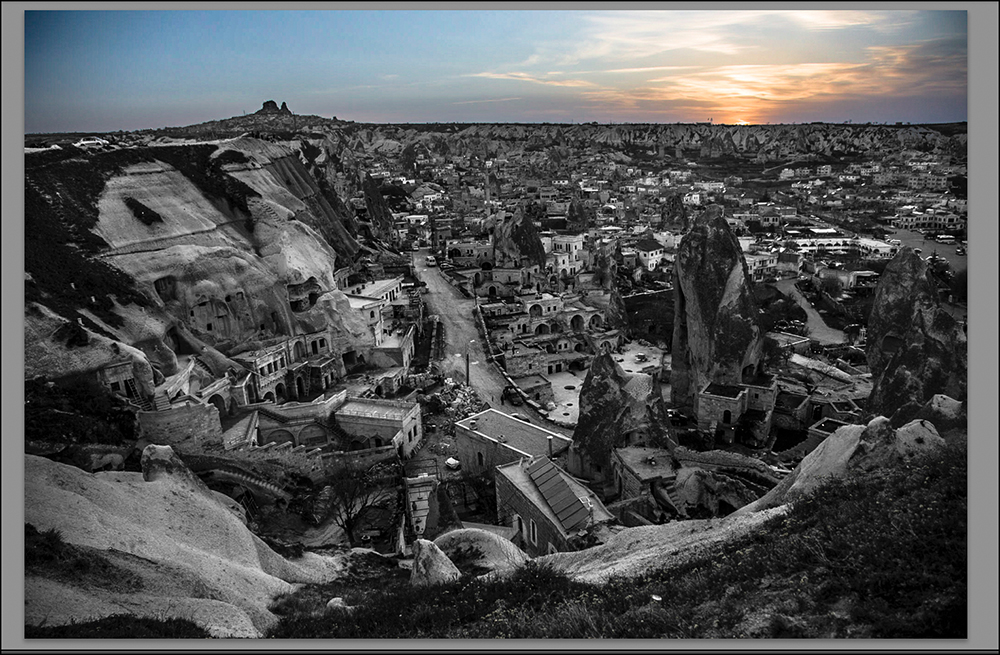
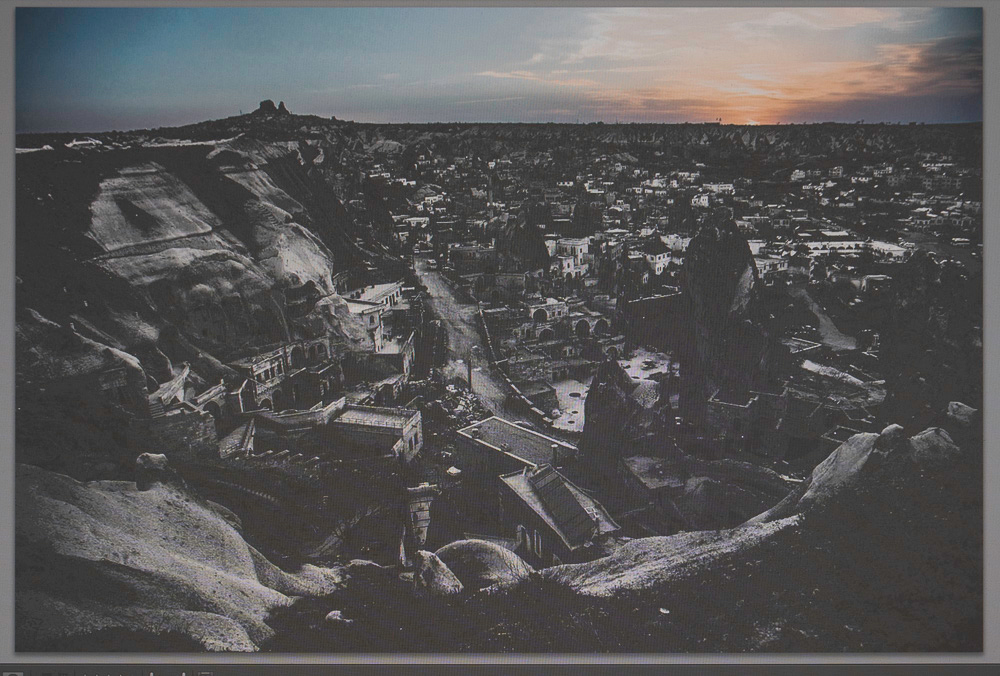
The importance of this came home to me yet again as I was printing a set of B&W photos I made from a photoshoot in the Goreme region of Turkey. For this set of photos, in particular, it was truly important that the prints have exactly the tonality on paper that appeared under softproof when I completed the image adjustments as they looked on the display. I provide several samples here so you can appreciate what I mean (figures 1, 2, and 3).


In each of these photos, the adjustments and reproduction of tonality are demanding, in order to preserve highlight detail, shadows with the desired amount of detail, and midtones with good modeling of forms and correct rendition of tonal gradations, especially skies. To achieve this, a properly calibrated and profiled display is essential.
The viewing of photographs is subjective and context-specific, depending on our visual perception, the ambient light surrounding our photo editing environment and the viewing light reflected from the prints. The greater the extent to which display calibration and profiling can be managed to take these factors into account, the more consistent will be the perception of the photograph between monitor and print. This is where basICColor display 6 software excels, particularly with the new Pro features.
In assessing the quality of a display profile, we’re looking at two separate but related factors: (i) how accurately does the display render the reference values in the image file, and (ii) how good is the perceptual consistency of the same image between say two different displays or one display and a print. The first is amenable to numerical analysis, the latter is subjective, and perhaps more important.
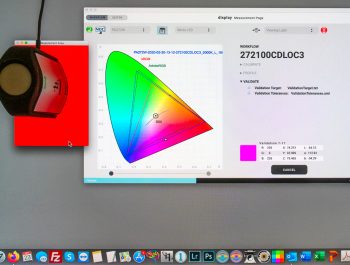
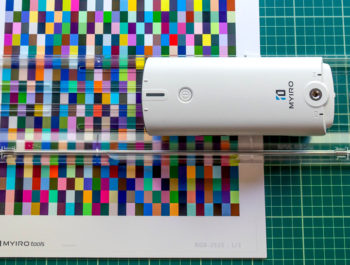
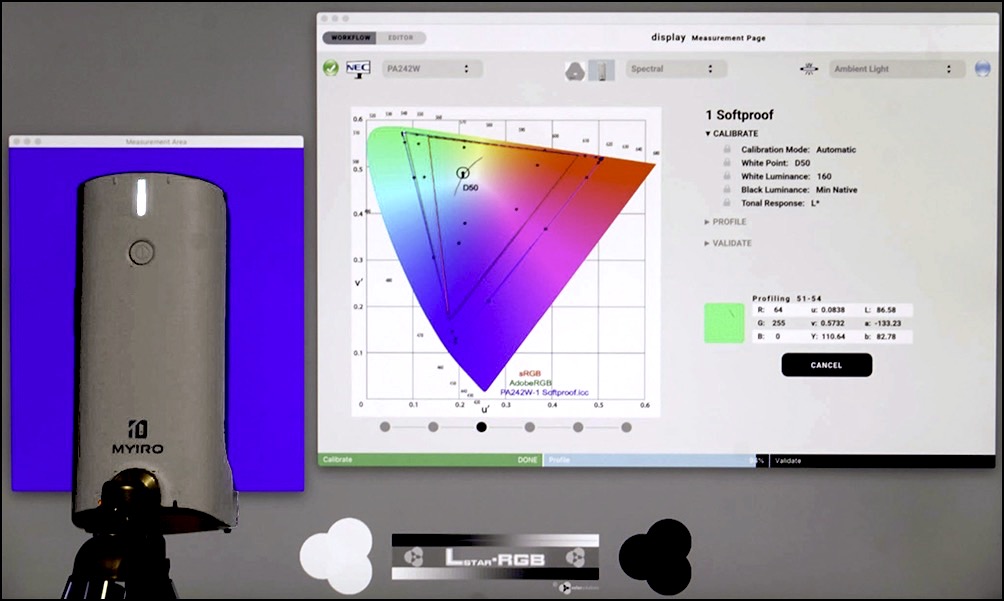
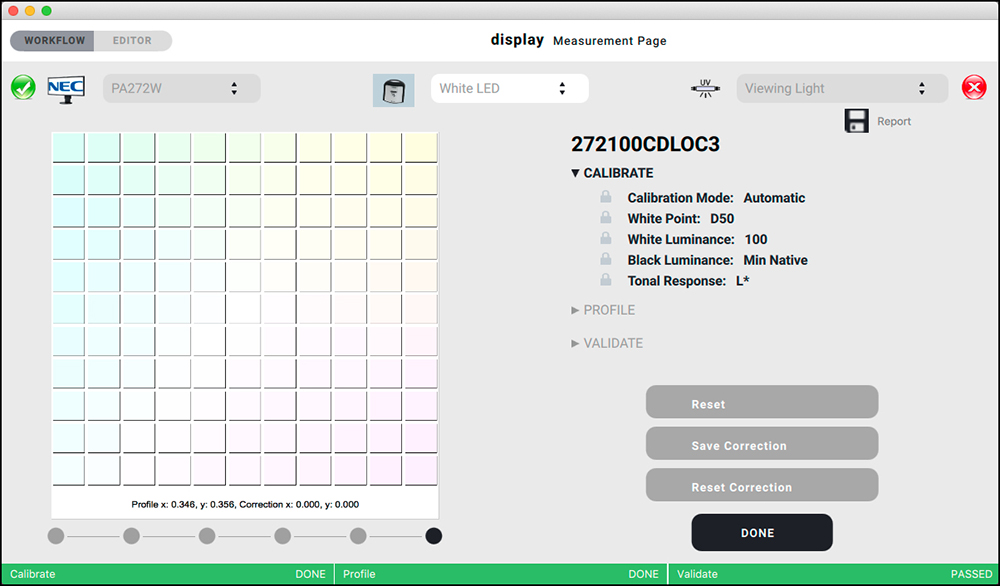
Let us begin with accuracy – the first new feature in basICColor display 6 I’ll cover is support for the MYIRO-1 spectrophotometer to perform the calibration and create the profile. Readers may recall that I reviewed the MYIRO-1 on this website last September and Christopher Campbell wrote a concluding section of that review covering the use of the MYIRO-1 and the previous version of basICColor display 6. I would simply re-iterate here that the most recent release of display 6 used with the MYIRO-1 produces profiles that validate to a high level of accuracy, as attested from the new profile I created wih the MYIRO-1 and basICColor display 6 Pro for my NEC PA272W display (Figure 4).
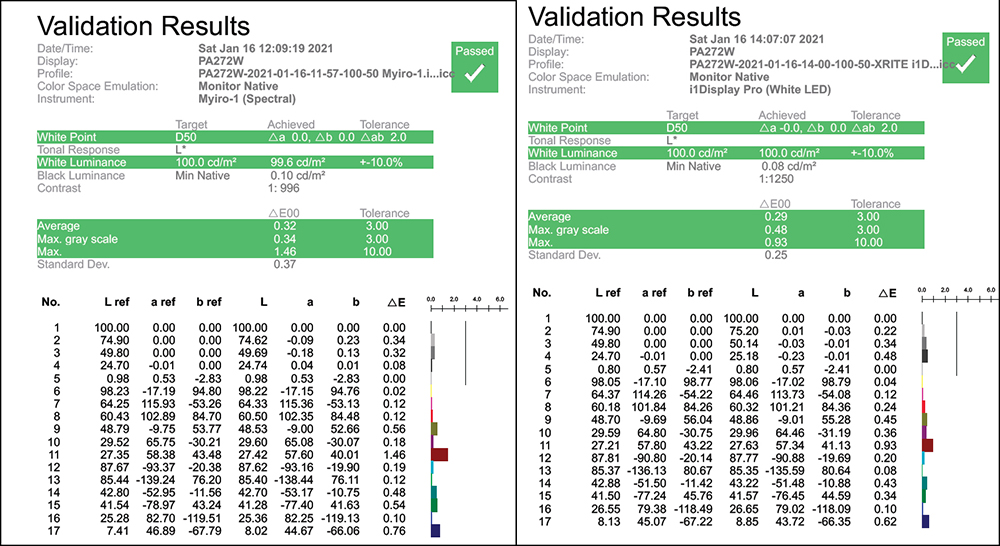
basICColor display 6 provides a well-detailed validation report with every profiling, which is important for understanding whether the process of calibration and profiling has been successful. Not all necessarily are, and when they are not, provided the monitor is amenable to profiling within tolerances, one can repeat the exercise, if necessary, adjusting calibration parameters, until the application returns a satisfactory result – according to the criteria for Pass/Fail specified in the report itself.
The Figure 4 (left panel) report for the PA272W display shows that with MYIRO-1 spectrophotometer, the White Point and Luminance are extremely close to their target values, and for the colour patches, the average dE(00) was only 0.32, the maximum deviation being 1.46 for patch 11. While this result is to be considered excellent, I repeated the profiling this time using the X-Rite i1Display Pro, a colorimeter and the result was ever so slightly better (Figure 4 right panel). The difference of a displayed image between these profiles would be inapparent to a user of this display.
So, the upshot of this discussion boils down to two straightforward propositions:
(1) This application is capable of producing highly satisfactory display profiles regardless of whether one uses a MYIRO-1 spectrophotometer or an i1Display Pro colorimeter.
(2) The MYIRO-1 is too expensive to purchase for this purpose alone. It’s fine if you own one for printer profiling as well – good to know that basICColor display 6 supports it for display profiling.
Instrument correlation: This is the right place to introduce the basICColor display 6 Pro features of instrument comparison and correlation. We know that these measuring instruments do not necessarily perform identically from one to the other. Service bureaux and graphic arts houses may have different displays and profiling instruments located at different work stations, and they want the consistency of output from all of them. When the devices used to achieve consistent color management from one set-up to the next are themselves inconsistent one has a problem. The Pro version of basICColor display 6 goes a long way to overcome this problem with a workflow in the application that can correlate sensors, such that to a considerable extent all supported sensors correlated to a supported reference sensor will perform more similarly than if they were not correlated.
As I have both devices here, I gave this a try between the MYIRO-1 as the reference instrument and the i1Display Pro as the instrument to be correlated with the MYIRO-1. It’s a two-step process. First one measures the extent of correlated performance using the dE(00) metric (Figure 5), then one correlates the one to the other, and basICColor display 6 Pro measures the new correlation (Figure 6).
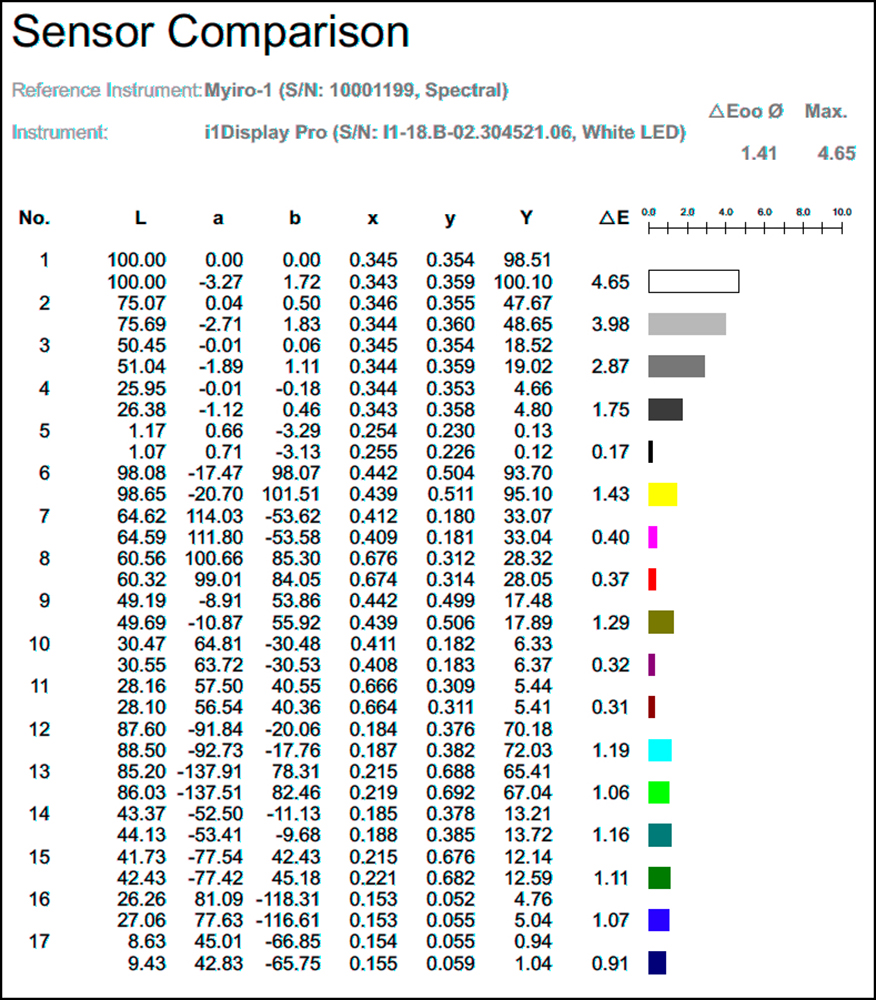

In this example, you can see that before correlation the average dE(00) between the two sensors was 1.41, and the maximum disconnect was 4.65. However after basICColor display 6 Pro correlated them, the average dE(00) came down to 0.17 and the maximum dE(00) was 0.31.
To be clear about the meaning here: this process produces coherence of the relative behavior between the instruments. It does not specify which is more “accurate”. The one selected as the reference instrument is presumed to be the more accurate, but this is something the user tells the application.
Display Uniformity: basICColor display 6 Pro provides for a display uniformity test. Ideally, one wants a display to produce even illumination all over the panel. The uniformity test verifies the extent to which this prevails. It takes a total of 75 guided measurements (3 measurements per location in each of 25 locations) covering most of the panel and produces a report of the display’s luminance uniformity (Figure 7).
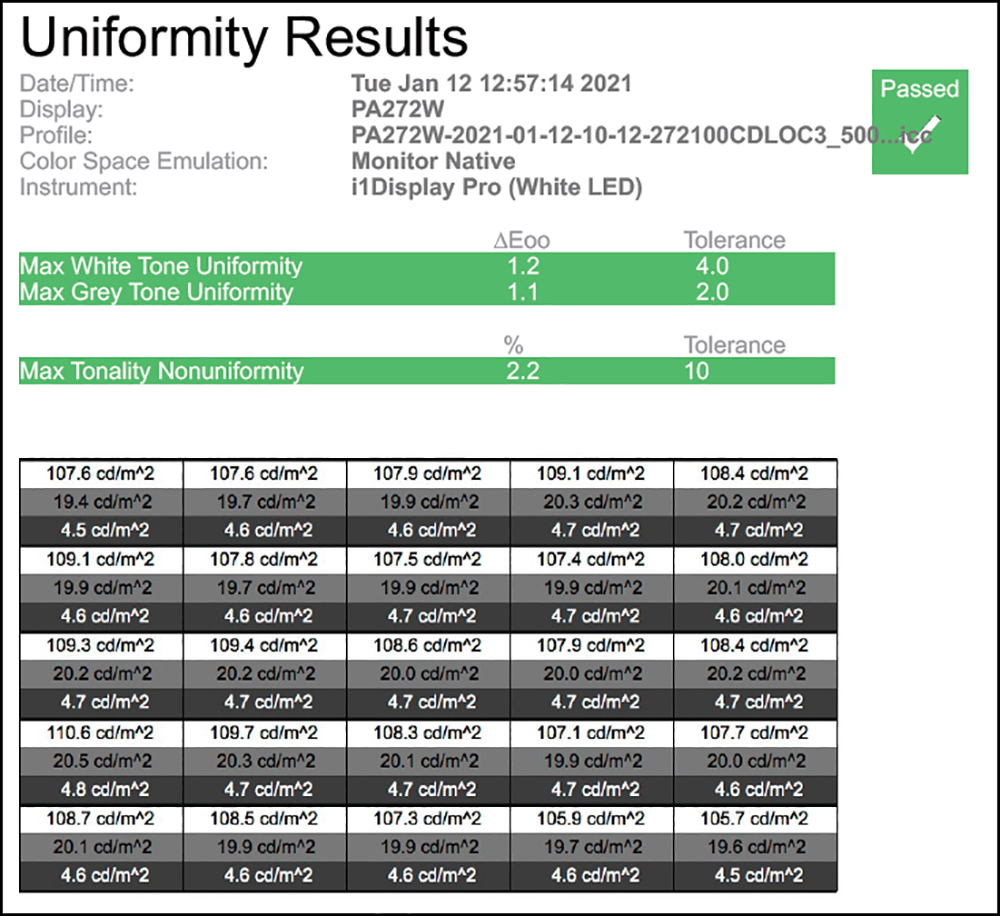
You can see from this test that my PA272W has very satisfactory uniformity. The dE(00) is only 1.2 (versus tolerance of 4.0) and the maximum tonal non-uniformity is only 2.2% (tolerance of 10%). To the extent one values uniformity (and I think one should), this is a useful test to perform just after purchasing a new display in order to verify that it is working satisfactorily, and periodically during the life of the display, because as they deteriorate, they are likely to do so unevenly. Therefore, this test would indicate when to start thinking about a new display (if you really want to know!).
Emulation: This Pro feature is most helpful for people whose image editing applications lack soft-proofing capability, or who just want the convenience of quick soft-proofing without the need to trigger profile simulations from within the image editor. Emulation allows one to flip back and forth between a regular monitor profile and an emulated color space with a couple of mouse clicks, and without needing to touch anything in one’s image editing application. It has its own Workflow in basICColor display 6 Pro but drives off an existing profile.
So, just to keep order in our minds on how all this is choreographed in basICColor display, let’s review the architecture of Workflows, Memory locations, profiles, and emulations (Figure 8).
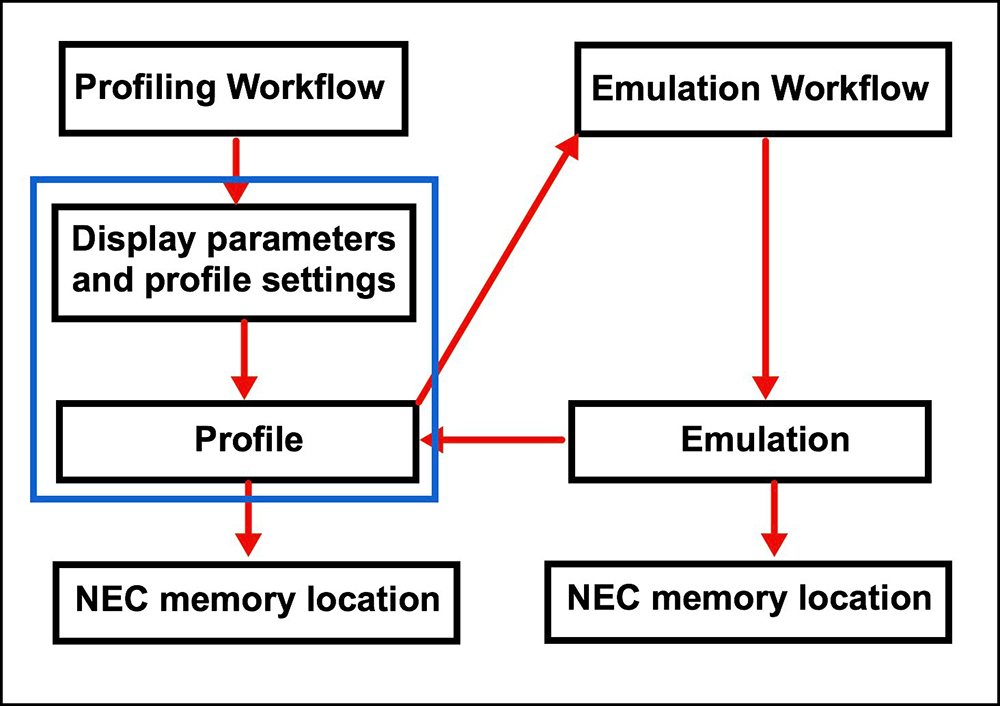
A workflow consists of all the display parameters, profile settings, and a display profile incorporating those conditions (blue frame in Figure 8, left); if using NEC or Eizo displays, that package of settings and the associated profile goes into a user-specified monitor memory location. The Emulation (Figure 8, right side) is a separate Workflow that drives off of the currently active display profile but goes into its own memory location. Once an emulation is activated, the display becomes a soft proof of the image as it would be seen in the conditions being emulated. basICColor display 6 includes a bunch of canned profiles (e.g. SWOP, GRACOL, FOGRA, Newsprint, etc.) that can be simulated.
Newsprint shows the effect of emulation most dramatically (Figures 9 and 10).
The idea here is that if this image were destined for reproduction in a newspaper having image reproduction qualities that are this poor, we would make adjustments of brightness, contrast and saturation to improve it as feasible under these conditions. You could see this feature of basICColor display 6 Pro being particularly handy for soft proofing photos destined for offset book production.
White Point Adjustment: In a multi-display environment where the various display whites look different because of sensor or observer metamerism notwithstanding the inputting of identical calibration values, basICColor display 6 Pro provides for independent adjustment of white point appearance in movements of 0.005 x or y values in the xy colour model (Figure 11 matrix).
basICColor recommends have a suitable image open on the monitors being adjusted in this manner so that the user can directly see the impact of the adjustments on real photographs.
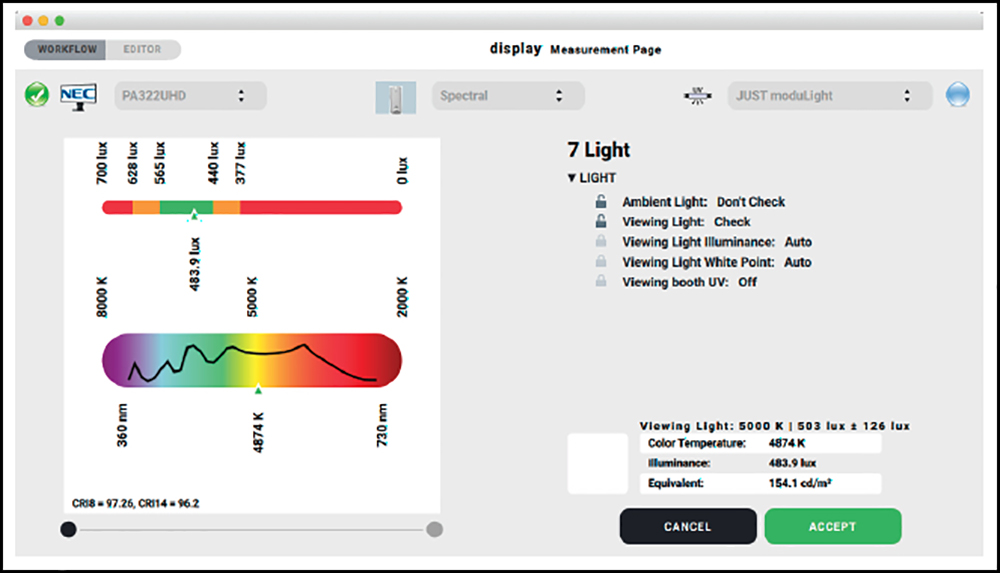
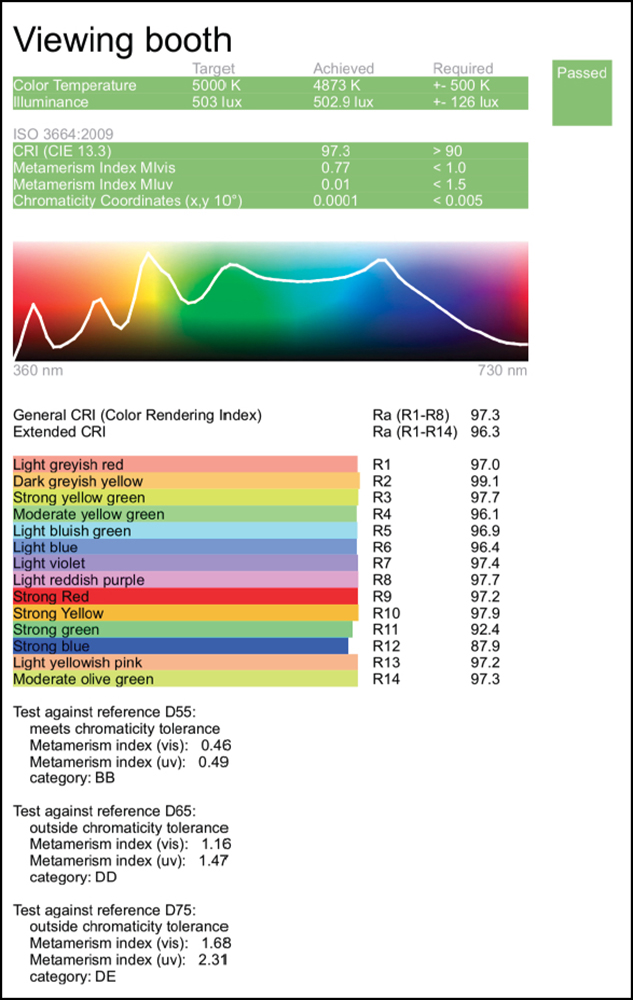
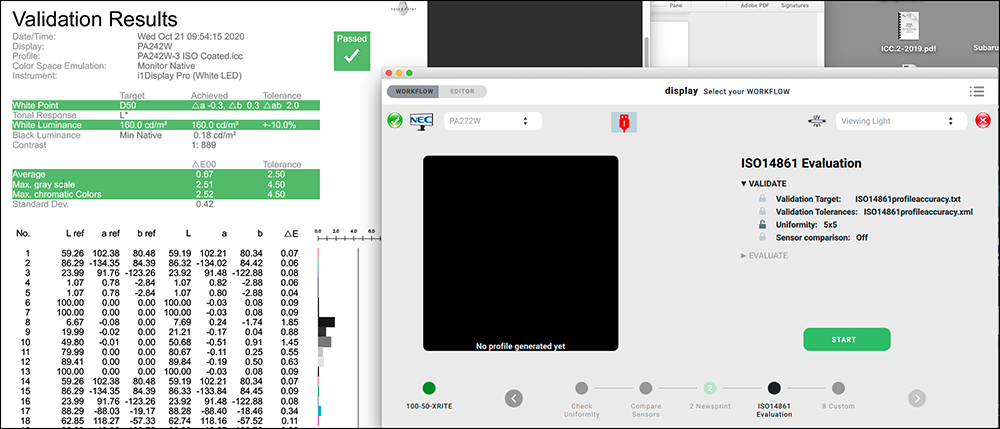
Print Viewing Light Measurement: In a profiling workflow using basICColor display 6 Pro, the user has the option of setting a measured value for the print viewing light environment, provided the instrument has an ambient light measurement disc that can be fitted in front of the sensor for measuring the value of the lighting. One does the ambient/viewing light measurement in a separate workflow, saves the result (Figure 12) and then inputs it as a parameter in the profiling workflow. This step fine-tunes the display profile to better match the viewing light environment, partly overcoming the disconnect between transmitted display luminance and the light that will reflect off the prints. basICColor display 6 Pro also supports calibration of certain print viewing booth models that allow for this and provides a reporting of the CRI values for 14 colours (Figure 13).
DICOM: This Pro feature will be of interest to those needing to calibrate and check monitors for compliance with the DICOM standard used in medical imaging. It will check for JND (Just Noticeable Differences) relative to the standard for the gray axis (Figure 14). basICColor display 6 Pro can calibrate the monitor to DICOM standard in order to trigger
the correct Tonal Response curve (by setting the Tonal Response in the Calibrate tab to DICOM); it will perform a DICOM compliance evaluation and do the DICOM specific uniformity check.

Compliance with ISO 14861: This workflow runs 318 patches and takes about half an hour to verify display profiles for compliance with ISO Standard 14861. This standard is used in the graphic arts to set standard conditions for soft proofing. To quote from the introduction to the ISO specification of the standard:
“The use of images displayed on a color monitor is increasingly being used in the graphic arts industry for color evaluation and color acceptance (commonly referred to as “soft” proofing). This requires that the color display and its associated viewing environment be able to simulate the appearance of the final printed image viewed under standard graphic arts viewing conditions.”
This test in basICColor display 6 Pro allows the user to determine whether the display is capable of ISO 14861 compliance, which responds to one of several components in this standard (Figure 15).
Summing Up and Commercial Aspects
basICColor display 6 Pro offers quite a few high-end refinements for adjusting and testing supported displays to meet a large variety of image production requirements. Whether it is worthwhile for you to buy the higher end Pro version or the basic version is of course a personal decision that depends on needs and budget. basICColor does not have a webstore, so you cannot buy the application directly from their website. They do, however, provide a list of resellers on different continents. One of them lists the basic version at USD 85 and the Pro version at USD 315. The application download does come with a manual. Very much in line with the quality of manuals from a number of other developers I’m familiar with, I would rate the quality of this manual at about B. But at least it exists, and the Workflow structure of the software itself makes it fairly intuitive to use. The “Pro” package is the most complete and sophisticated monitor profiling application I have seen or used.
Mark D Segal
January 2021
Toronto, ON
Mark has been making photographs for the past seven decades and started adopting a digital workflow in 1999 first with scanning film, then going fully digital in 2004. He has worked with a considerable range of software, equipment, materials and techniques over the years, accumulated substantial experience as an author, educator and communicator in several fields, was a frequent contributor to the Luminous-Landscape website and now contributes frequently with in-depth articles on the PhotoPXL website. Mark has contributed over 75 articles to the two websites up to Q1-2024, with a particular emphasis on printers and papers, given his view that a photograph printed on paper remains the epitome of fine photography, as it has been from soon after the medium was invented and started gaining momentum in the 1830s/1840s. Mark developed a particular interest in film scanning and authored the ebook “Scanning Workflows with SilverFast 8, SilverFast HDR, Adobe Photoshop Lightroom and Adobe Photoshop” (please check our Store for availability). In his “other life” (the one that pays for the photography), Mark is a retiree from the World Bank Group and was a consultant in electric power development.