10 Tips for Remarkable iPhone Photos!
Most of us today have an iPhone in our pocket or purse and that iPhone has one of the most sophisticated cameras in the history of photography.
Equipped with a little know-how, this easy-to-carry and simple-to-use camera can help you create extraordinary photographs that you’ll be proud to share with family or friends, or even hang on your wall.
Here are ten tips that will help you create memorable photos with the camera that fits in your pocket – your iPhone!
1. Use the iPhone’s Native Camera
That’s the camera app that comes with your phone. It’s so good these days that you don’t need other camera apps. It’s quick and easy to access, and it will let you attend to image composition without worrying about camera settings.
TIP
Access your camera quickly without unlocking your phone by swiping from right to left, or long-press the camera icon that appears on the screen.

2. Create in ProRAW
If you have the 12 Pro Max or later, I recommend setting the camera to create ProRAW files so you have more data to work with in post processing.
3. Tap for Focus and Exposure
Tap on the bright areas in a scene (like clouds) to expose for the brightest area, even if the darker areas of your scene look too dark. Why? If the bright areas are two bright, you will not be able to recover details in post processing. But the dark areas can almost always be brightened and details recovered in post processing. Creating in ProRAW will also help you recover details in bright and dark areas when you edit your photos later.
4. Don’t Pinch or Dial to Zoom
Avoid pinching to zoom or using the zoom dial; these zoom methods cause the camera to switch from a high quality zoom (optical zoom) to a lower quality zoom (digital zoom). Instead, “zoom with your feet” when you can and always use one of the options you have on the camera interface — 0.5x, 1x, 3x, 5x, etc. This will ensure the camera remains in optical zoom and your images will be recorded in the highest resolution.
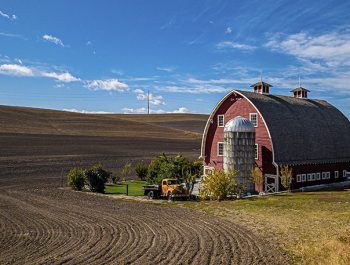
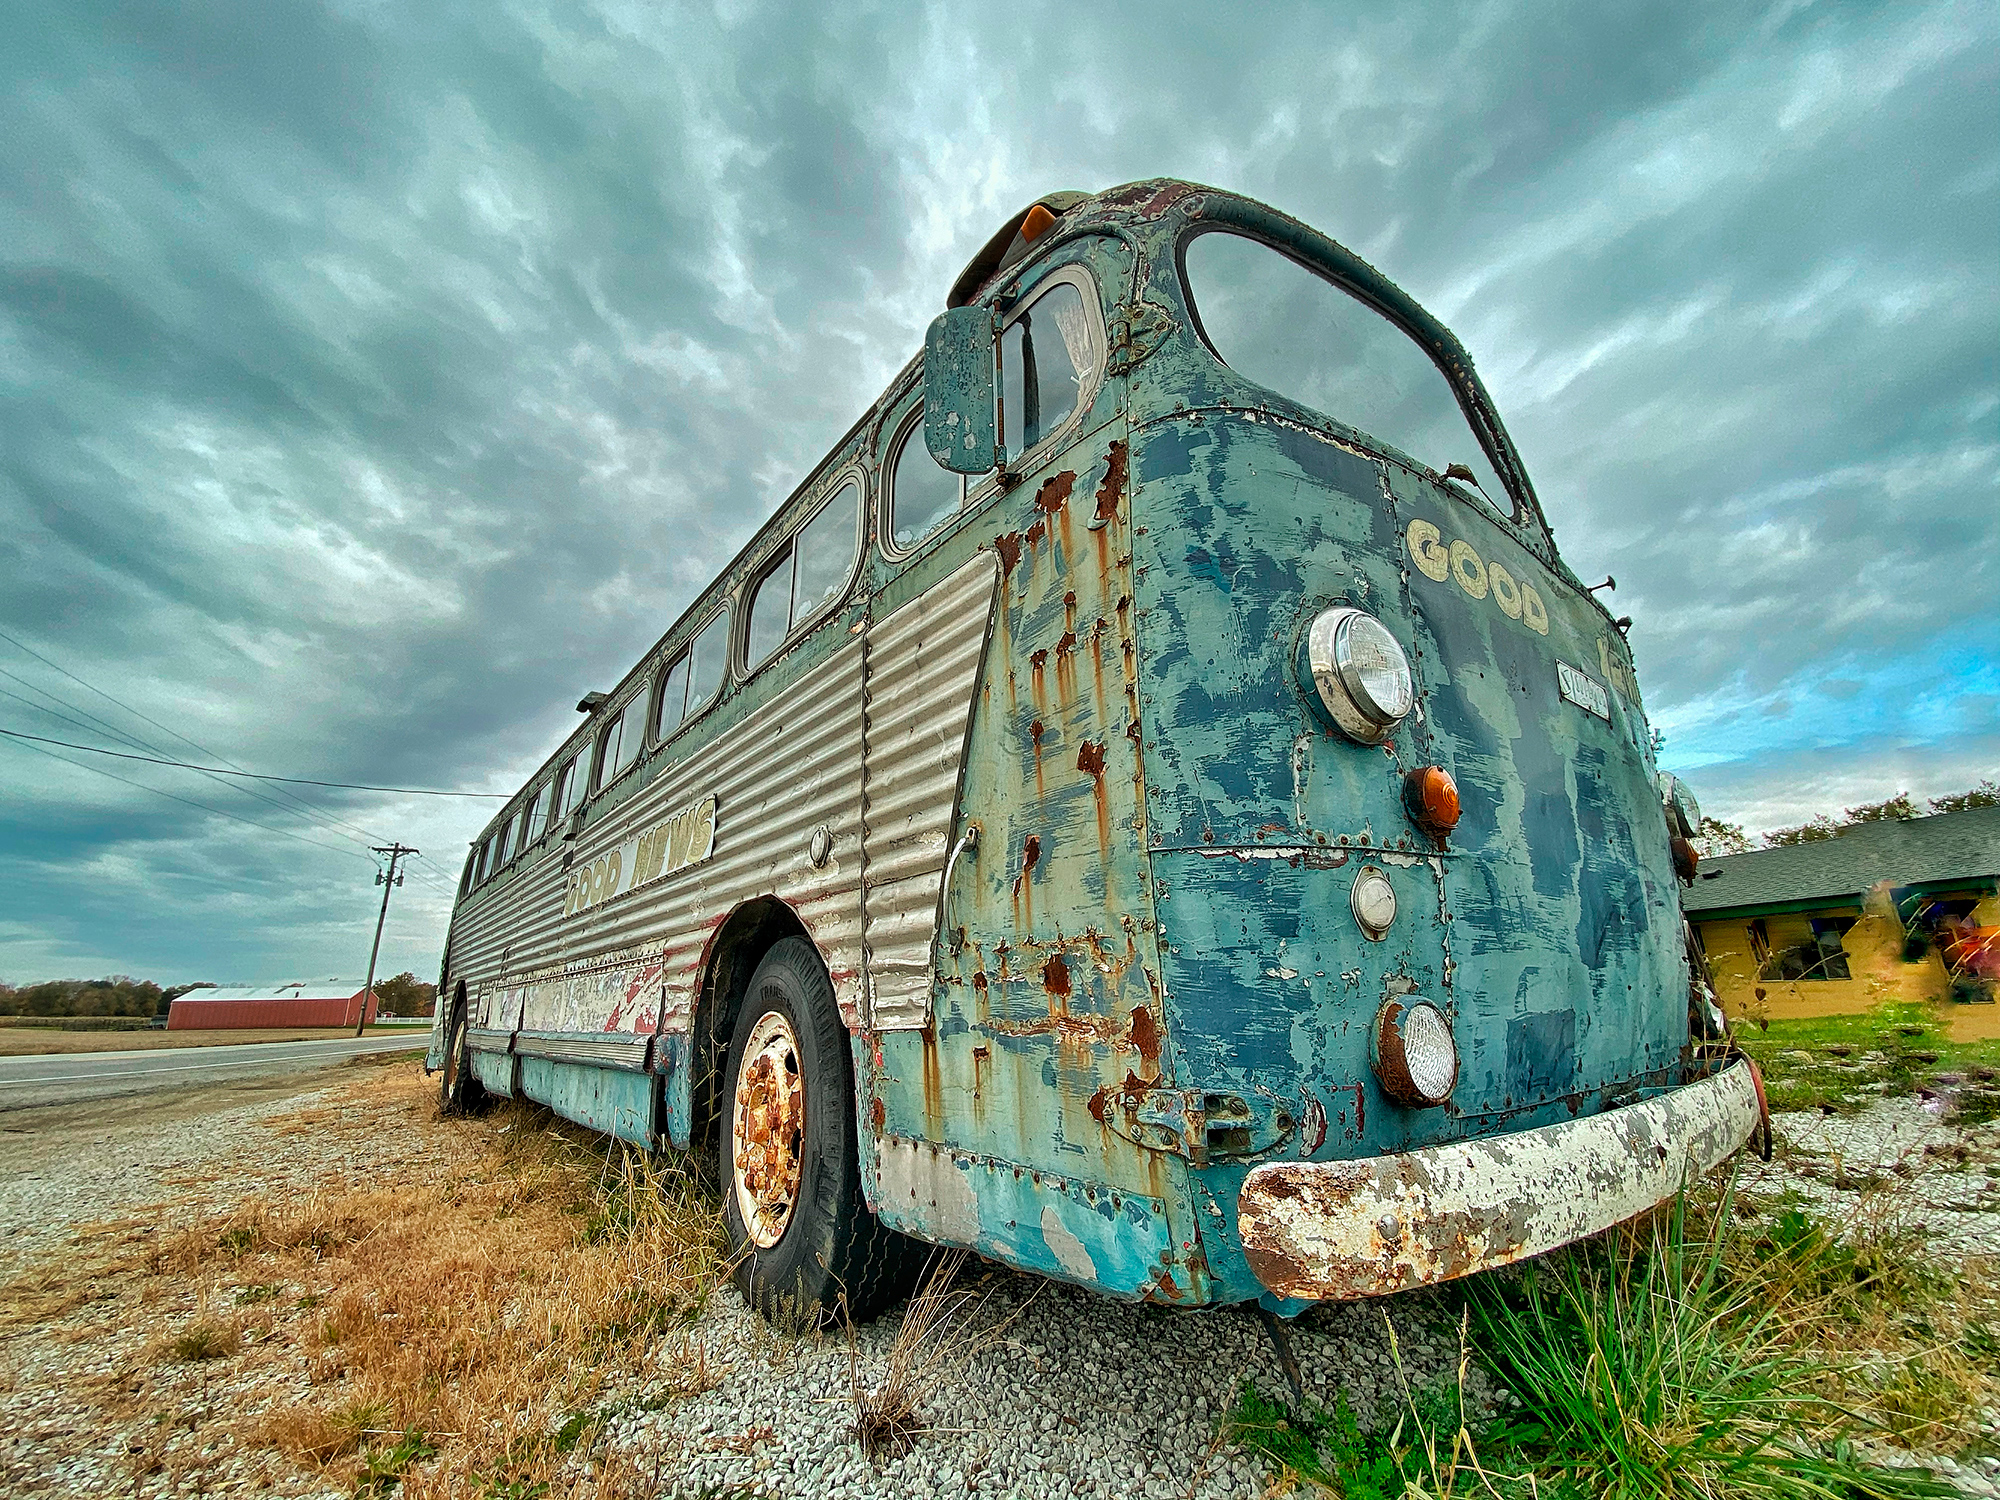
5. Take advantage of your camera’s multiple lenses.
One of the great features of our iPhone is to be able to photograph macro, ultra wide angle, and telephoto all with the touch of a button. Photograph the same scene with different lenses and you might find you prefer one look over another. I especially like the ultra-wide (0.5x, 13mm) lens effect when you get close to some subjects like this bus. It does great things with clouds, too!
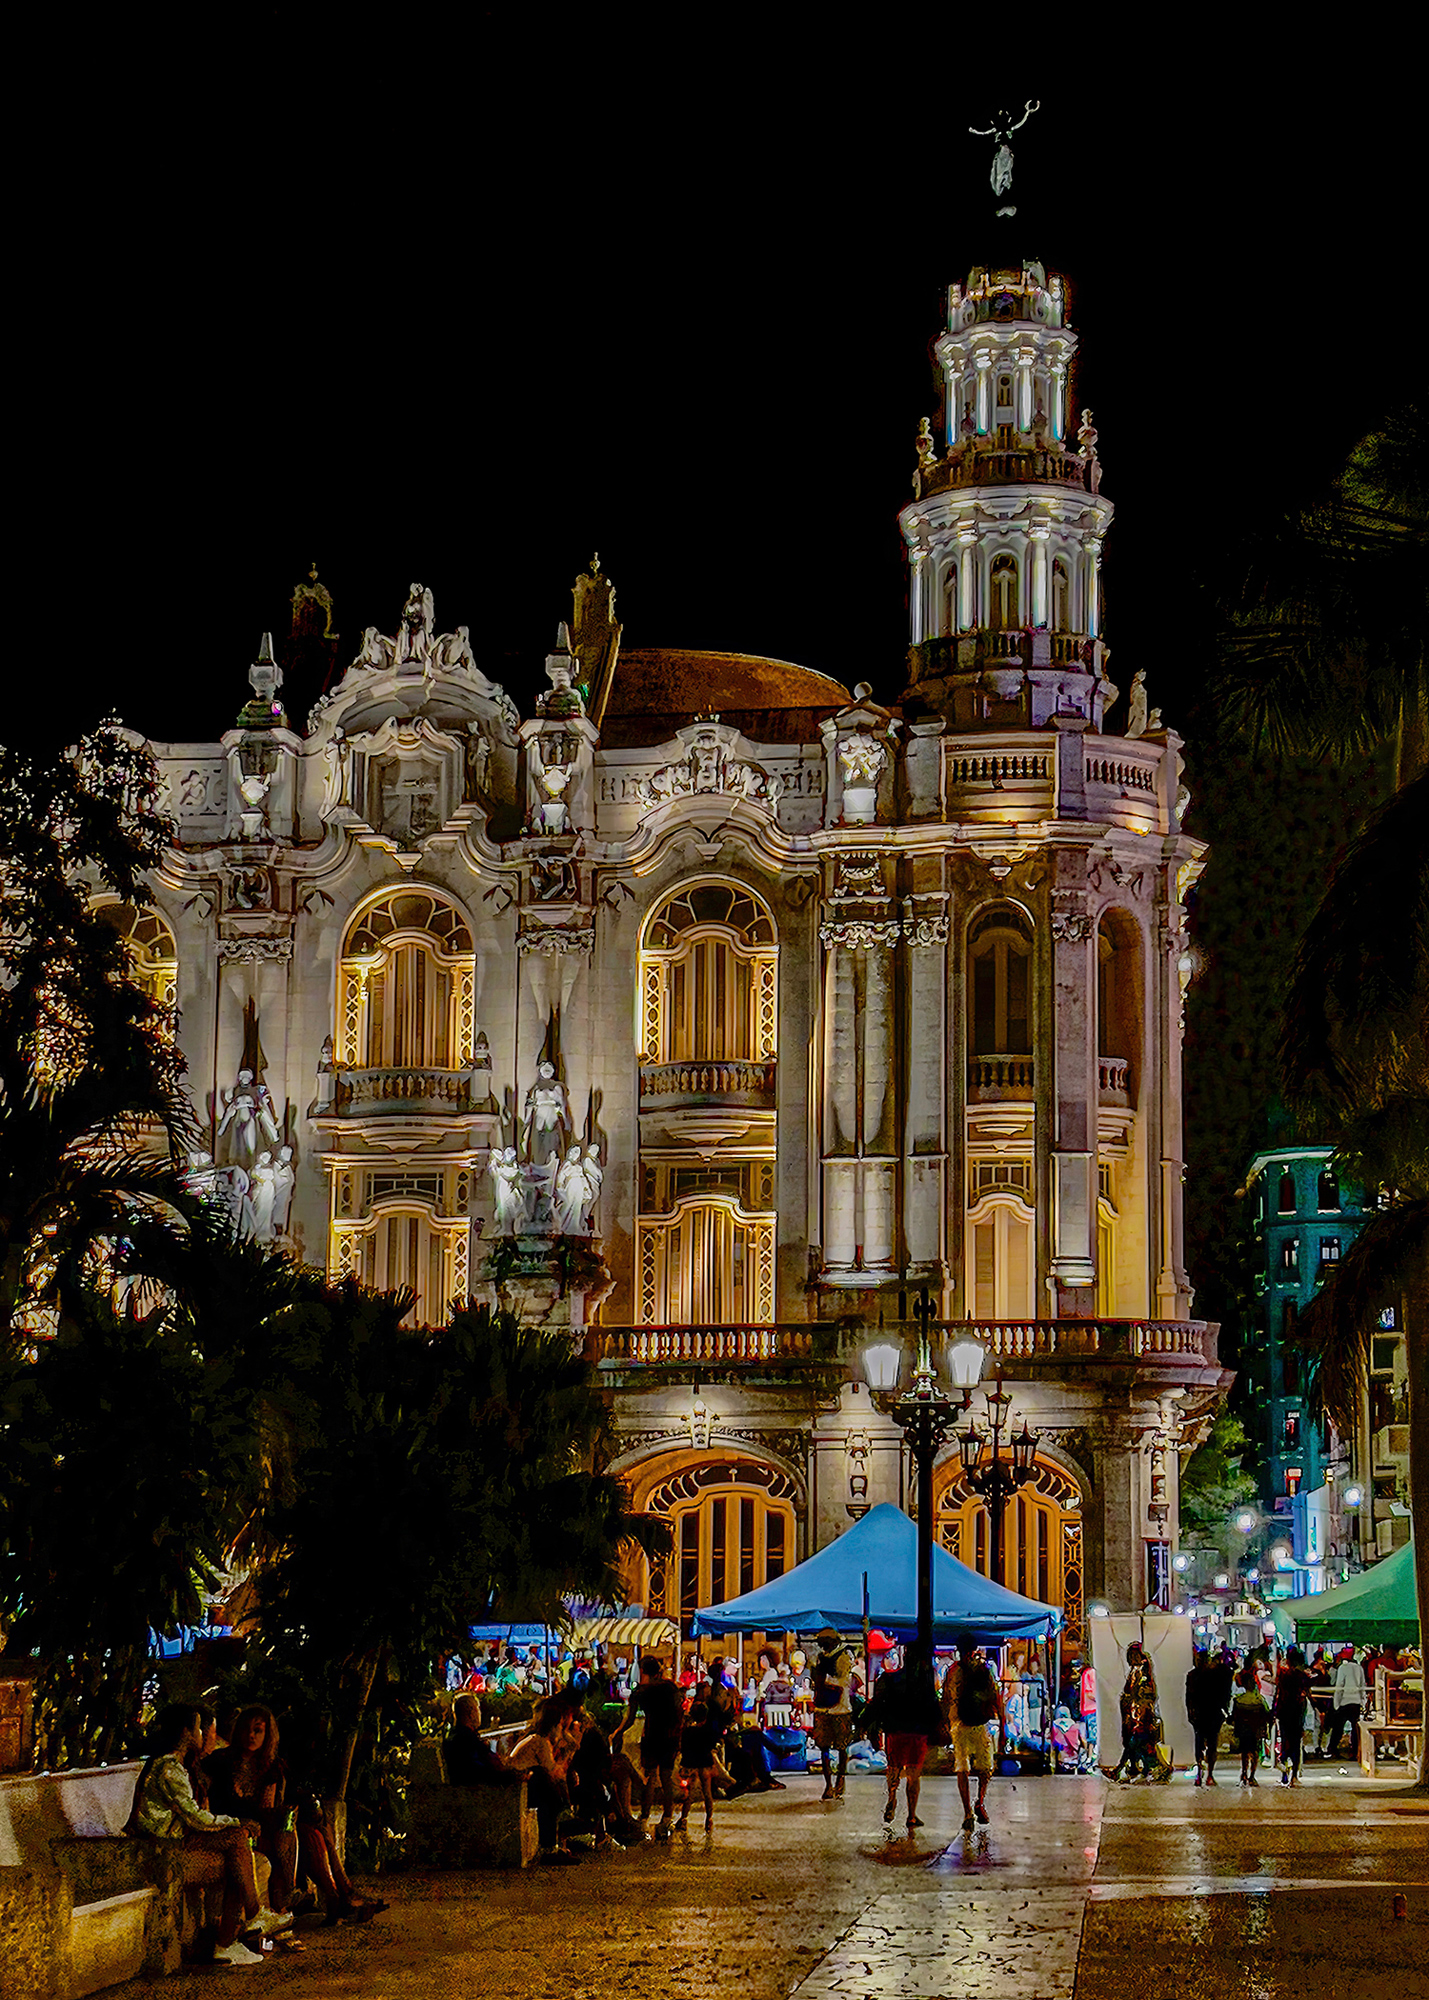
6. Take advantage of Night Mode (iPhone 11 and later).
You can handhold in Night Mode for up to 10 seconds in low light situations for great photos of cities at night or other lowlight scenes. Put your camera on a tripod and, if it’s dark enough, the camera will fire for up to 30 seconds. The image below is a street scene in Havana made handholding the iPhone 12 Pro Max.
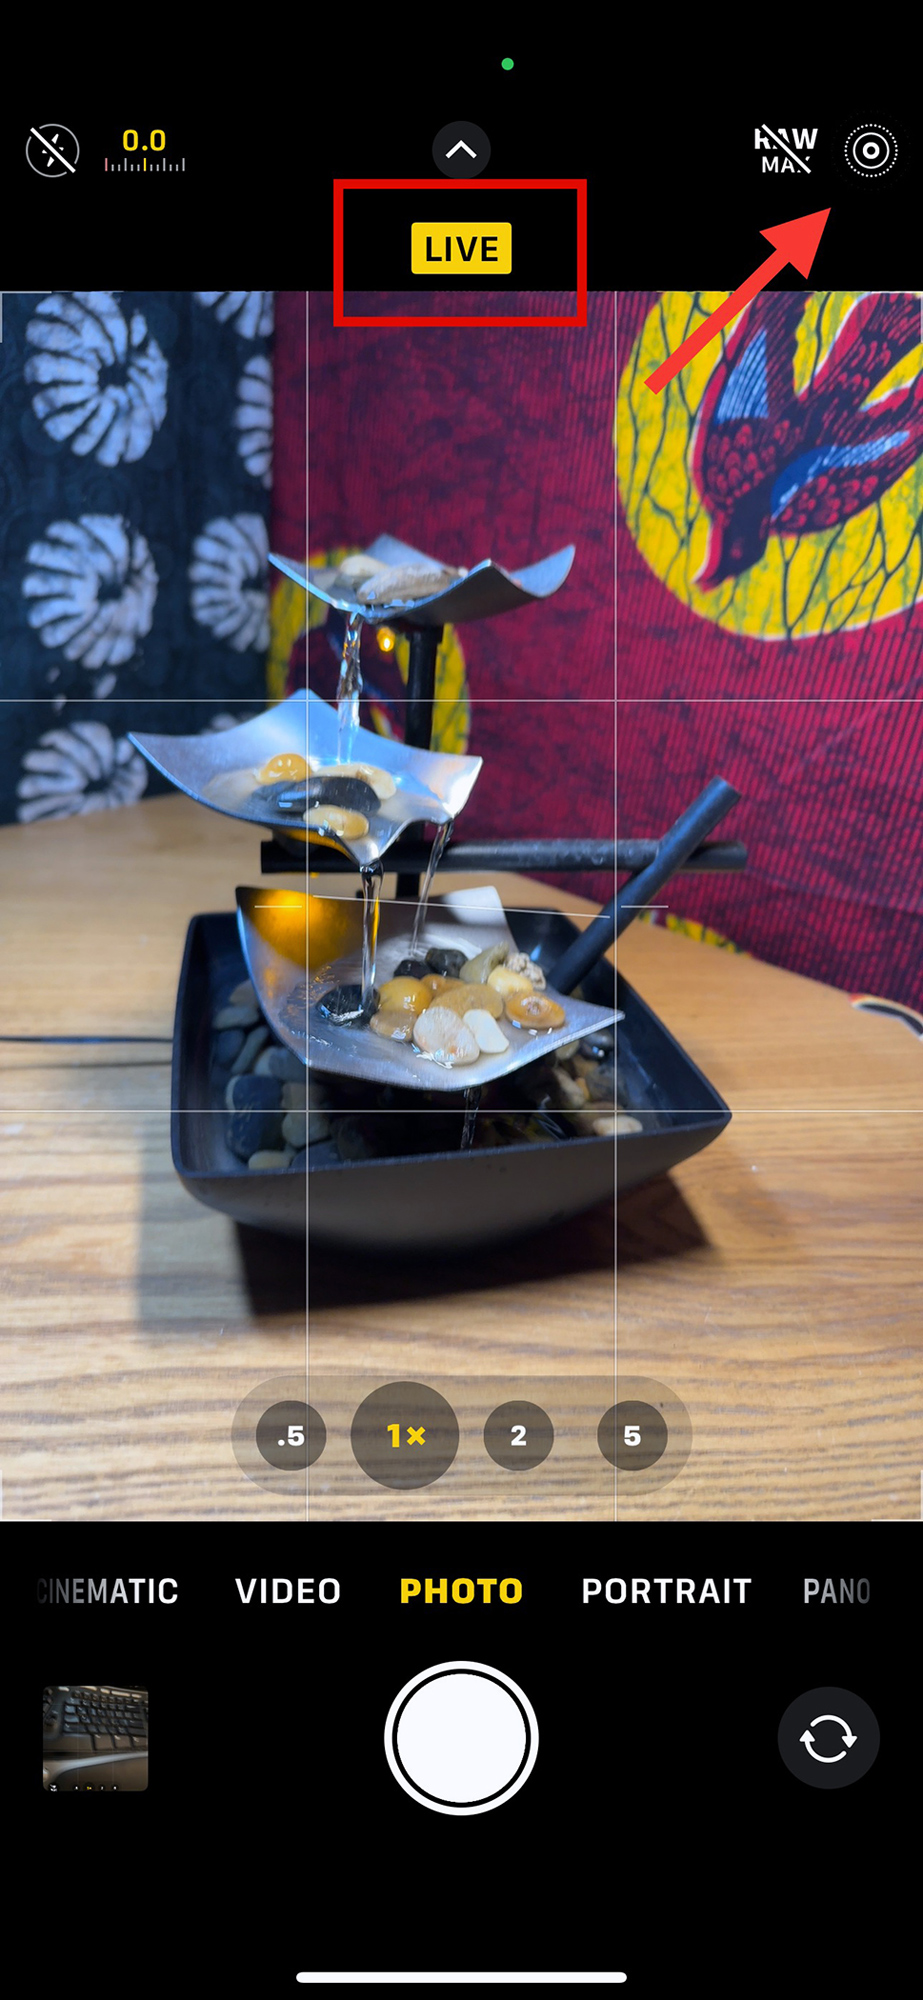
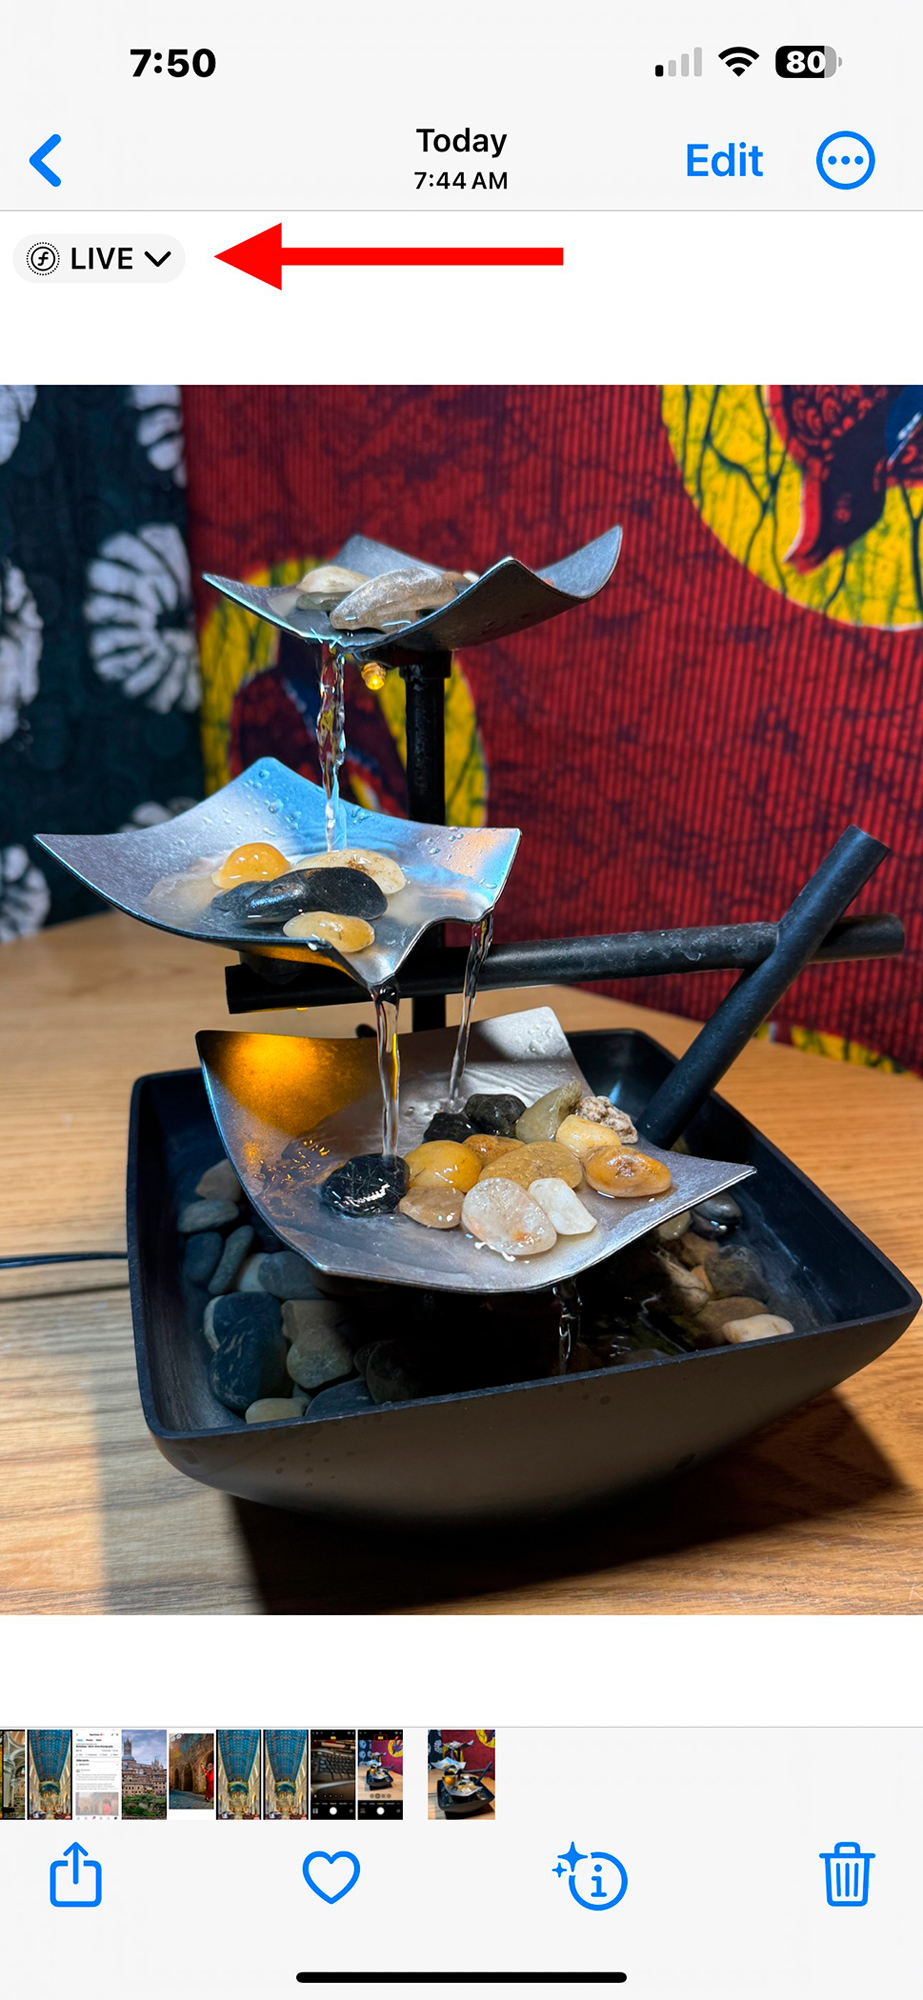
7. Use LIVE Mode for Long Exposures
For fountains or waterfalls, use LIVE mode and the Long Exposure option to create beautiful “soft water” images. You can create these photos handheld without a tripod or neutral density filters. Just be sure to turn off LIVE Mode when you’re finished with your water photo.
To turn on LIVE mode, tap the bullseye icon in the upper right of the screen as shown in the screen shot below. The word LIVE will appear briefly in yellow to indicate that LIVE mode has been activated. (I wish they left that yellow indicator on for us, but, hey, they didn’t ask me!)
Hold steady and press the shutter button and the camera will record the LIVE photo.
To transform the still image into a long exposure to show “soft water,” open the image in the camera roll and you’ll notice that it is labeled as a LIVE photo.
Tap on LIVE and then Long Exposure in the menu that appears.
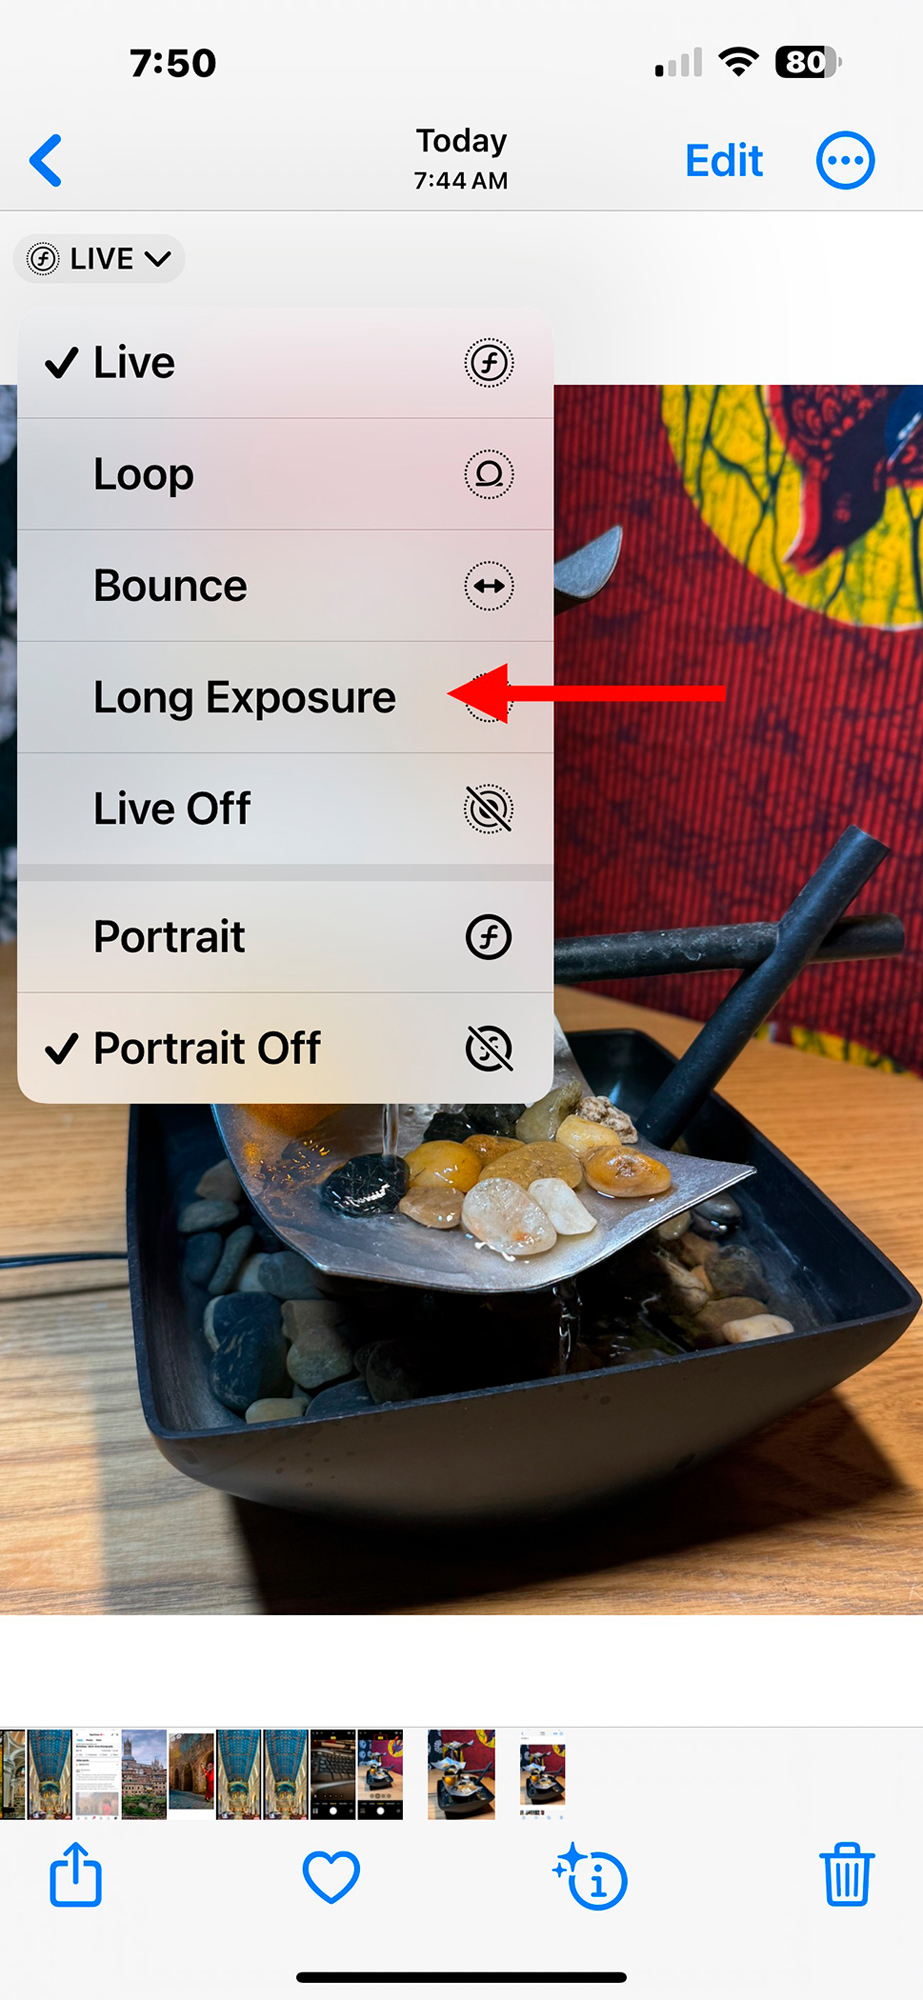
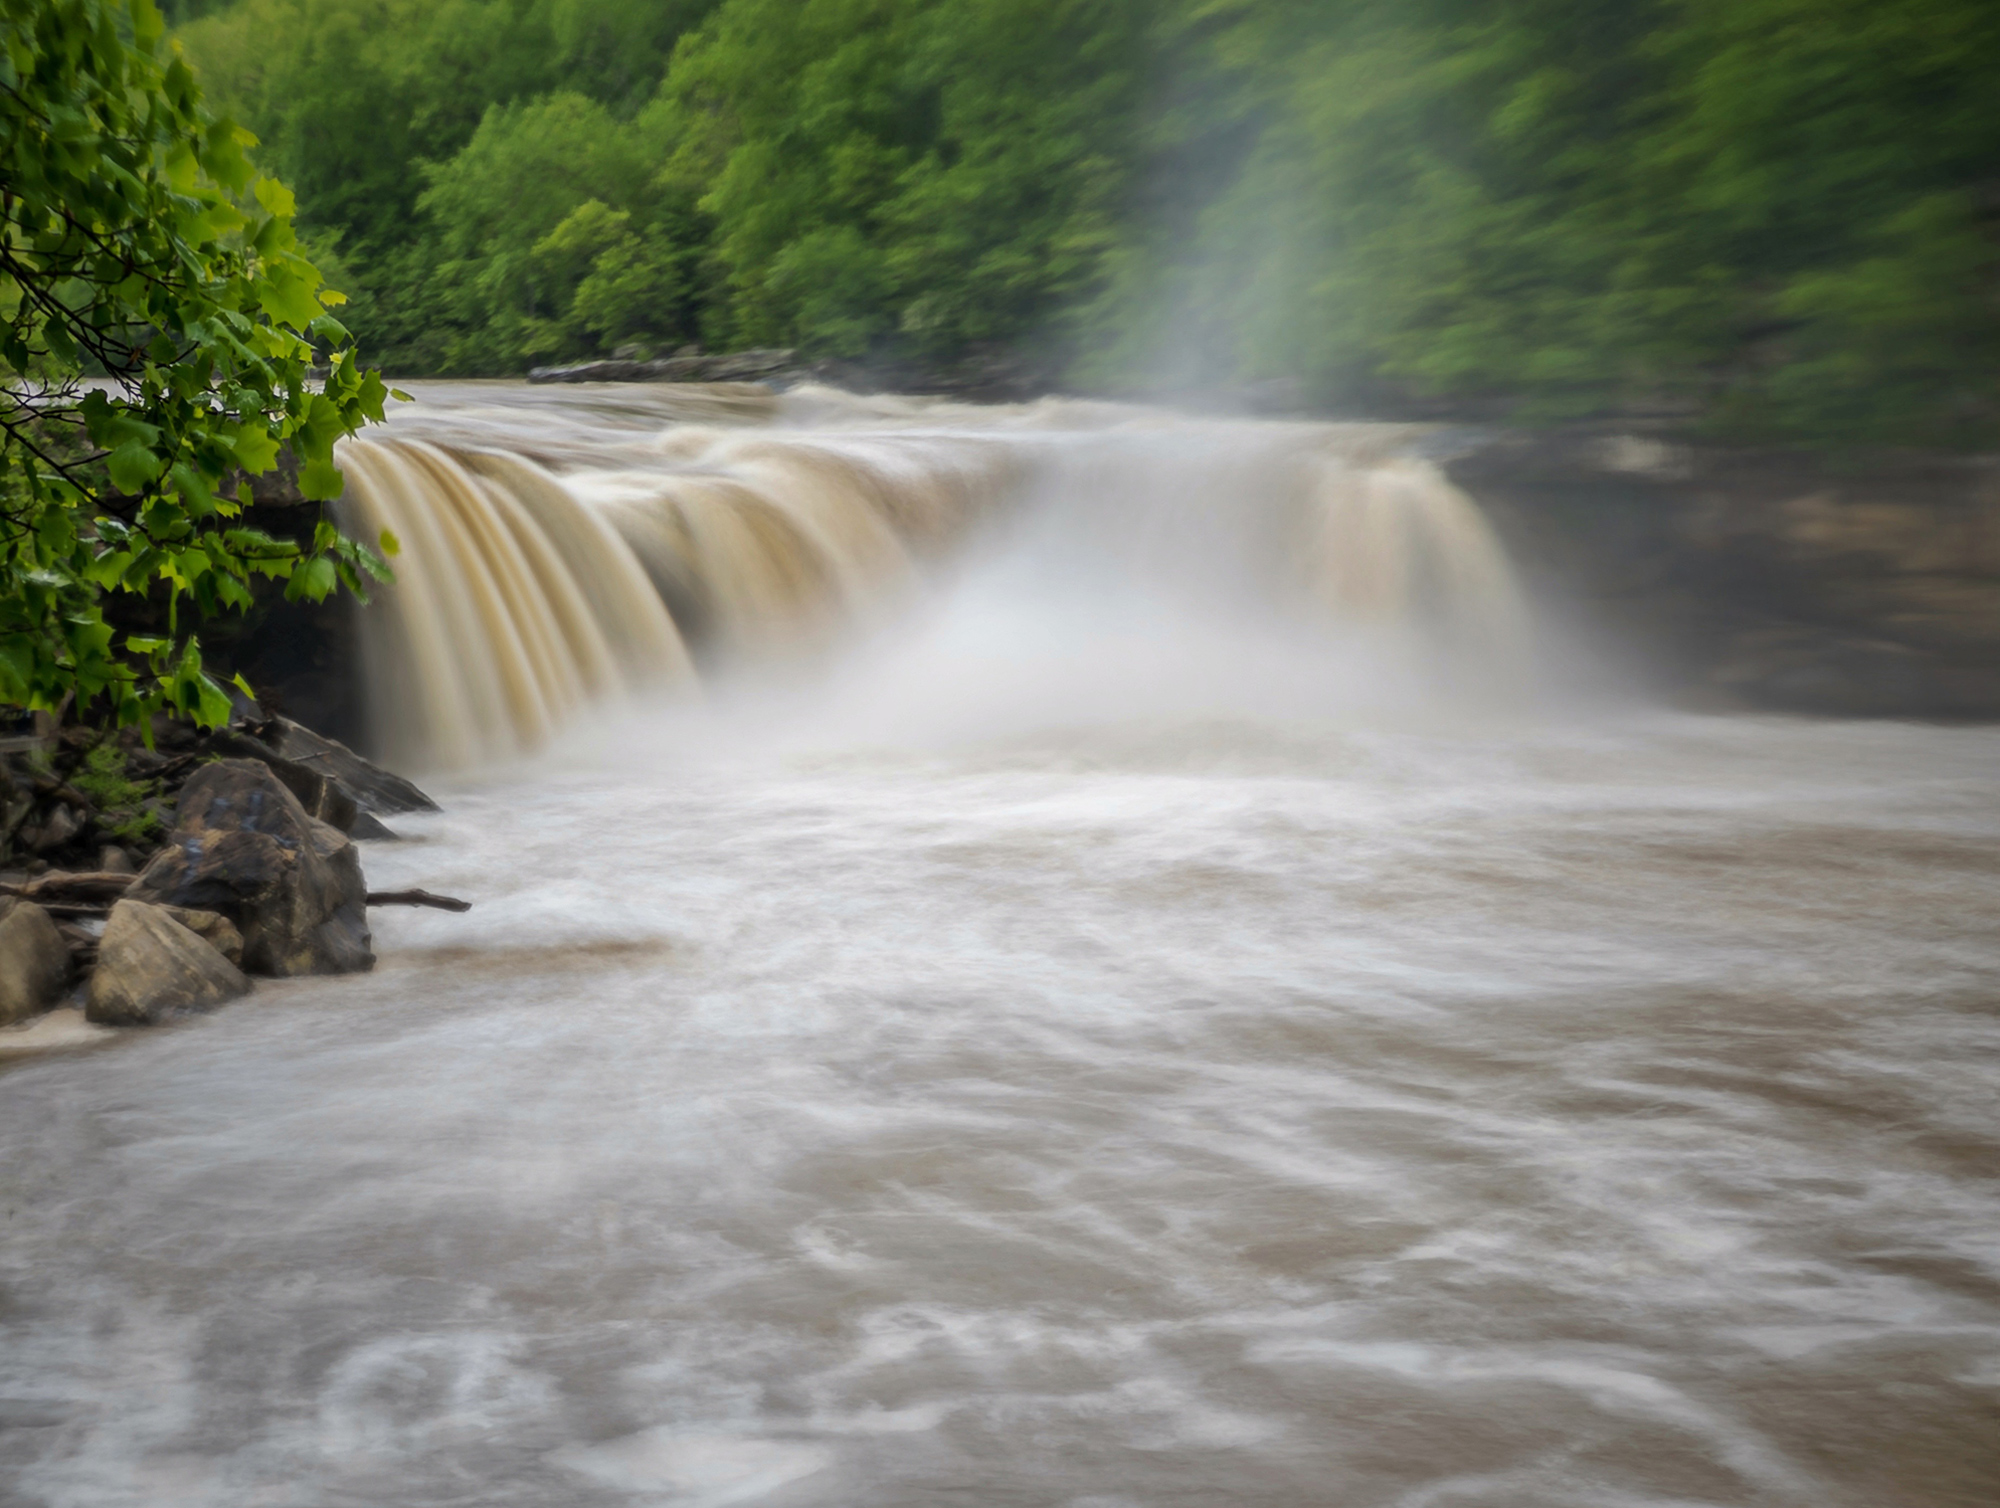
After selecting Long Exposure, anything in the image that is moving will be blurred, while other parts of the image remain sharp, like the image below of Cumberland Falls in Kentucky.
8. Take advantage of Portrait Mode to create photos with a shallow depth of field.
This allows your subject to be in sharp focus while the foreground and background are blurred. This is great for photos of people or pets, but also can be used on any subject you want to isolate and have a soft blurred background.

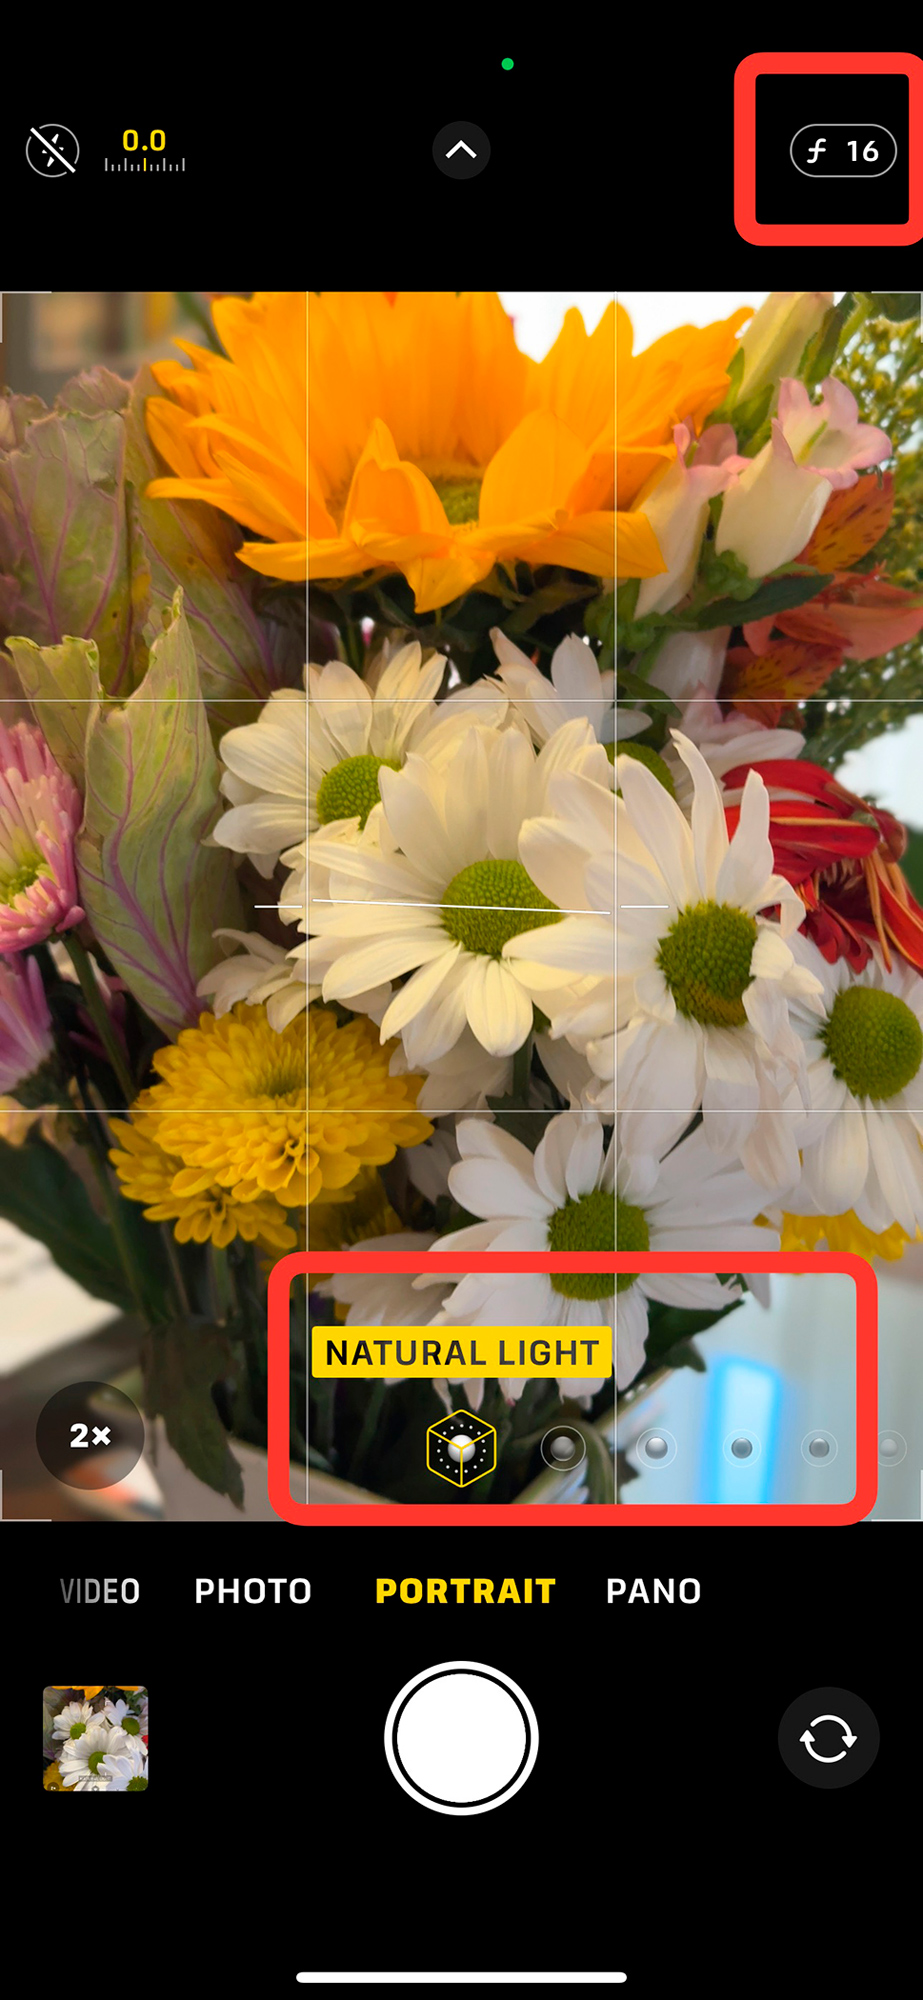
TIP 1
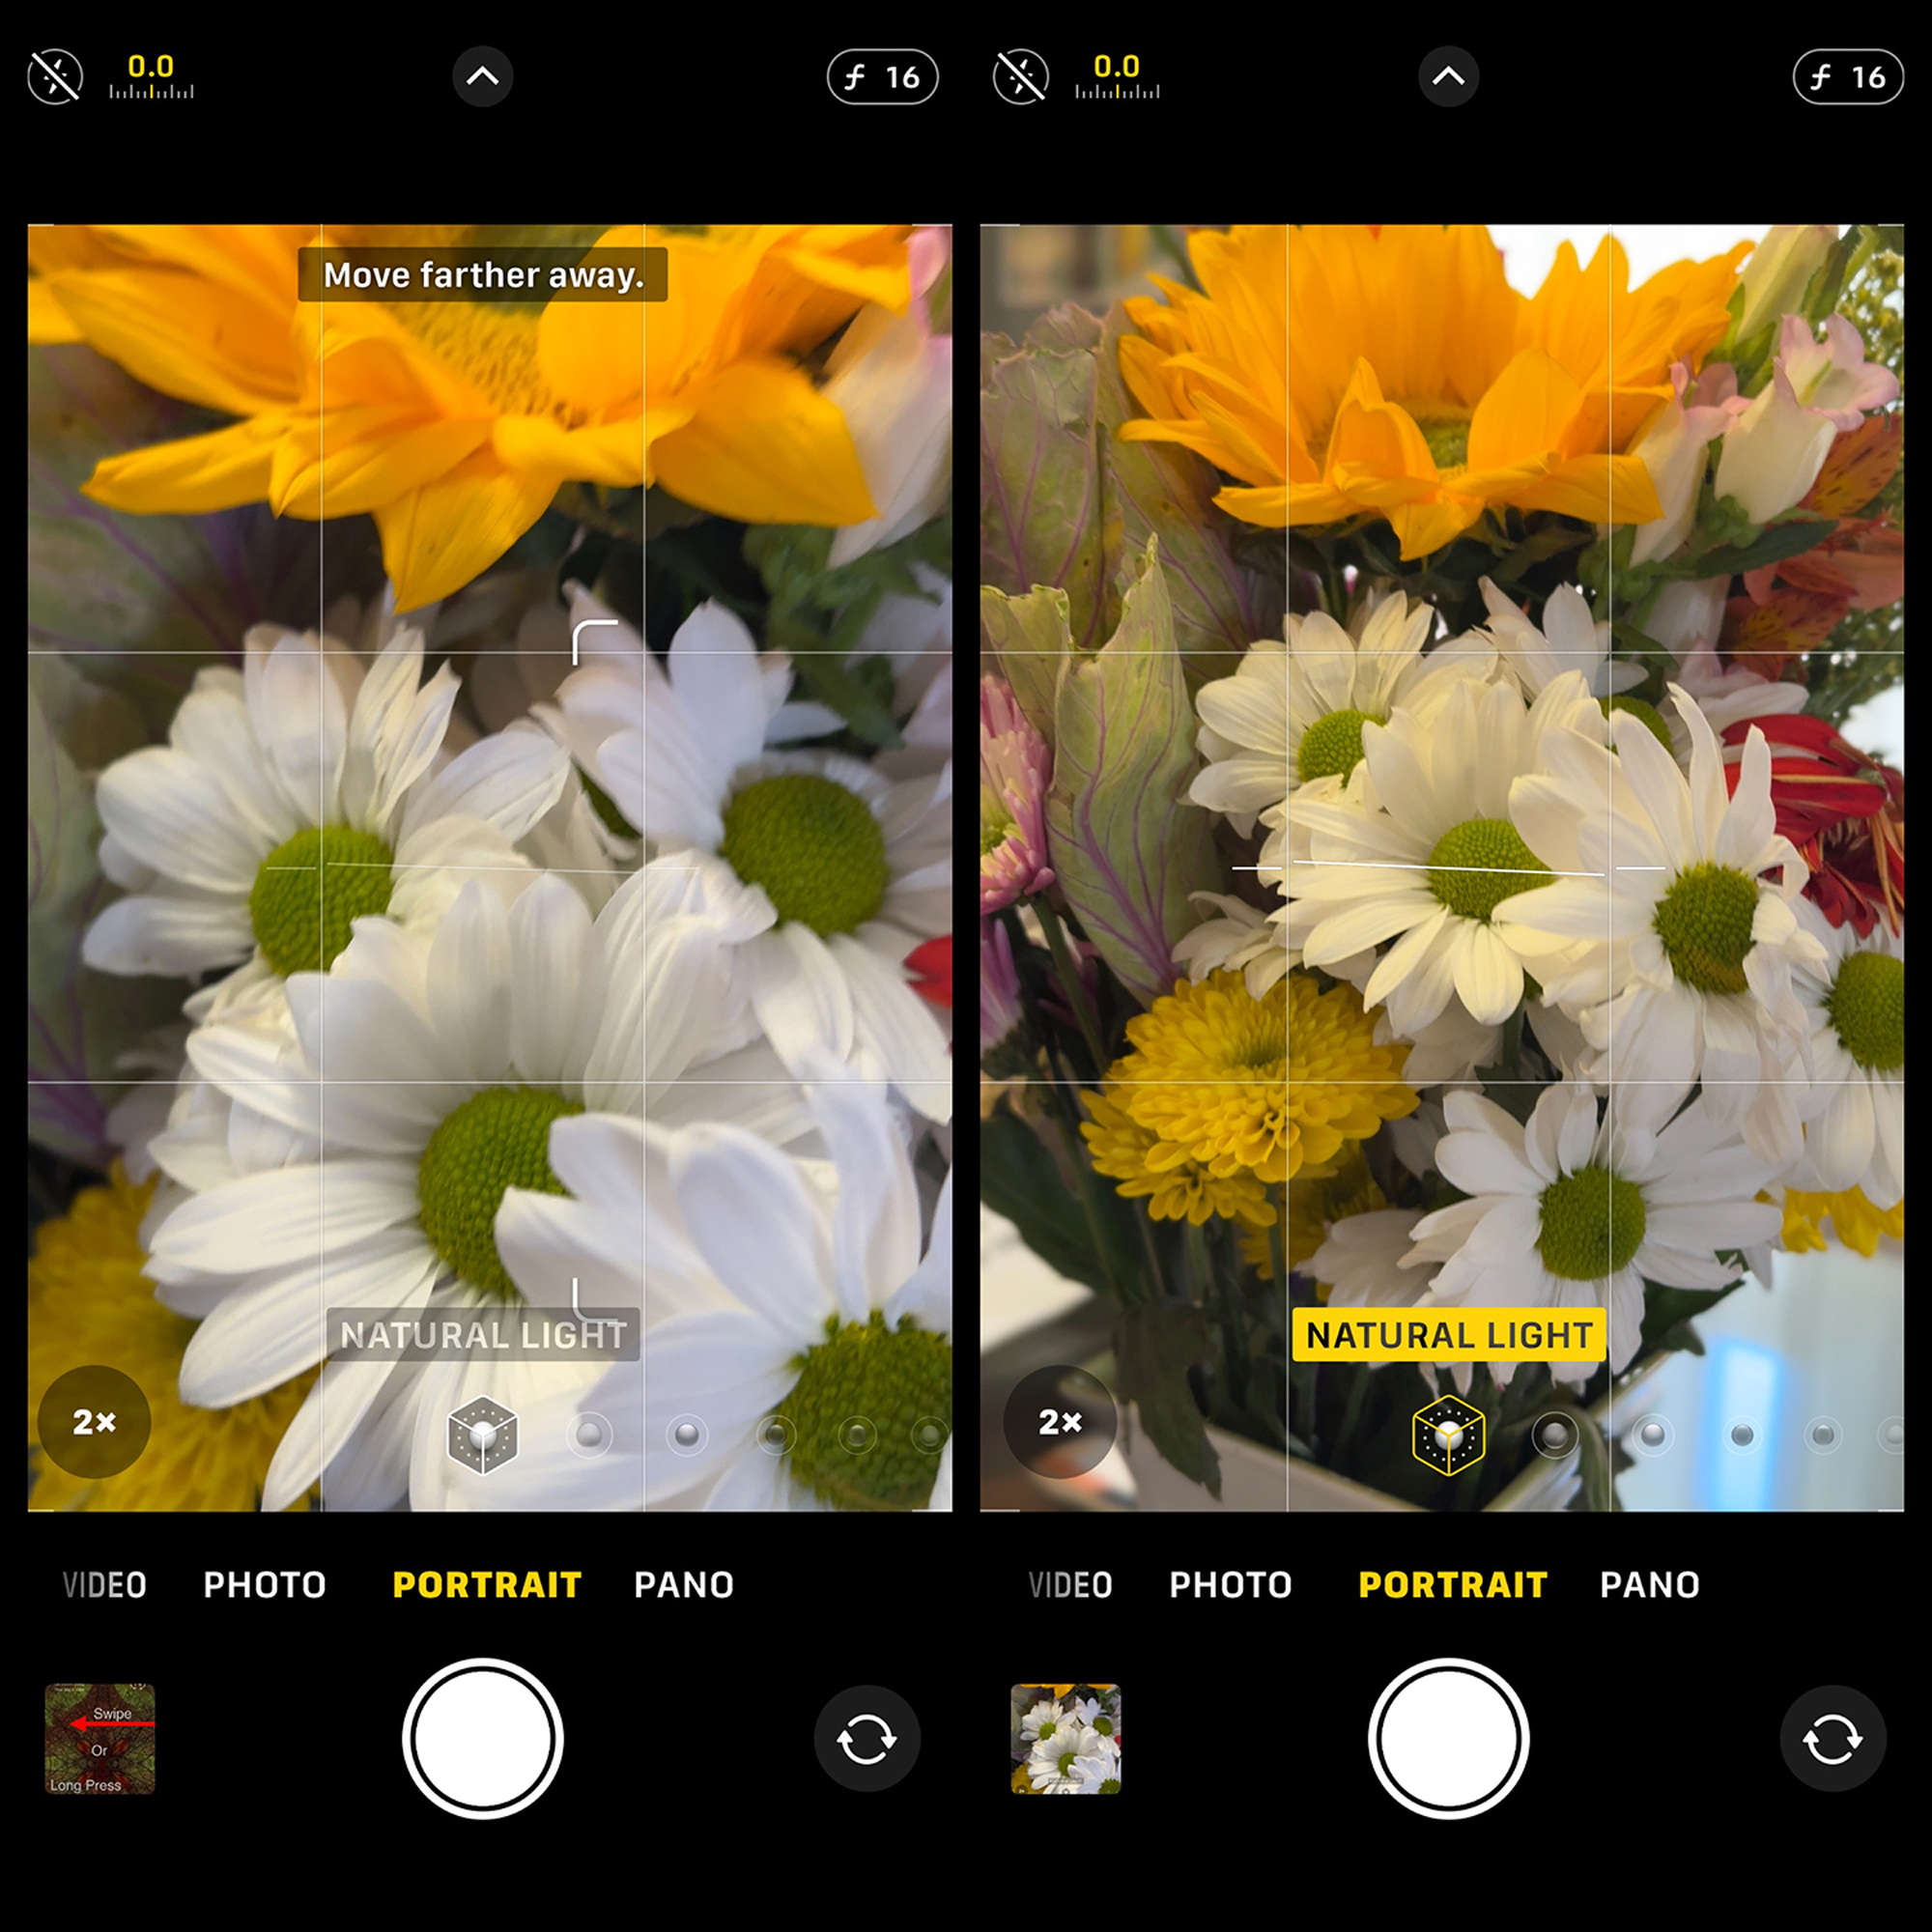
Make sure the Portrait Mode is activated before tapping the shutter button. You must be the right distance from your subject for Portrait Mode to activate. You’ll know it’s active when the light option you’ve selected turns yellow.
Portrait Mode is not active in the image on the left because the camera is too close. Notice that there is a message at the top of the screen to “Move farther away,” and the label NATURAL LIGHT at the bottom of the screen is grayed out.
In the image on the right, the camera has been moved farther from the subject, the message has disappeared, and NATURAL LIGHT has turned to yellow indicating that Portrait Mode is active.
If you tap the shutter when Portrait Mode has not been activated, you’ll get a photo, but it won’t have the depth map that allows light selections and f/stop adjustments.
TIP 2
Create the photo in the Portrait Mode’s Natural Light setting and wait to try and apply other light settings or adjust the f/stop until after making the photo. It’s so much easier to make these adjustments after you’ve recorded the image than to fuss with it before. It will save you a lot of time and possibly missed photos.
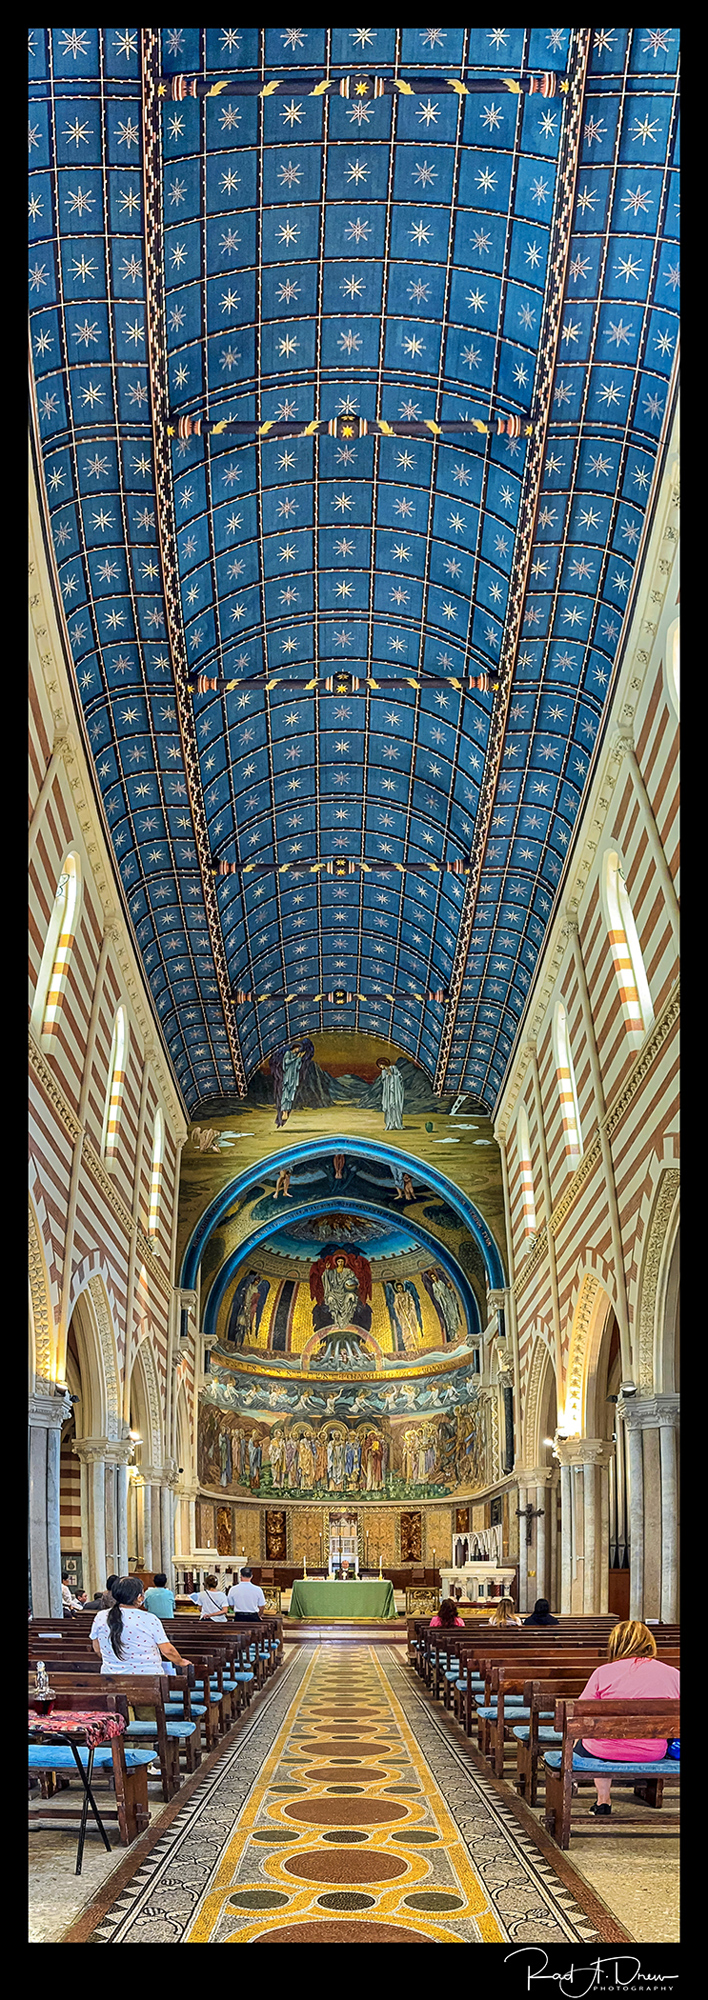
9. Don’t forget to make a panorama!
The pano option is great for vast land or cityscapes and you can also turn the camera on its side for vertical panos. Vertical panos are great for church interiors.
Try making a pano at the intersection of two or more streets and see how the camera distorts reality for a fun and unusual photo.


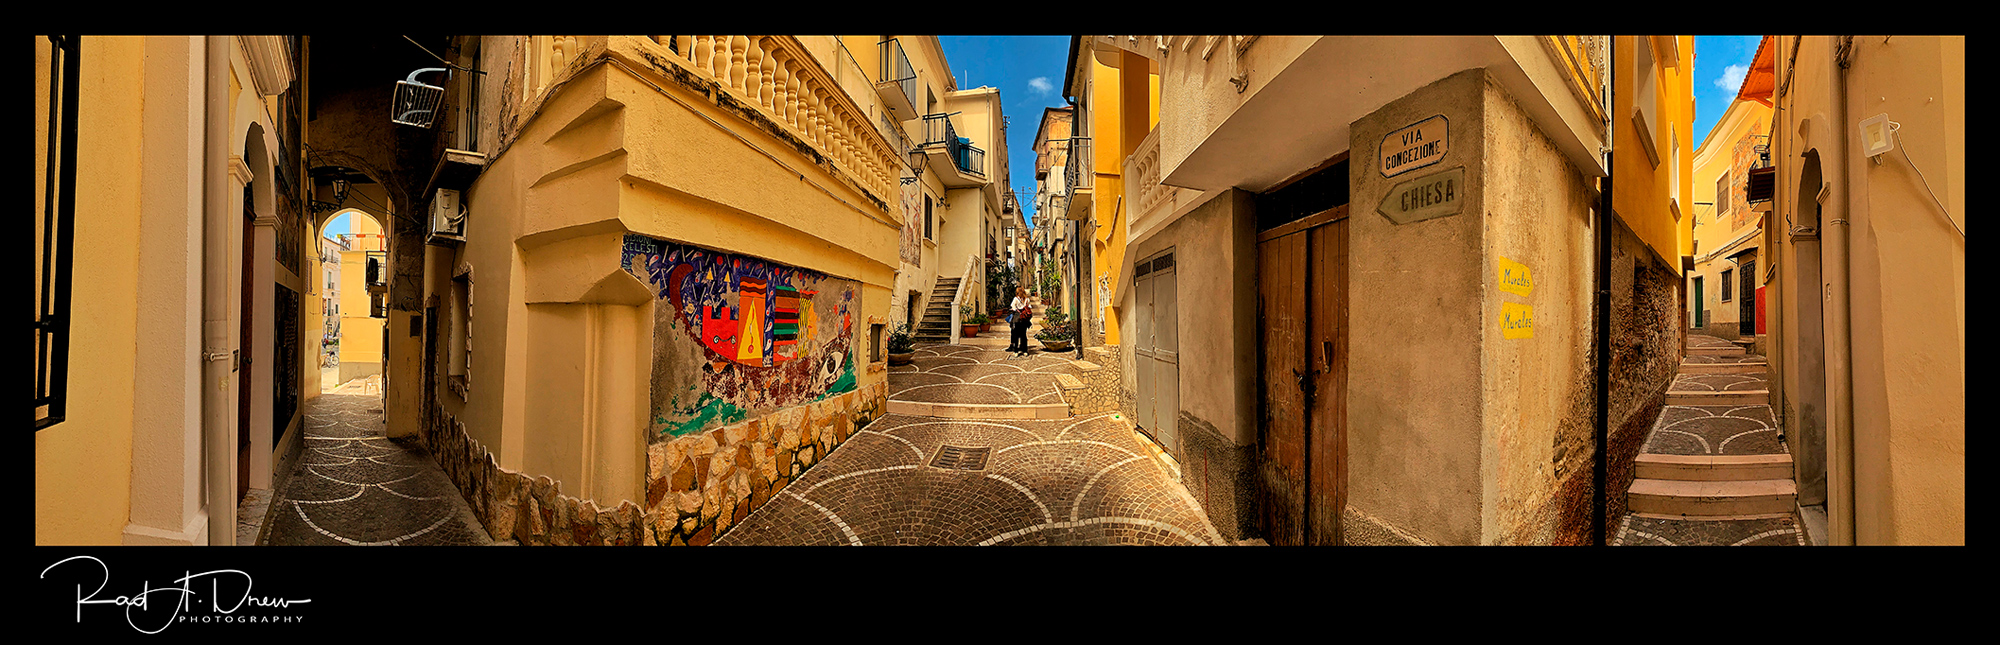
Horizontal Pano of three intersecting streets in Diamante, Italy, appear to be almost parallel.
TIP 1
When making a pano: find the brightest spot in the scene and tap and hold your finger on the screen to lock the exposure on the bright spot. Now when you move through the scene to create the pano, the camera will not constantly readjust the exposure. It will give you consistent exposure throughout the panorama. If you don’t do this, your pano may have lines in it showing different exposures. Don’t worry if the areas in shadow look too dark. These shadows can easily be corrected in post processing in tools like SnapSeed or Lightroom Mobile.
Tip 2
Experiment with making panos with each of your camera’s lenses. You’ll be surprised at how different they can look and you may find one focal length that you prefer for different subjects.
Remember to make the occasional video!
I set video to 4k at 30fps. I find this is a good compromise that provides good quality and a manageable file size. The later iPhones have tremendous video capability, so if you’re into video, I encourage you to look at the capabilities of the 15 Pro Max. With the 15 you have additional video options and the ability to record in LOG format. Some of these options create some very large files, but now that the 15 has the USB-C port, it’s possible to record directly to a portable hard drive and avoid using your iPhone’s storage space.
TIP
Did you know, you can record a video and make still photos at the same time? Seriously!
Simply set up your photo as if you’re about to make a still but instead of tapping the shutter button, drag the button to the right and release. The video will begin to run as indicated by the red counter at the top of the screen and the white shutter button will remain at the right side of the screen. To make a still photo while the video is recording, tap the shutter button. To stop the video recording, slide the shutter button back to the center of he screen.
Both the video recording and all the stills you made will be in the camera roll.
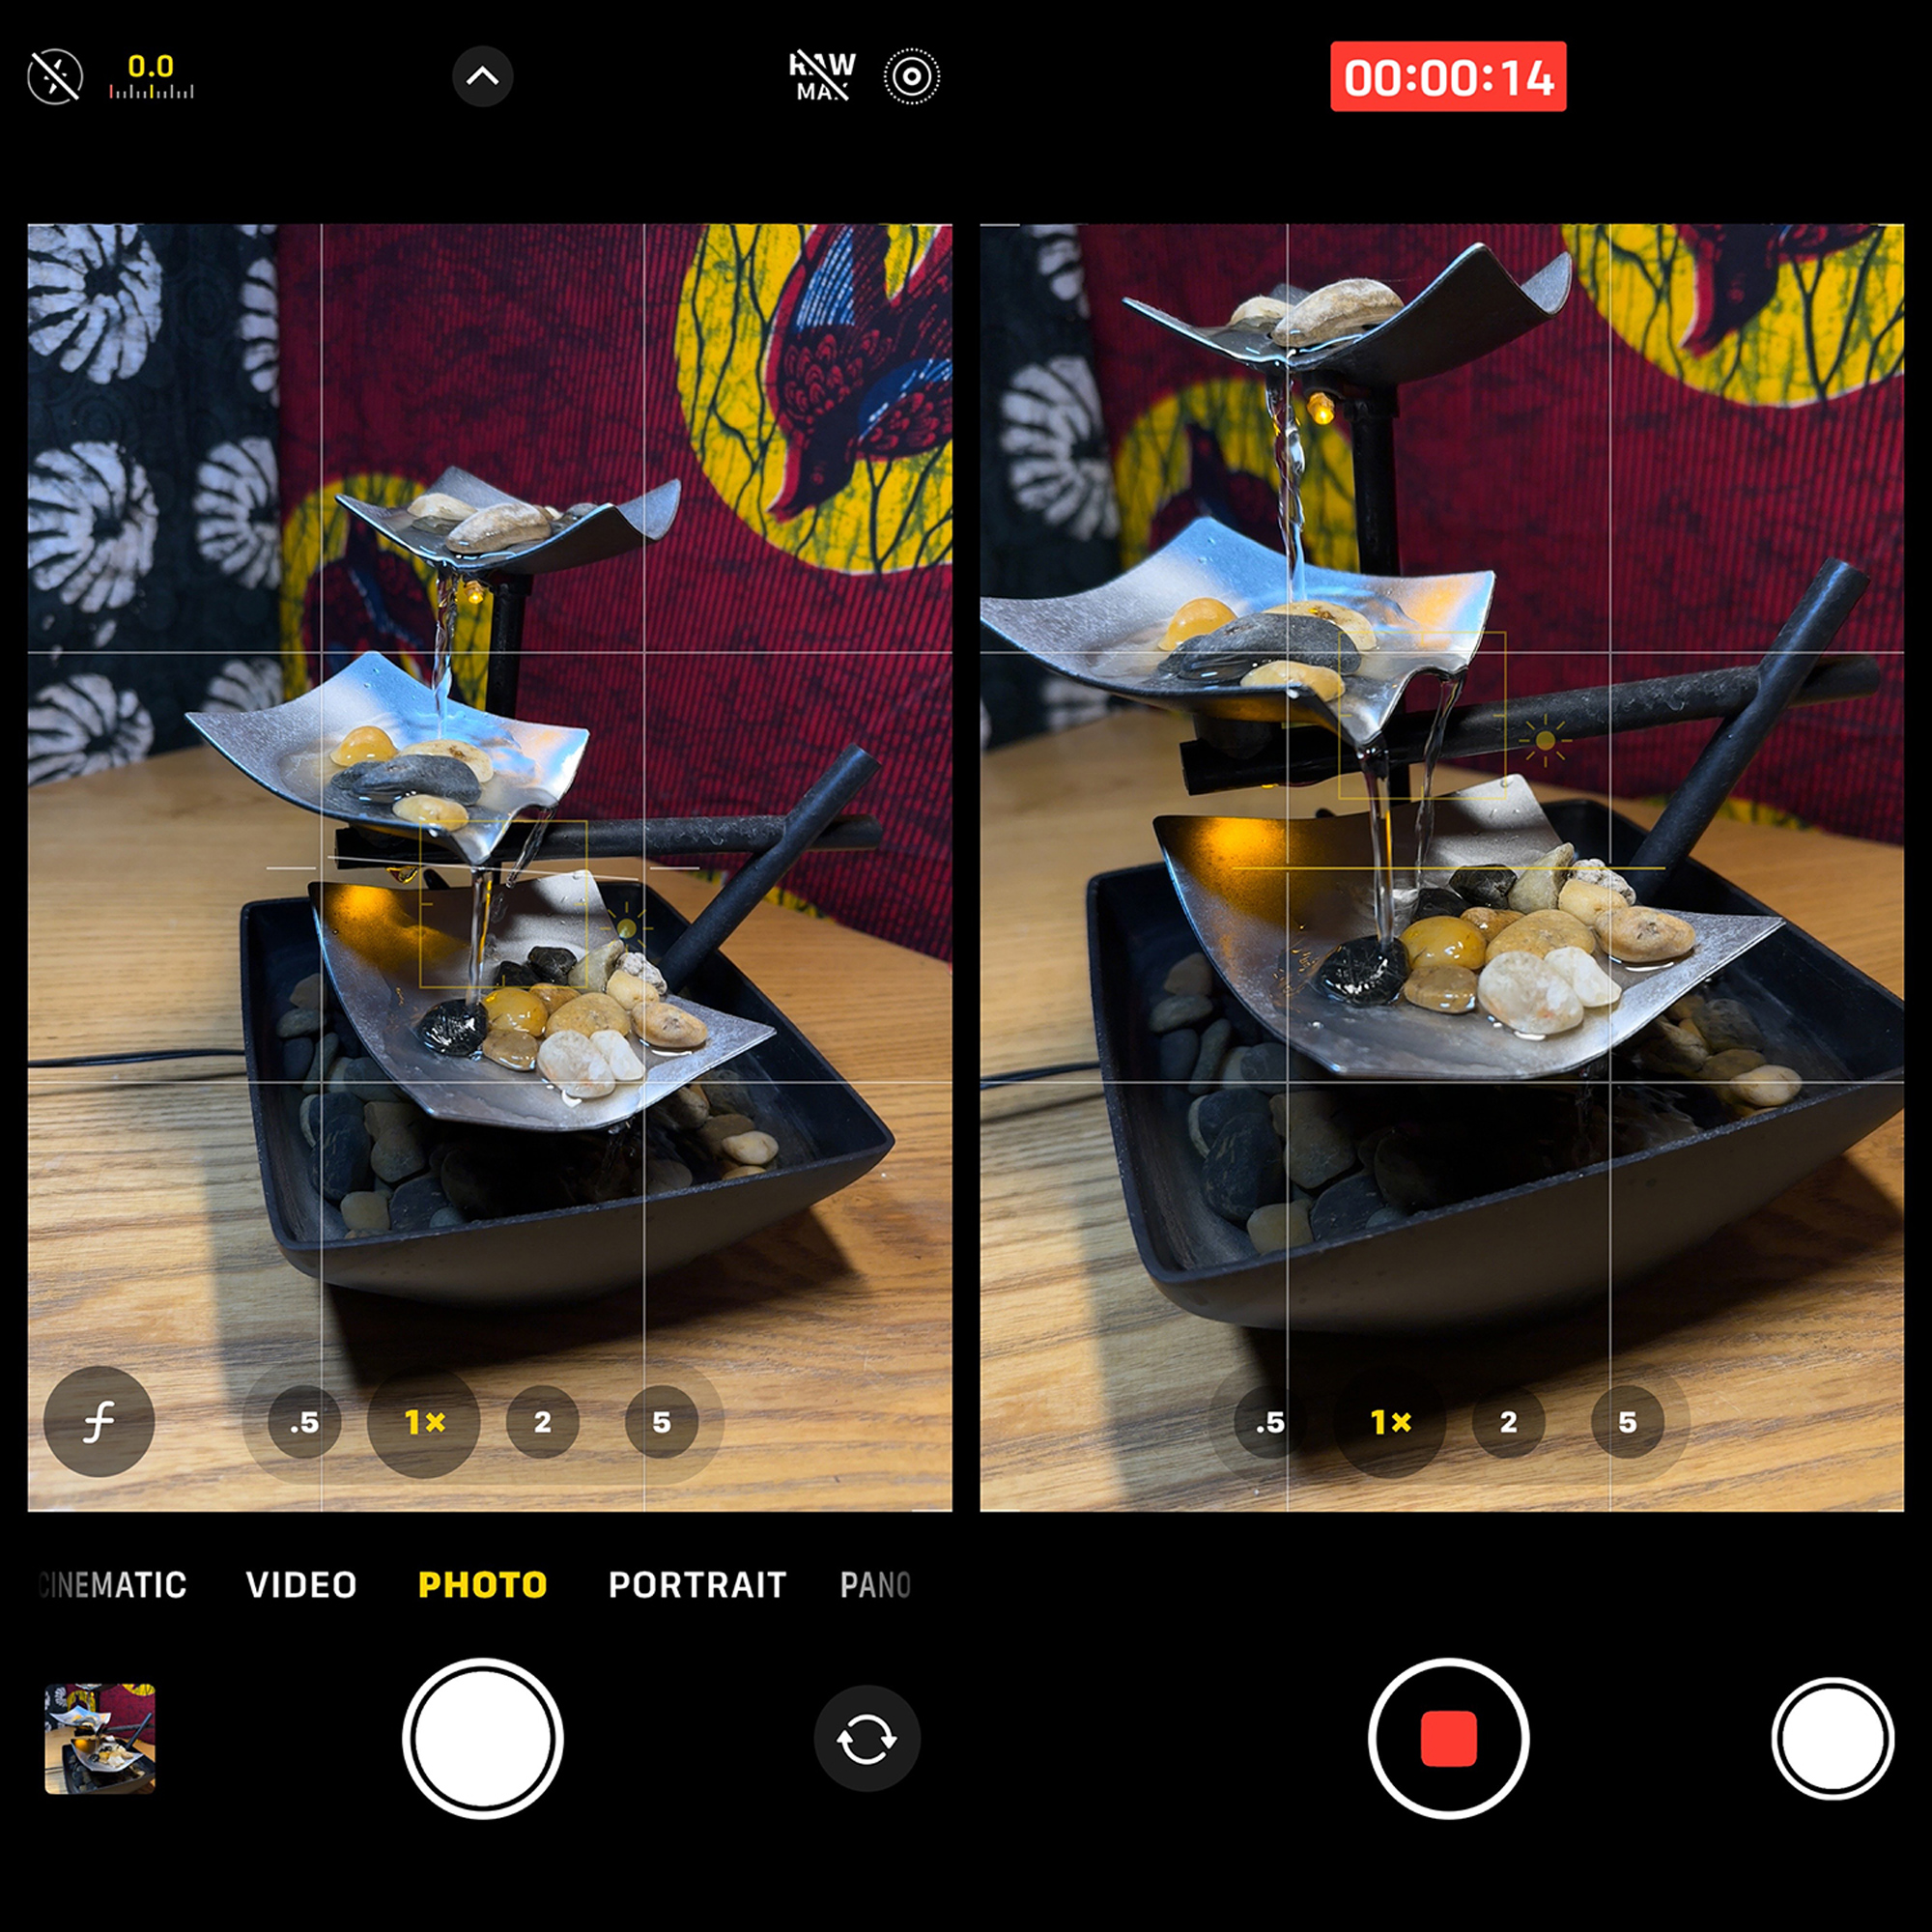
Set up for a still photo (left), then drag the shutter button to the right and release. The camera will begin to record the video. To make a still photo while the video is running, tap the shutter button on the right of the screen. Drag the shutter back to the center to stop the recording.
NOTE: These stills cannot be created in ProRAW and they are 10MP files instead of the 12MP default. Still, to be able to make stills and a video at the same time is awesome!
Enjoy the Ride!
Our iPhone – this one device – allows us to make a wide variety of photos including macro, long exposures, night photos, ultra-wide, telephoto, portraits, and panoramas, and thanks to computational photography tech, we no longer sacrifice quality when we photograph with our iPhone. (See my previous blog post, Macro Control: Getting Close with the iPhone 15 Pro Max for a look at creating macro photos with the Macro Control setting on the iPhone 13 to iPhone 15.)
Notice that only one of the photos on this blog post – the title photo of the Ballet School in Havana – was made with the 15 ProMax. I chose photos made with phones as early as the XS Max just to make the point that you don’t need the latest iPhone to create wonderful photos of high quality.
To create in all these ways with a traditional camera would require a tripod and a camera bag full of lenses and neutral density filters. Take advantage of the freedom, versatility and quality our iPhones offer us today. I think you’ll love the variety, the quality, and definitely appreciate the freedom of carrying a lighter load.
Please subscribe to my monthly newsletter and check out my website for the photo tours and workshops I have coming up in 2024!
Rad Drew
March 2024
INDIANAPOLIS, IN
Photography has always been synonymous with fun and magic. As a kid, it was fun to compose, fun to capture, magic to develop and process, and fun to share. It was fun to seek out photos and to engage people, and magic to travel to new lands or find the unusual in familiar places. It was magic to convey an emotion or make a point and touch others through visual imagery that I created. As an adult, photography continues to be more fun and magical than I ever dreamed! Despite changes in technology that have occurred during my lifetime, the esthetic of photography remains much the same. The creative mind of the photographer is still the most important element in a great photo. The camera doesn’t create a photograph any more than a hammer designs a building; it’s merely a tool that allows us to create our vision. Today, my camera bag holds two mirrorless cameras, an infrared camera, a point-and-shoot, and an iPhone. Of these tools, I credit my use of iPhones since 2010 with providing more opportunities to practice the esthetics of photography, making me a better photographer regardless of the camera I'm using. And photography has never been more fun and magical!