Getting It Right – The Spyder Cube
Getting the exposure and color right is an essential first step to making a good photograph. I found that the Spyder Cube is a valuable tool in my camera bag to assure that I can get the right color balance as well as good exposure. The Spyder Cube is a small and ingeniously-designed cube that allows you to thoroughly analyze an exposure. It gives you the ability to check white balance, white point, and black point in an exposure. Including exposures with the Spyder Cube will help you get the proper exposure and color balance in post-processing.
Using the Spyder Cube is simple and easy, and once you use it, you’ll find that you are pulling it out more and more as means of making sure, just in case you need it, that you can measure white balance, highlights, and blacks.
Here Is How I Use It
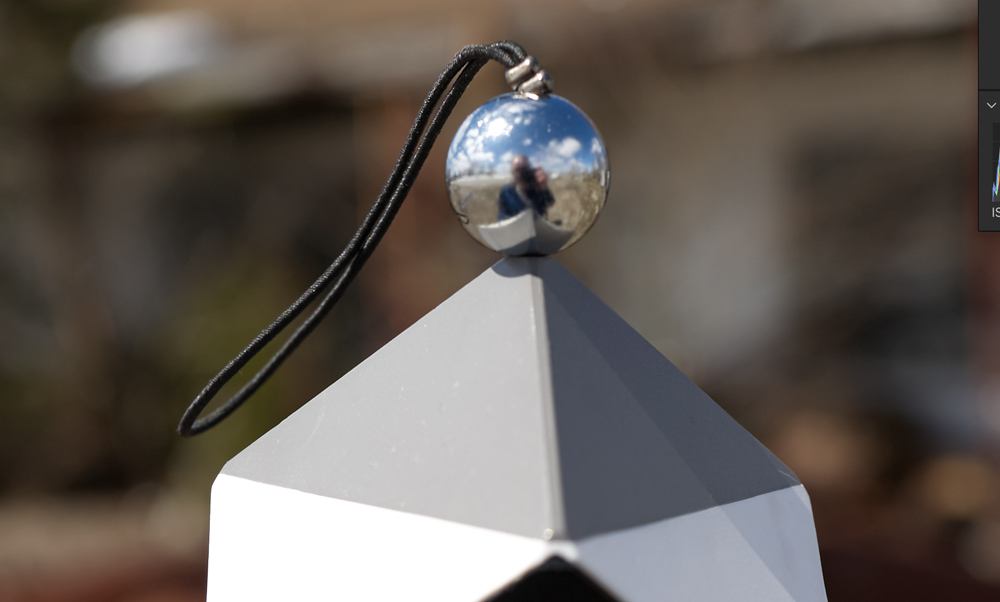
I mounted my Spyder Cube on a small, lightweight desk tripod I had hanging around my camera closet. The Spyder Cube has a standard thread tripod screen in the bottom, and it allows the tripod to be screwed into it.
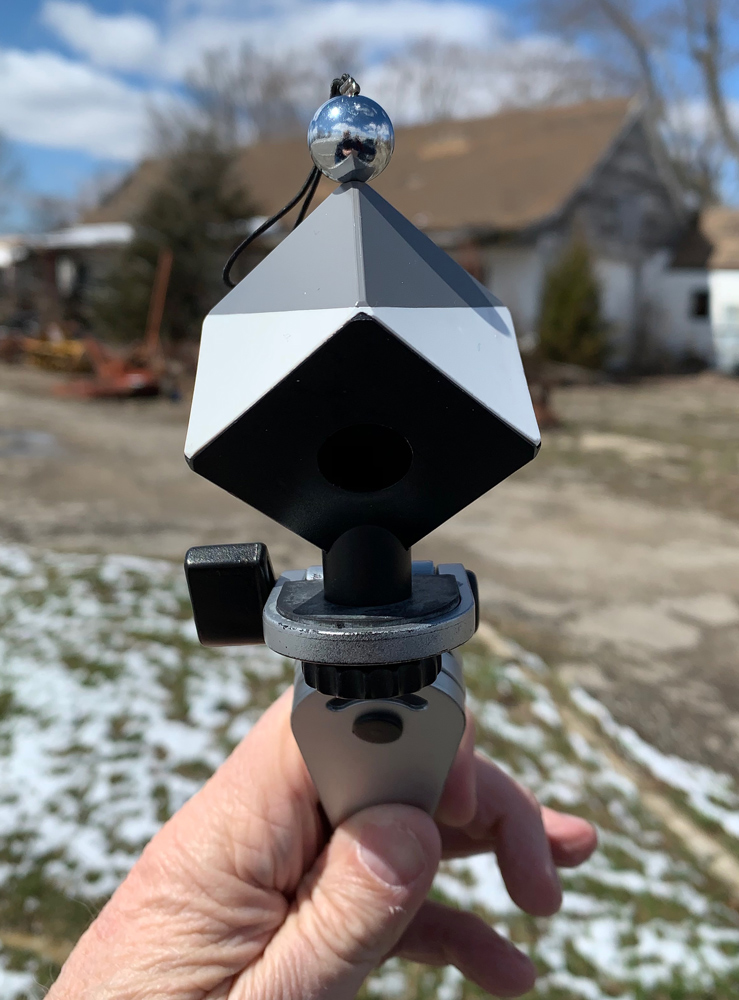
To use this, I pull the cube out of my bag and hold it at arm’s length and shoot an image of it. I let the camera pick the right exposure, and I leave the camera on Auto White Balance. Depending on the scene, I’ll get a wide histogram or maybe a histogram skewed to the right or left. Perhaps in a narrow-contrast scene, I might just have a bump in the middle.
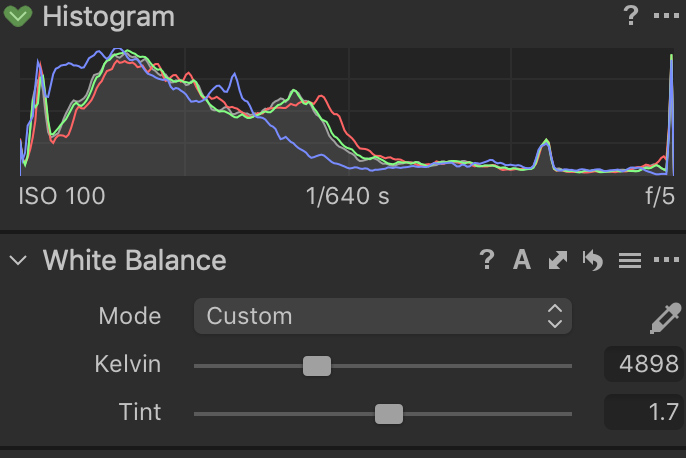
As long as the histogram isn’t clipped, I know that by using the Spyder Cube in my RAW processor, I’ll be able to balance the scene and get the best-looking image possible.
After the shoot, I’ll upload my images into my RAW processor, which is Capture One. While I’m a Capture One user, you could do the same thing and perform any of the adjustments I’m going to show you in Lightroom or Camera Raw. I select the image with the Spyder Cube in it and then do some quick analysis.
The first thing I do is to evaluate white balance. I simply take the White Balance dropper tool and click on the lighter-grey area of the cube. You should see the color immediately perform an adjustment. What you see now is a white balance determined by adjusting the color balance to neutralize the grey area. If you’re like me, I use this just to get in the ballpark and then I add my own subjective adjustments, usually towards a warmer white balance. For the most part, I don’t adjust too far, but I think that the grey area on the cube may pick up some color bias from the sky. The choice is yours, based on your color preference.

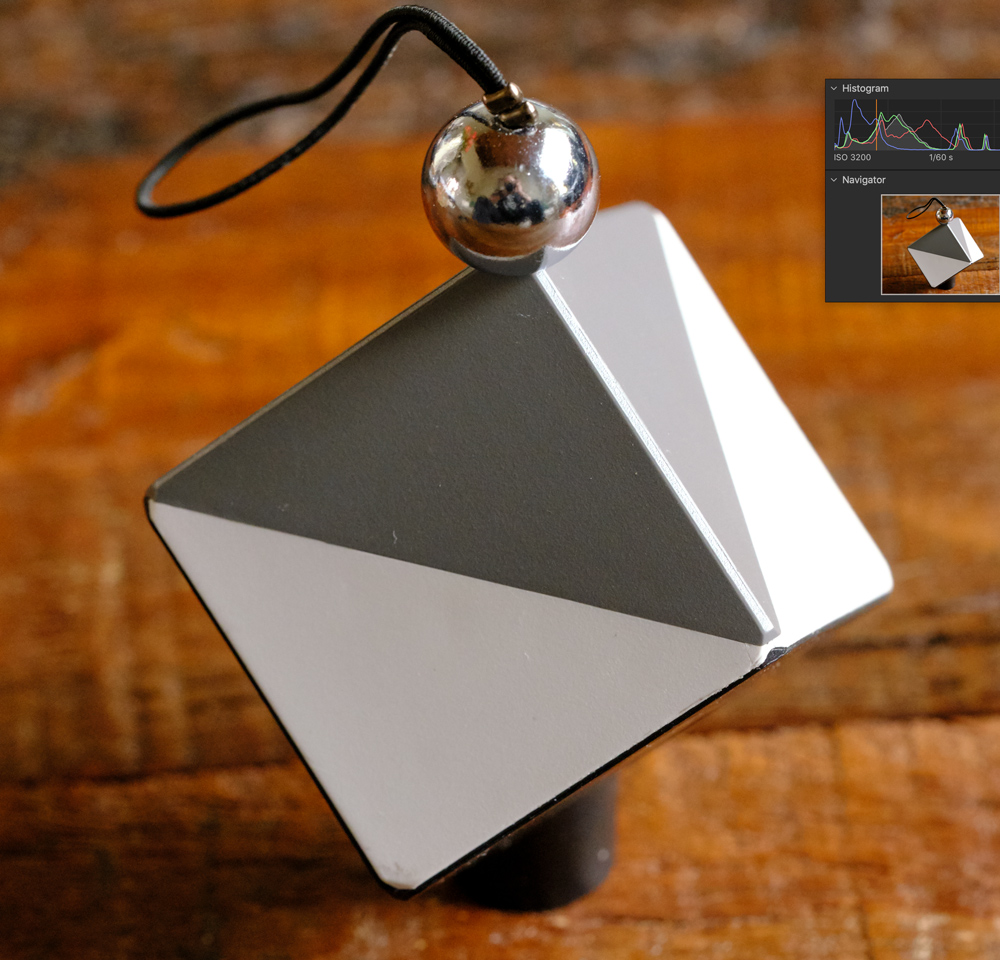
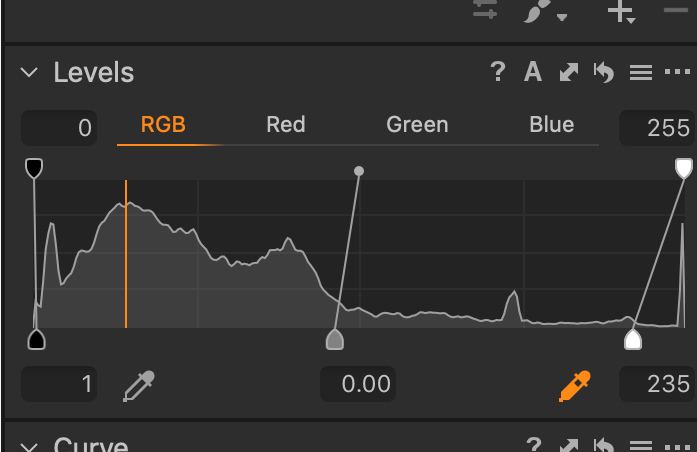
The next thing I do is to look at exposure. Using Capture One, I turn the Exposure warning feature on. This feature allows me to see, in red, anything that has a value over 245 and a value less than 15. This is my call and was set up in Capture One preferences. I set my Exposure Warning to show shadows in blue and at a value less than 15 and anything in red over 245. By using these values, I can see, using these colors, the areas that are heading towards under- or over-exposure.
I can merely correct for this using the exposure slider, or I can use the Highlight and Shadow recovery sliders. As I make adjustments with the slider, I can see the shadows open up and the highlights darken down. Remember, in some photos, you’ll have specular producing a 255 value and blacks that will e 0. So, you’re not always going to get rid of the red and blue warnings.
In addition to the corrections above, you can also set your black point and white point highlights from the chrome ball on top, and the black light trap on the bottom of the cube. You can see the blue light circle in the picture below that shows the light trap. This is essentially a hole with a felt-type coating that just soaks up the light. The Chrome ball is an excellent way to show the brightest spot in the reflection, usually referred to as the “specular.”

In the levels section on Capture One, you choose the black dropper to select the blackest point (the light trap) and the brightest spot on the chrome ball (the specular). You can then set the midpoint in the levels, further adjusting the image to your taste.
After all of this, I then will go and make subjective changes to the image to fine-tune the look. If desired, I then save this as a style or a preset in Capture One that can be quickly applied to other, similar images. All of this takes less than a minute, and it gives you the means to have some standardization regarding how you measure exposure and initial white balance.
The Spyder Cube, from Datacolor, is just one of many tools that I own and use regularly. I’ll be highlighting the tools I use on this site, including new tools as I adopt them.
You can use our Affiliate Links if you’d like to purchase the Spyder Cube. Purchasing products from our online partners help us each time you buy a product from one of our links. Thank You!
You can purchase the Spyder Cube from B&H Photo or Amazon
Kevin Raber
May 2019
Indianapolis, IN
Photography is my passion and has been for 50 plus years. My career in photography has allowed me to travel the world, meet some of the most interesting people on the planet and see things I could never have dreamed of. My goal is to share the passion of picture taking through photographs and teaching with as many people as I can, hoping it brings them as much joy and happiness as it has me. I do this through photoPXL.com, this site, as well as Rockhopper Workshops, and other projects, as well as teaching as Artist In Residence at the Indianapolis Art Center.