Creating Infrared Images with The iPhone
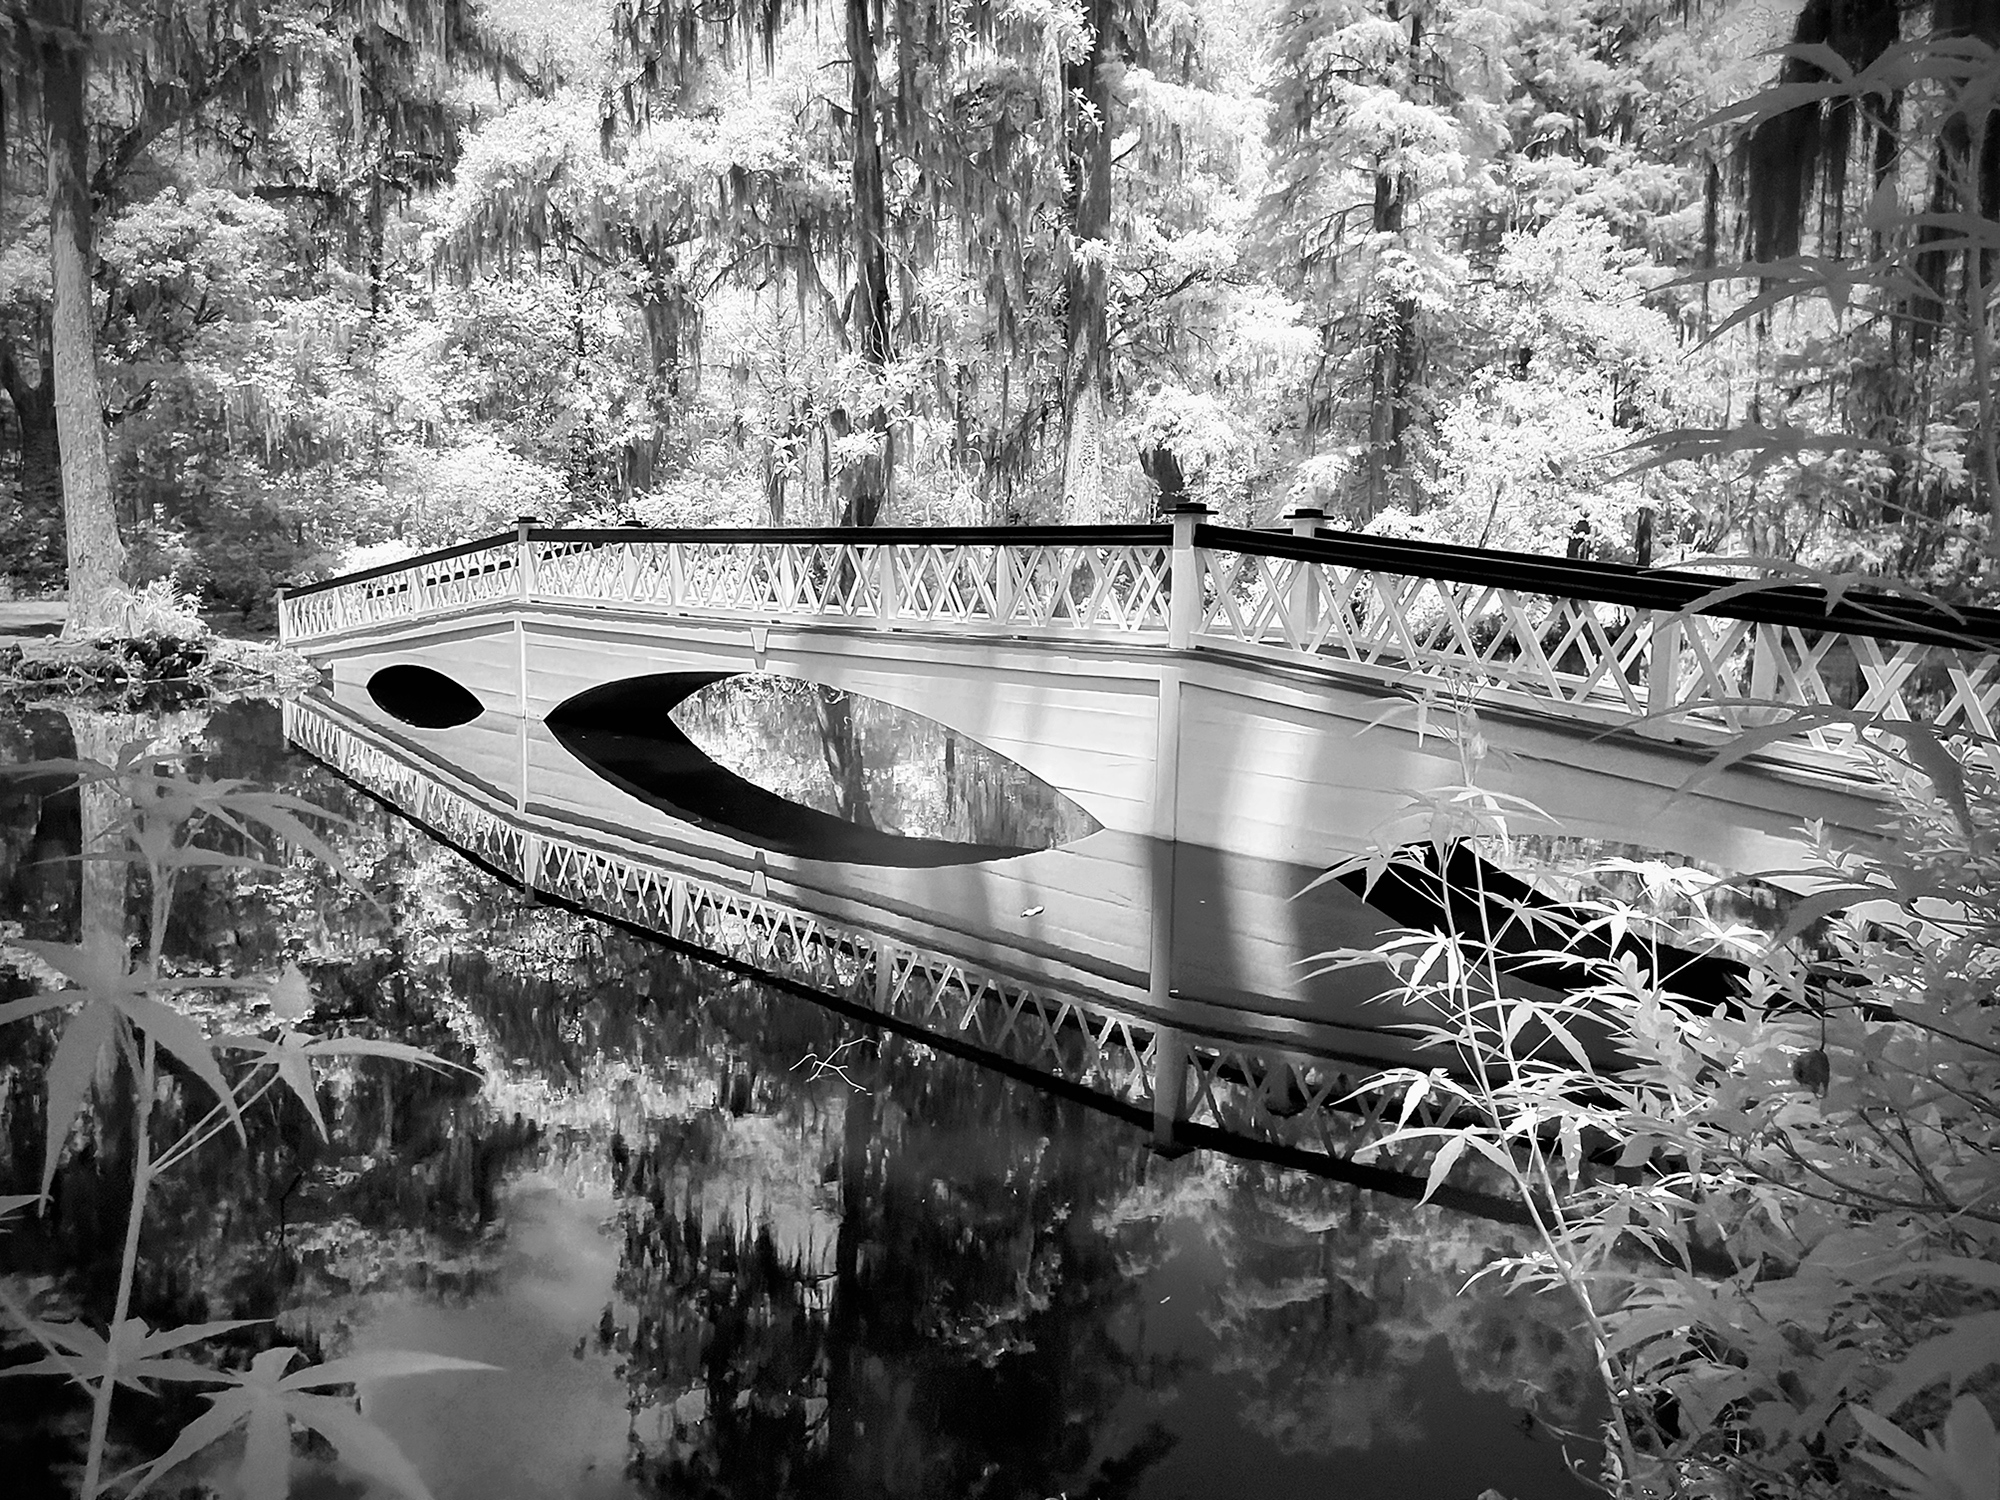
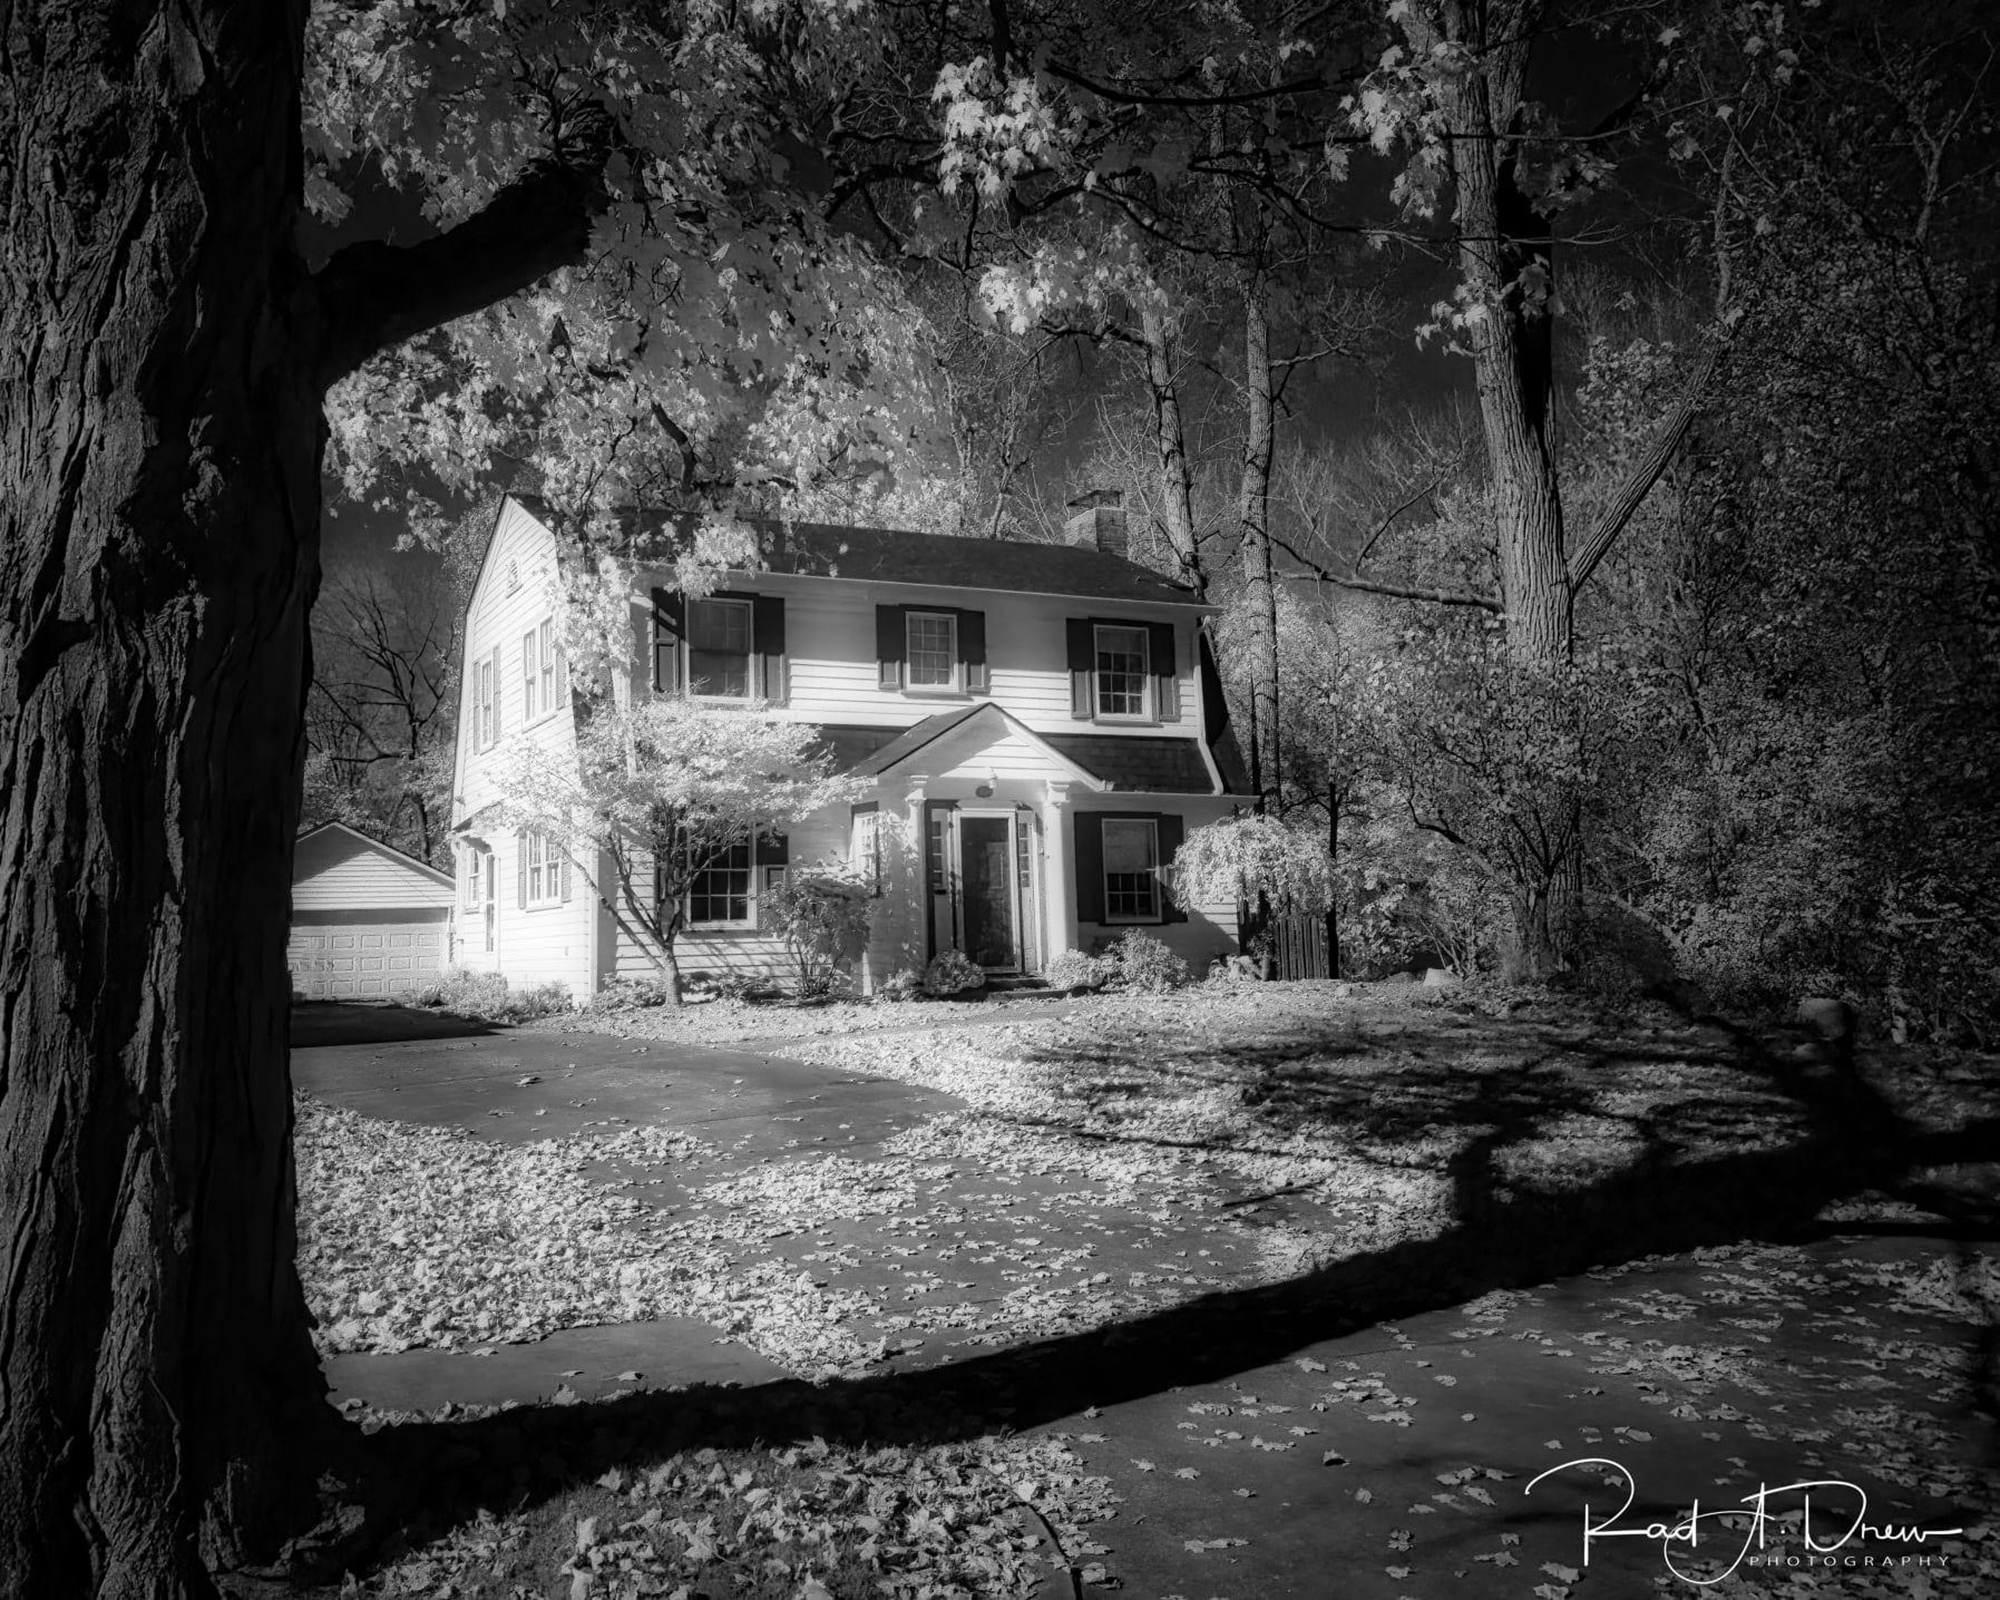
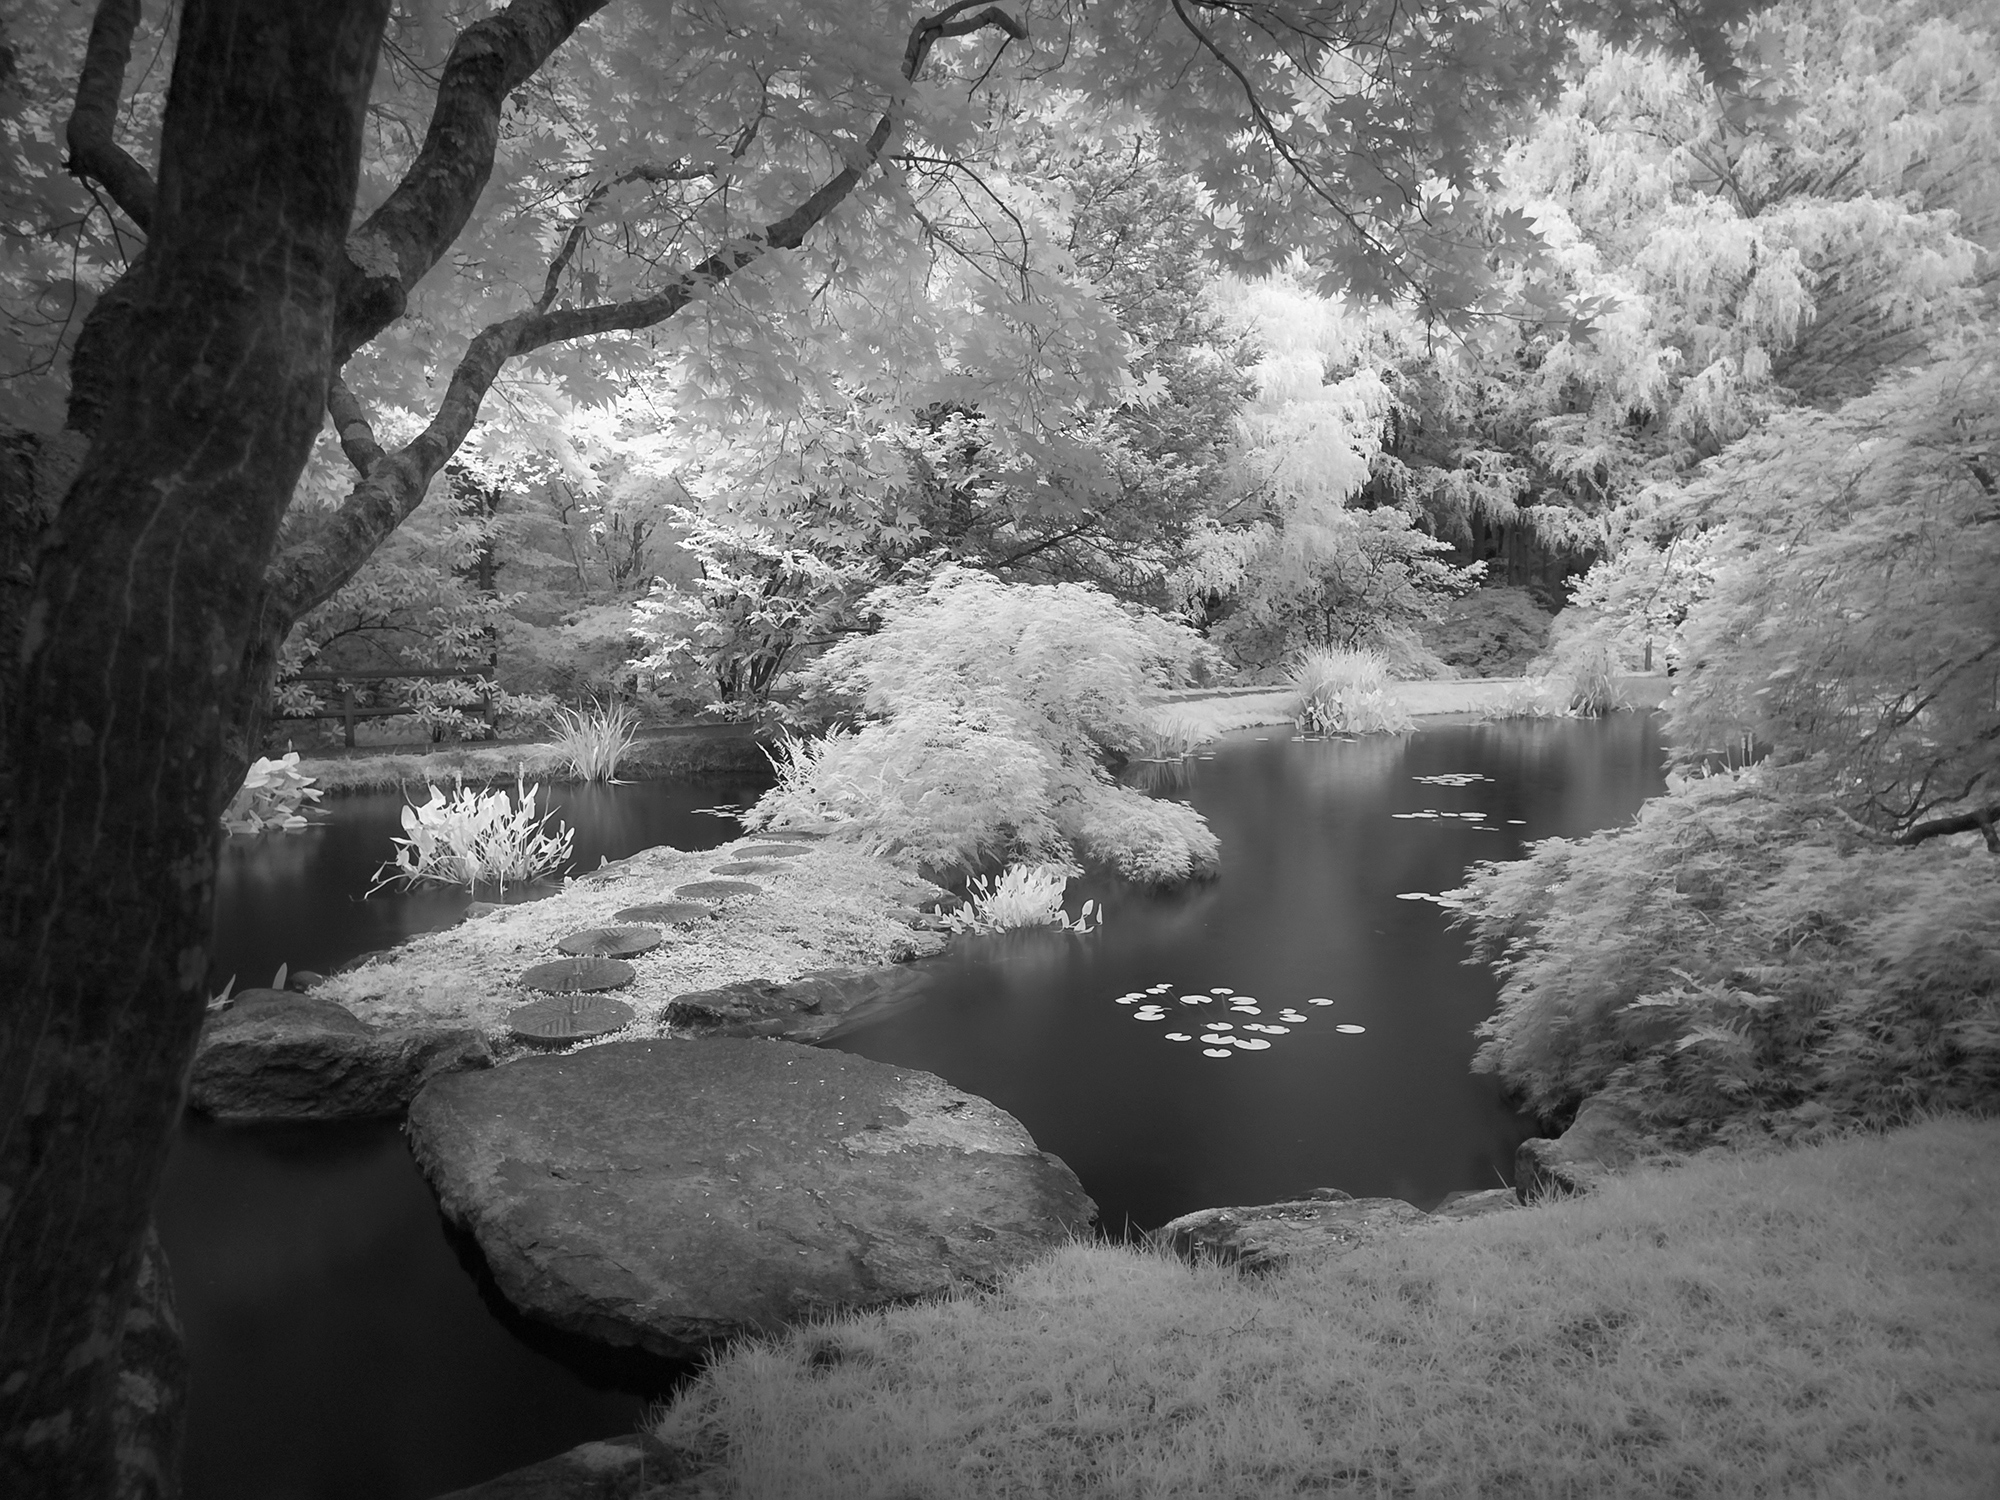
Infrared photography, the black and white variety, first captured my imagination in college many moons ago. I fell in love with this depiction of the world around me and was drawn into these snowy white fantasies.
Infrared became a lot easier in the digital age. By modifying a camera, removing the high-pass filter, we can now have a camera dedicated to infrared. Modern digital processing helps to get those bright whites and rich blacks, and we can even add that soft ethereal glow so characteristic of early film IR.
For the past seven years or so I’ve made images first with a LUMIX DMC LX7 point-and-shoot, and later with a Fuji X-T1, both converted to 720nm infrared.

While I love shooting with my “big” cameras, I’ve had a love affair with the iPhone since getting my first, iPhone 4, in 2010. I love the iPhone’s portability and, with today’s iPhones, I’m not sacrificing much in the way of image quality.
For years now, I’ve dreamed of making IR images with my iPhone.
Last year with the help of friends, and a lot of research and experimentation, that dream became a reality. I discovered how to make infrared images with my iPhone! In the beginning, there was a lot of trial and error and a few screaming pixels, but today, with all we’ve learned, well, we’re getting great results.

I say “we” referring to the more than 600 participants in the Facebook Group I created about a year ago. As the saying goes, the proof is in the pudding, or in this case, the pixels! You’re welcome to join our group, or just stop by to see what people are creating with their iPhones! Here’s a LINK TO THE FACEBOOK GROUP.
Clearly, the phone’s technology is quite different than a traditional camera. With the iPhone, there’s no modification of the hardware, no cracking open the phone to remove the high-pass filter or replace anything inside the phone itself.
Instead, everything is done using select camera apps, specific photo settings, an infrared filter, RAW files, and RAW processing methods. As one of my friends and fellow iPhone infrared enthusiasts says, “There’s a lot of jiggery-pokery!” But for the determined, patient photographer, the results are worth it.
Why Bother to Shoot Infrared with an iPhone?
Many of my fellow “big” camera photographers have asked me that question not just about infrared, but about why I bother to shoot anything with the iPhone. After all, they argue, the sensor is small, you can’t add lenses for long reach, and the resolution is less than what you get with a big camera.
Well, this is all true, and the same applies to making infrared images with an iPhone. So why do I bother?

Mainly, because it’s fun! Here are a few of the reasons I enjoy shooting Infrared with my iPhone:
-
- 1. The iPhone is small, lightweight, and most often doesn’t require a lot of equipment that I have to lug around. The older I get, the more I appreciate traveling light!
- 2. When I shoot with my iPhone, I can process, post and share my images immediately. I don’t have to wait until I’m back at the computer to process and share images.
- 3. Today’s iPhones take advantage of machine learning and artificial intelligence to run sophisticated computational photography algorithms in the background to create images of very high quality. Technology has advanced to the point where the quality we are getting, even with the phone’s relatively smaller sensor, is remarkable.
- 4. Phones now have the ability to produce the data-rich RAW files that have been the standard for “big” camera photographers for years. The iPhone 12 Pro and 12 Pro Max can produce files using Apple’s proprietary RAW format called ProRAW and it’s likely that this will become standard on subsequent iPhone models. The ability to record and process RAW means that we can recover details from bright and dark areas, have a greater dynamic range, and even better color in our images than ever before.
- 5. Even older phones have the ability to turn on Smart HDR, and later models have it built in so that our images use this technology to help ensure balanced exposures, even in high contrast scenes.
- 6. Features like the LiDAR sensor and night mode on the 12 model iPhones facilitate creating quality infrared images.
- 7. Today we have desktop software from Topaz that will help eliminate noise in an image, sharpen the image, and even enlarge an image for printing larger with integrity. The Topaz tools, DeNoise AI, Sharpen AI, and Gigapixel AI, make it possible to achieve remarkable (and large) results that often rival your “big” camera images. If you are in the market for these Topaz tools to improve your images, take advantage of my link and code for 15% off all Topaz tools, even those already on sale! Visit the TOPAZ website and enter code RAD15 at checkout.
These are just a few of the reasons I enjoy making IR images with my iPhone. But, for me, the bottom line, as I mentioned earlier, is that it’s so much fun!
To link these two passions – my passion for iPhone photography and my passion for infrared imagery – has been a dream come true! And it’s been great to see so many other mobile photographers become excited with this approach to IR.
So, How’s It Done?
It’s not rocket science, but there are a lot of details and “moving parts,” so to speak, and the approach varies with the iPhone and camera you’re using. And while the later phones, particularly the iPhone 12 Pro and 12 Pro Max, provide more options and often create the best results, quality IR images are being made with phones as early as the iPhone 7+.
Here’s a summary of the setup and process. For more specific details and demonstrations on shooting and processing, consider my video tutorial, How I Did It!™; Create Infrared Images on Your iPhone! available for purchase.
- 1. Use an external infrared filter. I prefer the 52mm, 720nm filter which produces a rich black-and-white image. I purchased mine from Spencer’s Camera because of the filter’s high quality and because Spencer’s filter is the only one I’ve found to work with one of the filter attachment methods I use for the 12 Pro Max (described below). (If you purchase from Spencer’s use the Code RADDREW25 for a discount on your purchase.)While you can simply hold the IR filter in front of the camera’s lenses (a technique I used before determining the best case and filter mount), this is a somewhat awkward option and not something I recommend for the long haul. Instead, I recommend getting a case and filter mount for attaching the infrared filter to your camera. If you have the iPhone 12 Pro Max, you have an option for attaching the IR filter that does not work with any other iPhone model. iPhone 12 Pro Max users can purchase Apple’s iPhone silicone case and the 52mm, 720nm infrared filter from Spencer’s Camera. The filter will simply twist on and “sticks” to the ridge on the case that surrounds the iPhone’s lenses.
This is the method I’ve used since the 12 Pro Max came out last year, but I’ll caution you that it may not be for everyone. This method is not intended to work this way, but it does. It’s not as secure as other methods and there is the risk that the filter will get knocked off easily. I’ve used it for the better part of a year with no problems and I find it to be the most elegant and hassle-free method for me.
Another, more secure and conventional method for attaching the IR filter to the phone that is available for most other iPhone models (and some androids), is to purchase a Moment Thin Case with a Filter Mount insert that fits your model iPhone, and a Moon Dog Multi-Camera Filter Mount, v2. With this method, you’ll put your phone in the Moment case, securely mount the Moon Dog Filter Mount to the case, and then screw the 52mm, 720nm infrared filter into that Moon Dog Filter Mount. You can use any IR filter that is 52mm in size. Some people like this option because they can find less expensive filters than the one available from Spencer’s Camera.
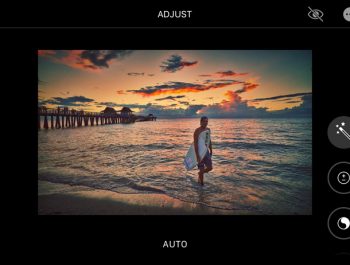
- 2. Next, we choose select apps for making the photo. For the iPhone 12 Pro and Pro Max, the native camera with Night Mode and ProRAW is one of the best camera options.Other apps that can be used with the 12 Pro, Pro Max, and earlier phones include Camera+2, and the Lightroom Pro Camera that is part of the Lightroom for Mobile app. Why these two camera apps? Because both produce RAW files, and both allow the white balance, ISO, and exposure time to be set manually. Could you use other camera apps? Yes! So long as you can control the ISO, white balance, and exposure time.When shooting with the 12 Pro and Pro Max using the native camera in Night Mode, the camera may be hand-held. For best results with Camera+2 and the Lightroom Pro Camera, regardless of the phone model, a tripod is recommended because longer exposure times are necessary.
- 3. Once the RAW file has been created, the rest happens with post-processing, which can be done on the iPhone or the desktop.There are three apps and methods for post-processing IR RAW files with the iPhone that I’ve found to be effective: Apple’s iOS editor, SnapSeed, and Lightroom for Mobile; and other methods that involve desktop processing software.Apple’s iOS editor is accessed from within the Camera Roll. In the past, this editor was nothing to write home about, but with the release of iOS 13, the editor got a facelift and today it’s one of the best options for editing RAW files on the iPhone. And, if you’re shooting Apple’s proprietary new ProRAW format, the iOS editor may be the best option for editing ProRAW files that we have at this time. What I miss in this tool is a histogram and the ability to mask for selective editing. I often use the iOS editor in combination with SnapSeed or Lightroom, both of which have a histogram and the ability to mask.RAW files can also be processed using SnapSeed’s RAW Develop tool. This tool only appears when a RAW file is opened in SnapSeed, so it’s possible you’ve never seen it! While this is my least favorite of these RAW processing options, there is something to be said for the convenience of using one app to both edits the RAW file and also add any desired stylizing.And, finally, perhaps my favorite tool for editing RAW files is the Lightroom for Mobile app. This is a remarkably robust editor with a histogram and the Selective tool for masking, which is often desirable when editing sky and foliage in an iPhone infrared image. While the above-mentioned processing methods on the iPhone yield great results, many images will benefit from editing with desktop software. Noise is one of the things that can be a challenge with some iPhone infrared images.
- 4. The best way I’ve found to reduce or eliminate undesirable noise is to transfer the iPhone image to the desktop and use Topaz Tools, DeNoise AI and Sharpen AI. (Use the link and the code RAD15 for 15% off all Topaz products.)
- 5. Here is a link to a How I Did It!™ tutorial on how I process iPhone infrared images on the desktop with Luminar 4, invoking Topaz tools, Denoise AI and Sharpen AI as plugins.
A Word about Lightroom for Mobile

Many people cringe when I suggest using Lightroom for Mobile because they are not interested in paying a monthly subscription fee for the app. Here’s the deal. If you already subscribe to Adobe’s Creative Cloud to get Lightroom and Photoshop on your desktop, the complete Lightroom for Mobile app is included in your monthly subscription. Simply download it from the App Store or Play Store using your Creative Cloud credentials.
If you don’t subscribe to the Creative Cloud and don’t want to, you can download the free version of Lightroom to your iPhone or Android phone at no cost. This free version is lacking three features: Healing, Geometry, and Selective. While these are all useful tools, they are not required to shoot and process RAW with the Lightroom app. You can do everything you need to create and edit RAW infrared files with this free version.
If your photography repertoire includes infrared (or you want to add it!) and your camera bag includes an iPhone, you may enjoy combining these two pleasures.
To see images created with other iPhones and android phones, visit our Facebook group, Open Group! Infrared on the iPhone.
Rad Drew
September 2022
INDIANAPOLIS, IN
Photography has always been synonymous with fun and magic. As a kid, it was fun to compose, fun to capture, magic to develop and process, and fun to share. It was fun to seek out photos and to engage people, and magic to travel to new lands or find the unusual in familiar places. It was magic to convey an emotion or make a point and touch others through visual imagery that I created. As an adult, photography continues to be more fun and magical than I ever dreamed! Despite changes in technology that have occurred during my lifetime, the esthetic of photography remains much the same. The creative mind of the photographer is still the most important element in a great photo. The camera doesn’t create a photograph any more than a hammer designs a building; it’s merely a tool that allows us to create our vision. Today, my camera bag holds two mirrorless cameras, an infrared camera, a point-and-shoot, and an iPhone. Of these tools, I credit my use of iPhones since 2010 with providing more opportunities to practice the esthetics of photography, making me a better photographer regardless of the camera I'm using. And photography has never been more fun and magical!