Black & White Image-Making In the Digital Age

Black & white, or monochrome photography, is alive and well these days. Surprisingly there are a number of young people like my grandson who use vintage roll film cameras and silver-based film to make silver prints in the darkroom. But, by far, the greatest number of B&W images are made through the conversion of digital color files to B&W files.
There are a number of software programs that facilitate this conversion like Silver Effects Pro II, many of which do a credible job, and which I have used in the past. Amazingly, my preferred method is Lightroom Classic for reasons that I will soon explain. In general, the problem with commercial conversion software programs is that they don’t teach the art of pre-visualizing B&W images pre-capture, or prior to selecting files for conversion. Some do provide thumbnails indicating the likely results for using pre-determined profiles.
But, if a photographer does not understand the art of selecting the right scenes in the field, looking for the right kind of lighting, selecting the right type of files for conversion, and how to edit digital files to create impactful B&W images, the results will be disappointing more often than not.
I spent 50 years developing B&W film and prints in the darkroom. And while I greatly admired Ansel Adams’ work, I never came close to his brilliance. Nevertheless, I had my occasional successes once I understood the graphic nature of B&W and other monochrome image-making. Ironically, it was color print photography that frustrated me during that same period because the two types of photography are entirely different arts, and each must be deeply understood in order to produce exceptional images.
Another irony is that I learned what makes really good subjects for color images and how to edit them successfully since I switched exclusively from film to digital cameras in 2002. But, I stopped making any serious B&W images thereafter.
And a third irony is that it took a pandemic to get me back to B&W image-making, simply because I was trying to satisfy my desire for producing fine images at a time when, like so many others, I was not able to travel far from home to take new ones.
Over the past six months I reviewed my 800 best digital files to see if any of these could be converted to strong B&W photographs, and by chance noticed several new features in Lightroom Classic that enabled excellent control in selectively adjusting different tones to produce the strong graphic impact that most successful B&W images require. But, before covering this, a summary of the principles that lead to successful B&W photographs will be most helpful.
The Nature of B&W Images and Principles for Creating Them
Other than some high key and low key photographs and a few low-contrast compositions, the strongest B&W photographic images are graphics with light, middle and dark tones, like pen & ink drawings, pencil sketches, and charcoal sketches. They are abstract and may only be related to reality in form and detail.
I didn’t appreciate this until I had occasion to study Ansel Adams’ 16×20 personally hand-printed images for lengthy periods. Though I have all the books he wrote on exposing and developing negatives and prints, and followed his Zone System meticulously (albeit with a smaller format than 8×10), my images didn’t have the same impact. After spending four days at Yosemite Lodge where some 20 of his best images were on permanent display, I realized that what he didn’t put in his books was the fact that he kept re-printing his earlier images and increasingly darkened some of the zones that started out closer to medium gray, but only when that gave the overall graphic composition more impact.
I have almost all of the major books featuring his best images, including the two published under his copyright, in my library. I also own three student 8×10 contact prints, and there is a huge difference from Ansel’s personally printed work and these. He did a lot of burning and dodging, as well as masking to stress graphic composition, where the overall composition was perhaps even more important than the rich detail for which he was known. Ansel also used more colored filters in his later work to increase the contrast between different parts of the composition by absorbing some wavelengths selectively while transmitting others. More about this later when editing techniques are discussed.
This brings up two guidelines for improving the likelihood of finding and developing good B&W landscape images. These apply to both selecting subjects prior to capture and selecting digital color images after capture and normal editing.
Landscapes
B&W Principle # 1
- Look for scenes that have broad swaths of dark tones alternating with lighter mid-tones, as opposed to scenes which have a range of light to dark tones broken up into small interspersed patches.
B&W Principle # 2
- Select those scenes and images in which the broader swaths already form a dynamic and pleasing composition.
While these two principles apply particularly well to landscapes, they are also applicable to wildlife images, portraits, still-lifes and nudes.
The following image illustrates these two principles and is shown in color and in B&W as a before conversion and after conversion comparison.
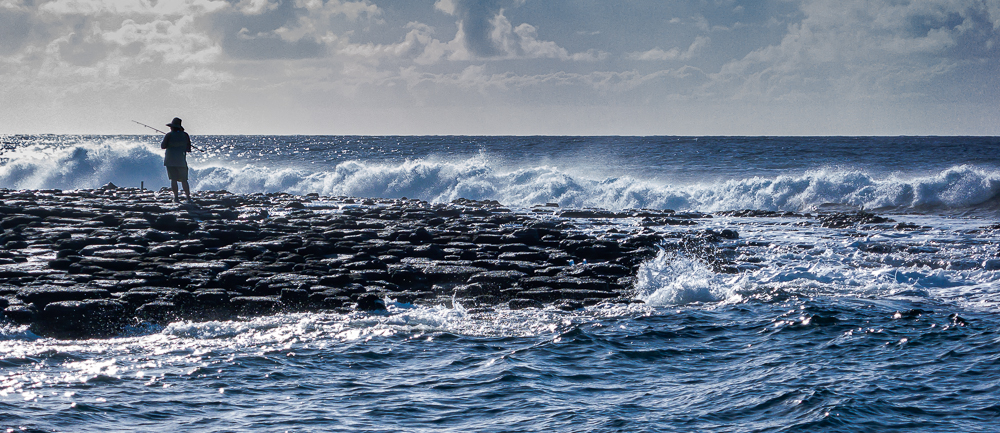
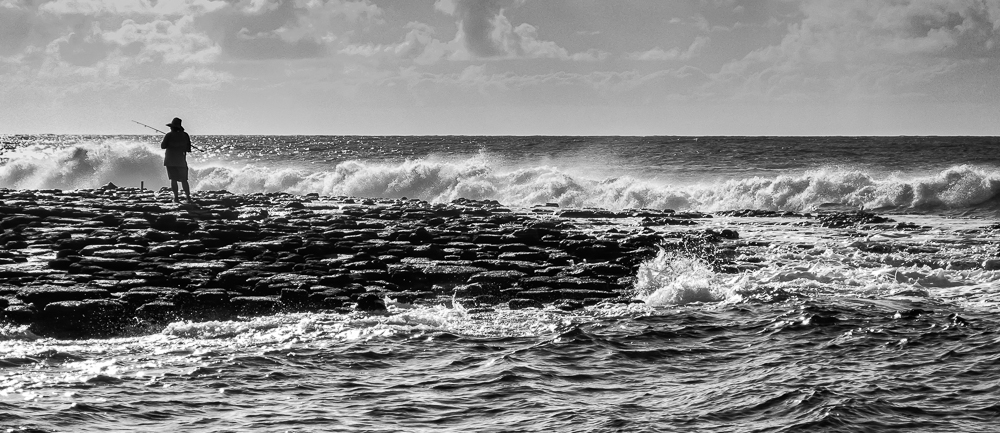
This is a good juncture to mention that the objective is not to create a B&W image that is better than the original color image. It is only to produce a good and compelling B&W image. The two versions can be equal in appeal, or one can be more appealing than the other. For the purpose of this article, the only objective is to create a strong B&W image. In the case of the above two versions, I would say that they are comparable in appeal.
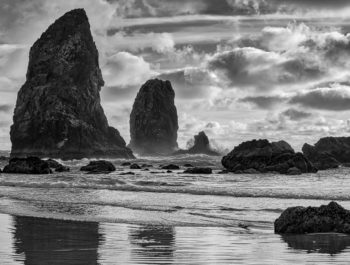
In looking at this scene it is easy to see the alternate horizontal layers. Starting from the bottom, there is the darker foreground ocean followed by a thin layer of light “chop”, then followed by the dark stone breakwater in the mid-ground, and then a layer of a foamy breaking wave in turn followed by the ocean in the background. The last layer is the sky. And even though it is tonally interrupted by lighter clouds, they are too poorly defined to be considered a separate layer. This layering effect is found in many landscapes, and is called “horizontal banding”.
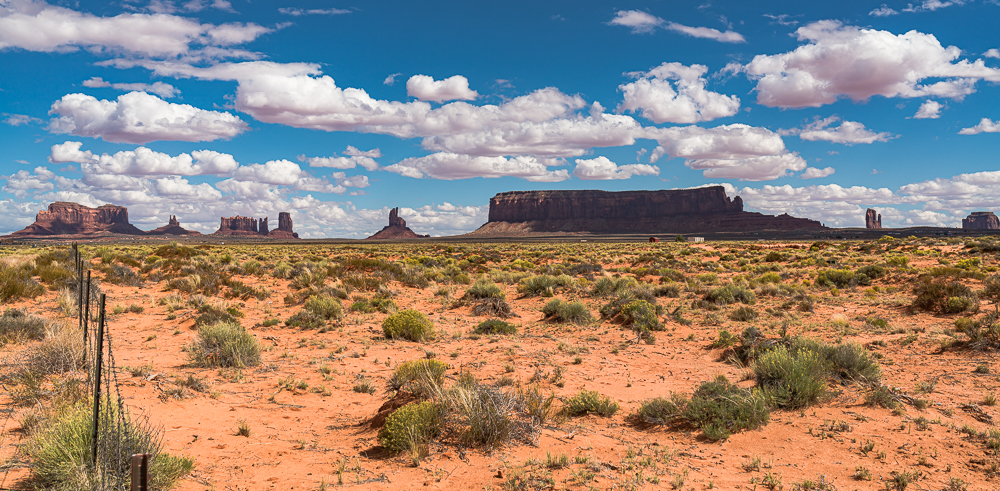
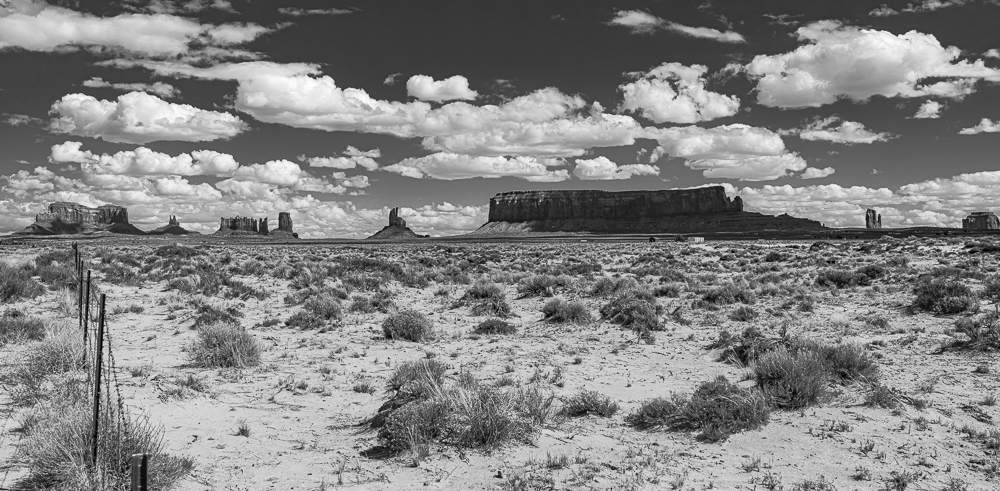
The following image that I took of Monument Valley also illustrates a rough pattern of alternating light and dark zones. In this case, the clouds are distinct and mostly fill the sky. So, this is an alternating bright-dark-bright sequence. The knoll in the foreground is a darker exposed rock stratum that could be considered as a fourth layer. It does help moderate and contain the expansive bright midground soil, though the effect is subtle.
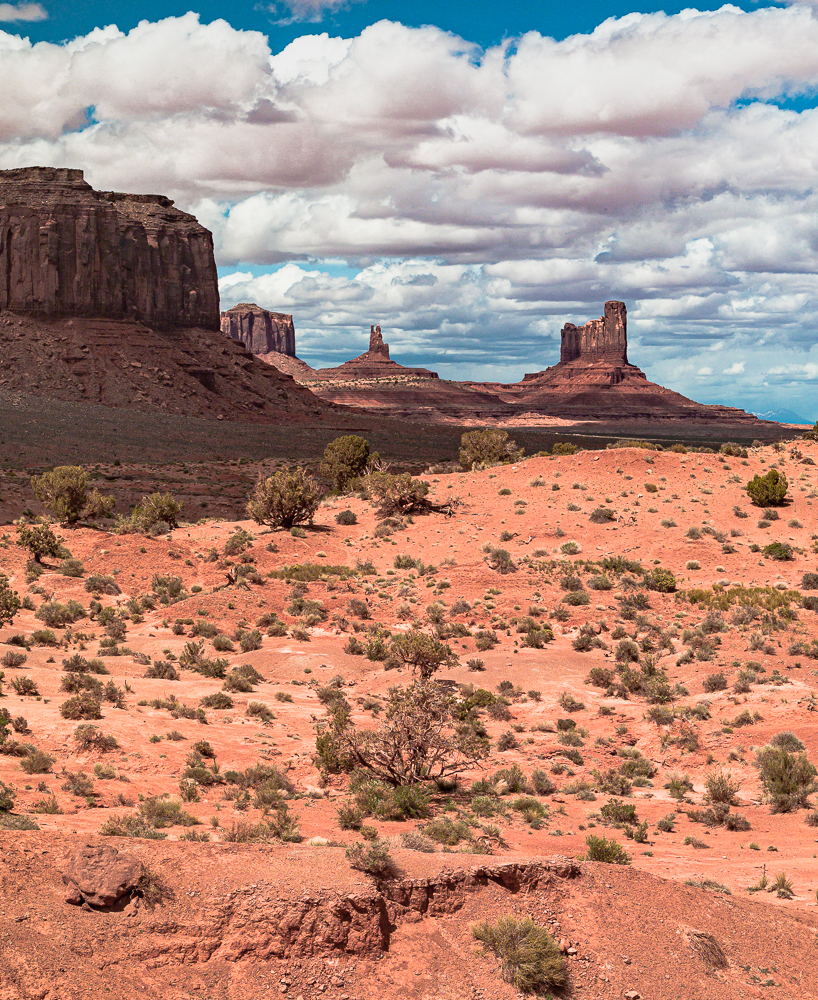
To make the B&W version stronger, I darkened the red and blue colors selectively and increased overall contrast. In my opinion, I think that they are equally strong images. Later in this article, I will elaborate on how to lighten or darken specific image areas while in a B&W edit mode.
I took the following image of Monument Valley from an entirely different perspective in the Autumn of 2016.
Usually, I warn against placing the horizon line in the middle of the image. But, in this case, the dark landforms protrude into the sky area to avoid a static look. To make the B&W version stronger, I darkened the sky, lightened the foreground and midground, and increased overall contrast slightly.
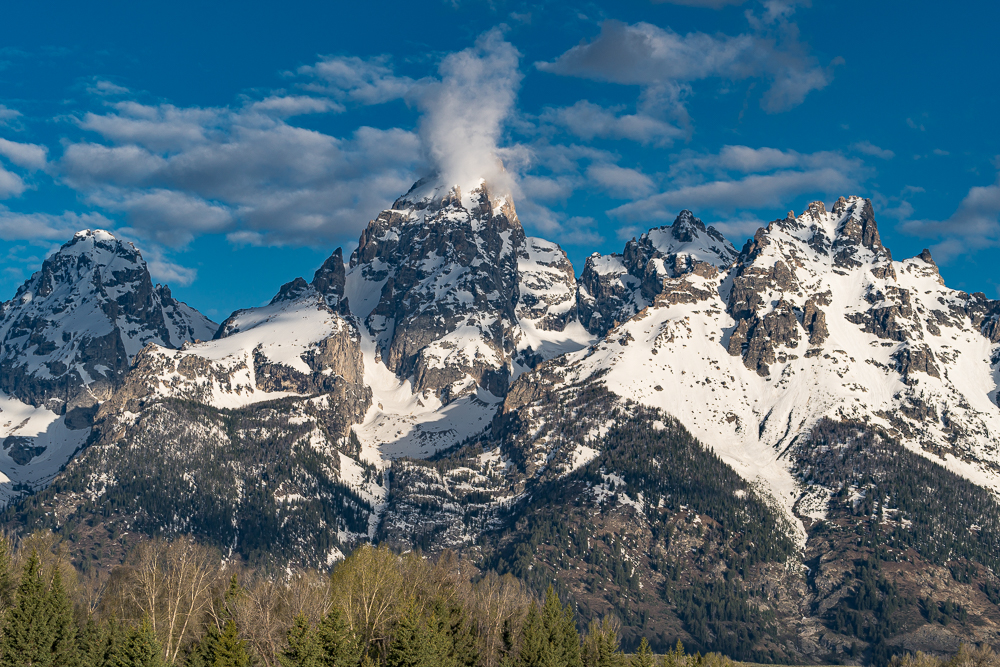
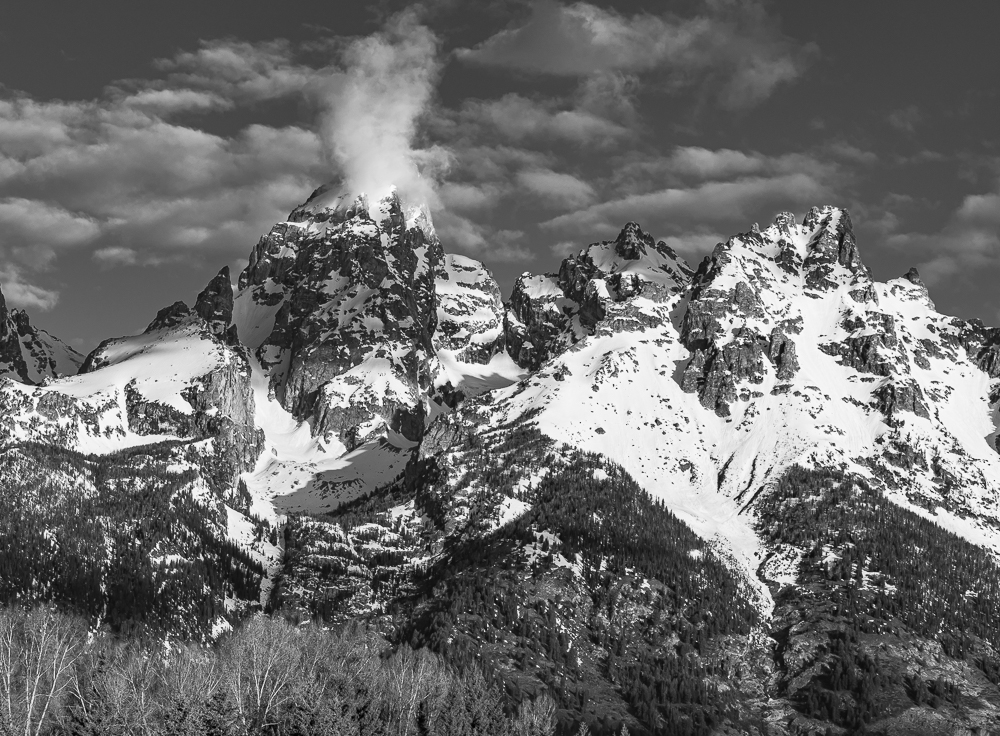
Mountains, particularly with snow, often lead to strong B&W images, when most of the mountain is visible and well defined. The Teton Range is an excellent subject for B&W images because it rises from a flat plain and can be seen in entirety from the Wyoming side for much of the year. The next two images demonstrate that.
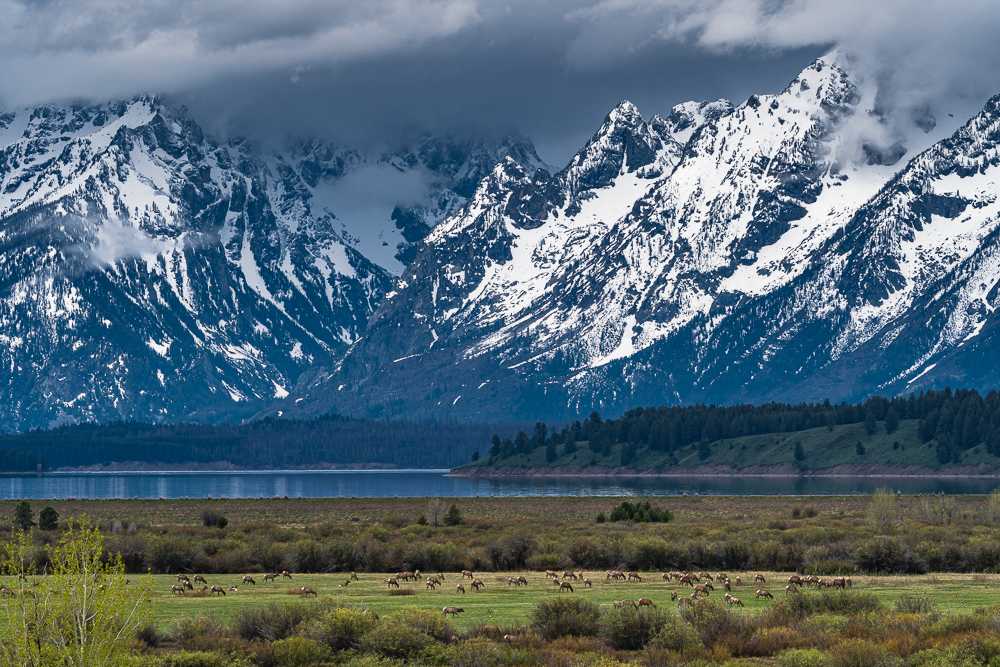
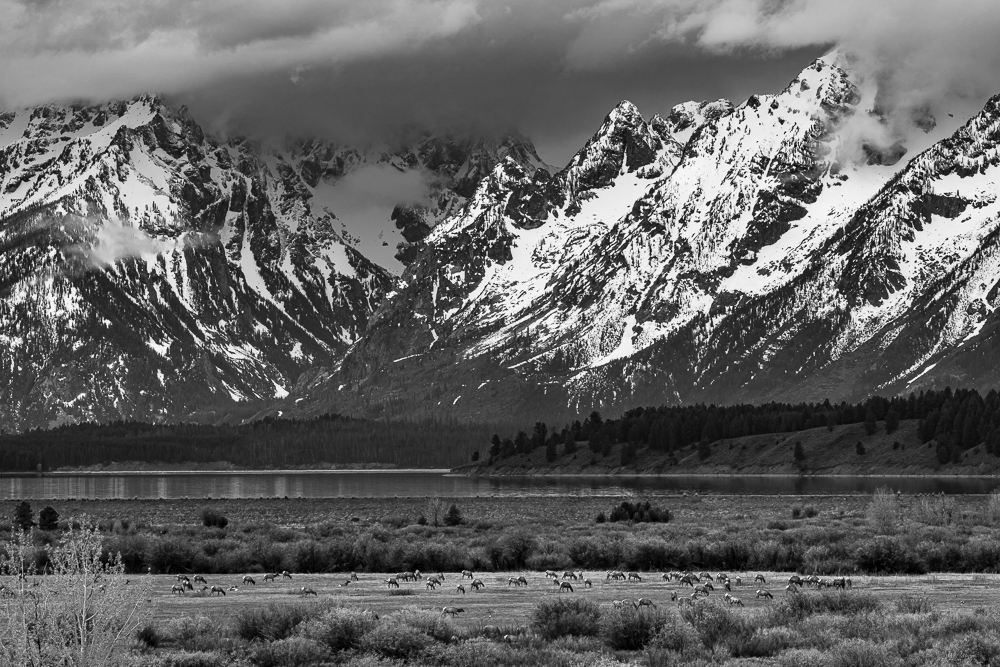
The B&W version emphasizes the banded pattern. The lowest horizontal layer contains the small trees and shrubs, followed by the elk and pasture, followed by dark scrub, followed by southern Jackson Lake, followed by low dark hills, followed by the mountains in low-lying clouds.
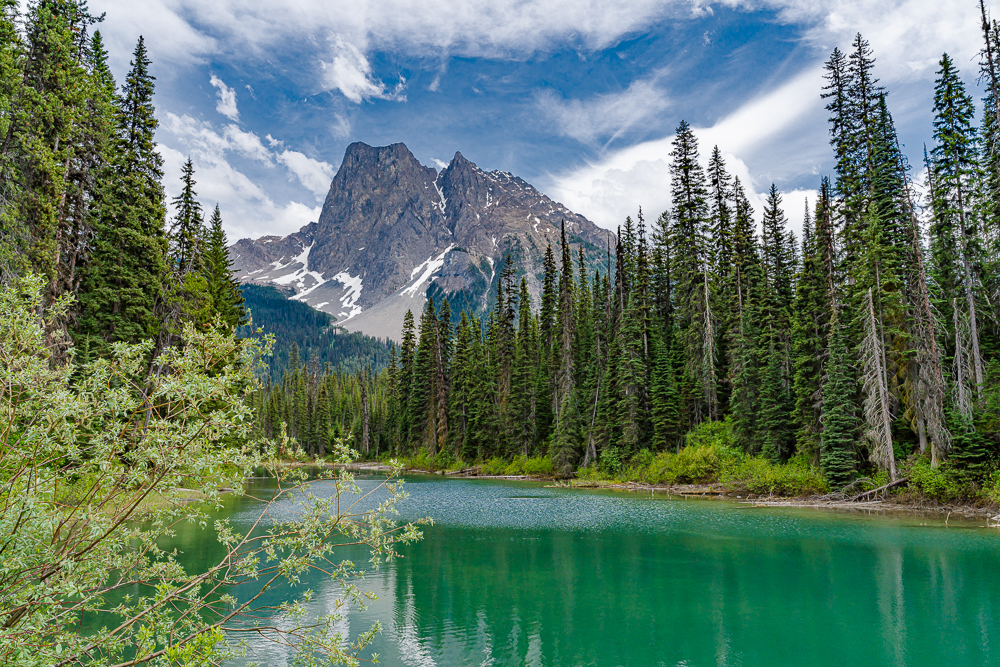
The next two images are also mountain scenes taken in the Canadian Rockies. They do not have well defined horizontal layers. But, the swaths of light and dark are strong enough to create pleasing graphic compositions.
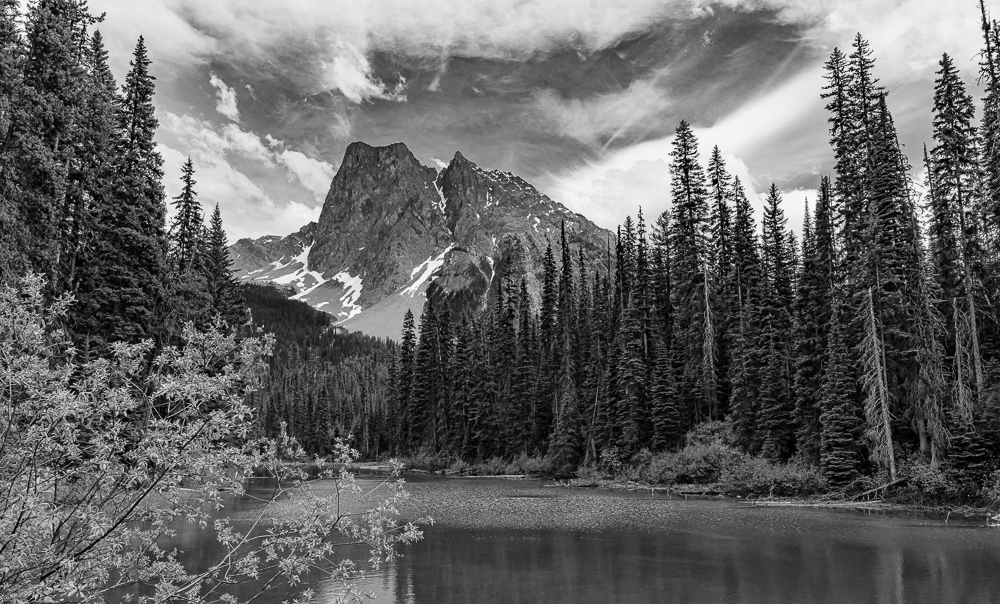
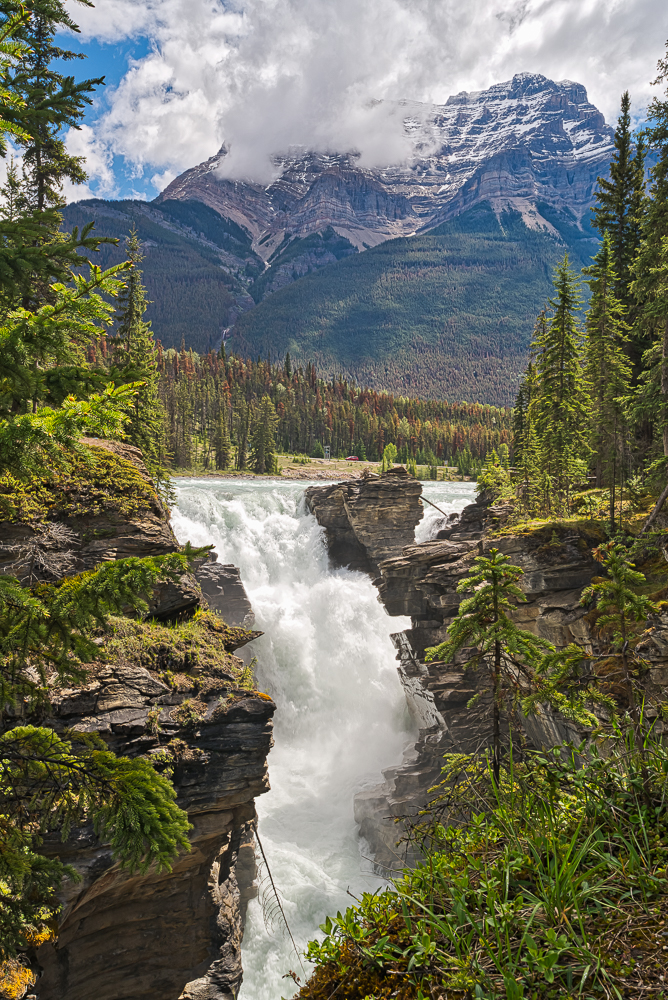
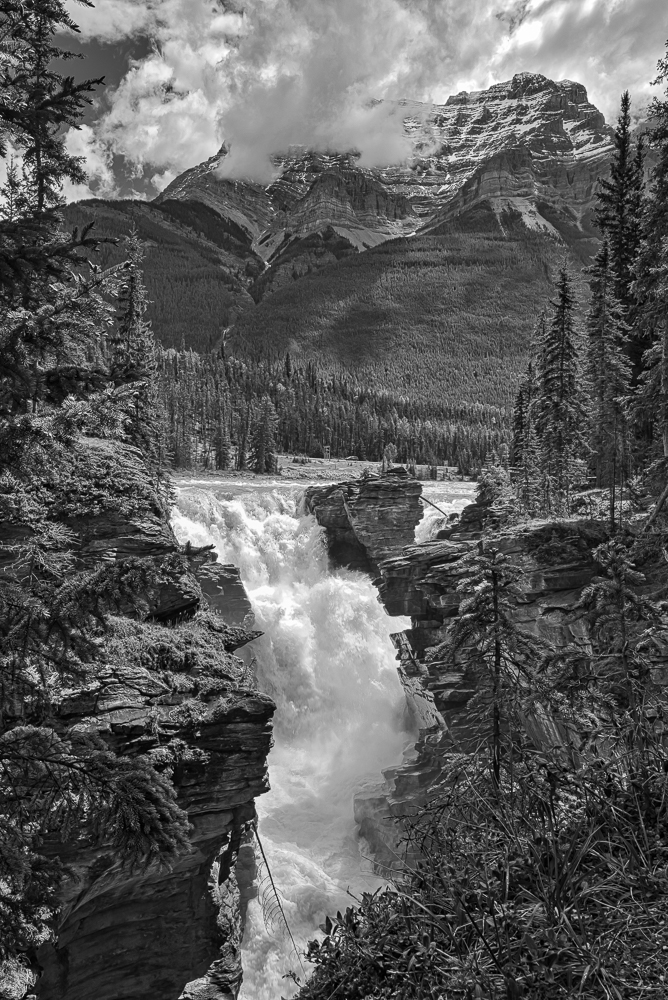
The Athabasca Falls B&W version shows more contrast and is a little stronger.
Other Subjects
Banded layers are not as often seen with non-landscape subjects. However, there are other principles that can be used to create appealing B&W images.
B&W Principle # 3
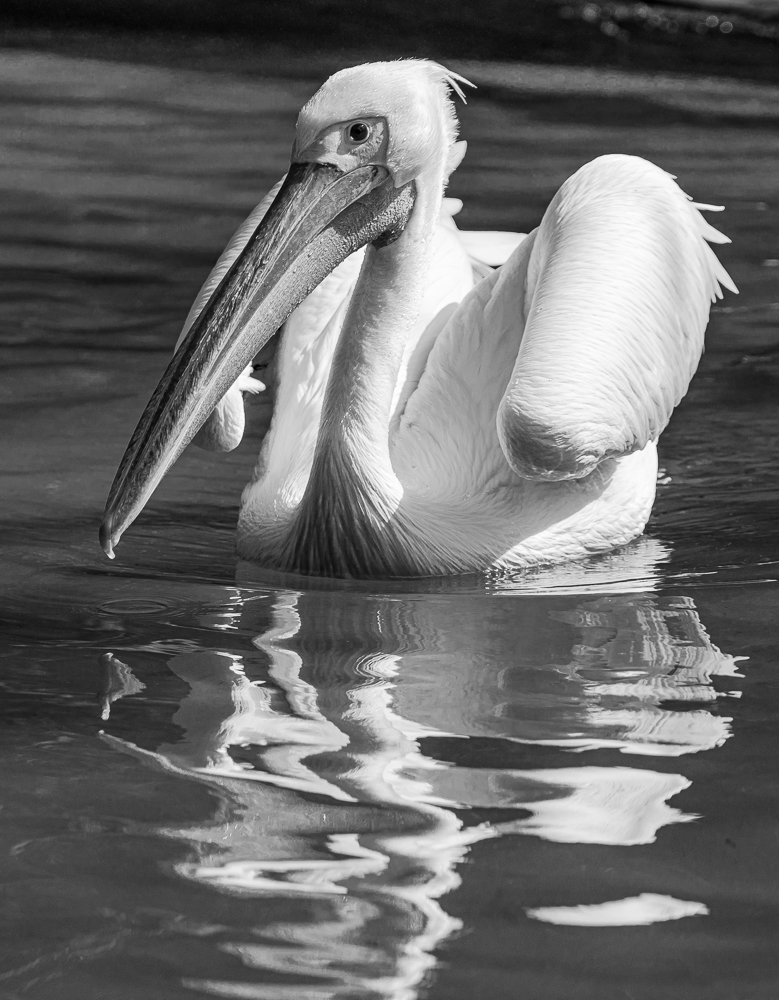
- A light-toned subject against a dark background has a higher B&W success probability.
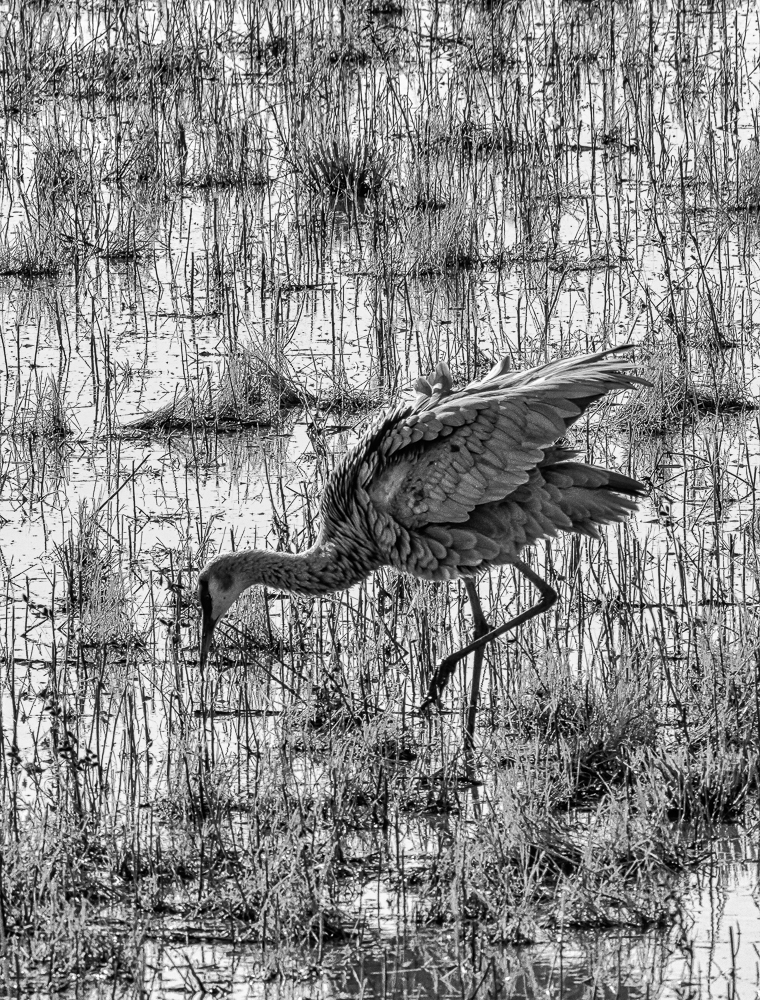
In photographing Nature, a white animal or bird or flower against a dark background usually will produce good B&W images as shown in the next five images.
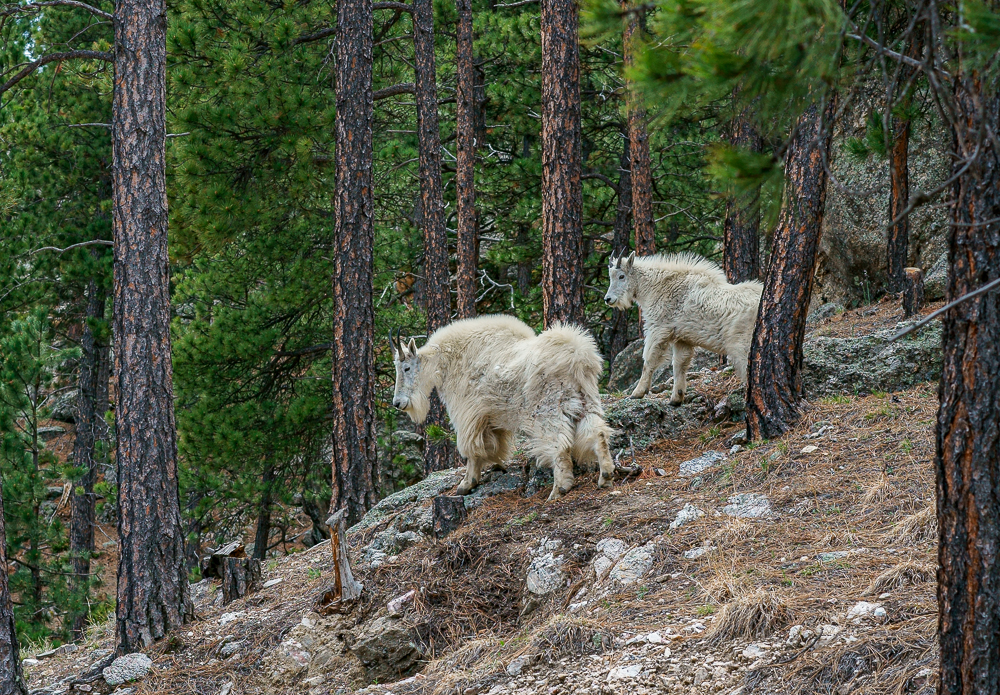

Another example of large white animals against a dark background follows.
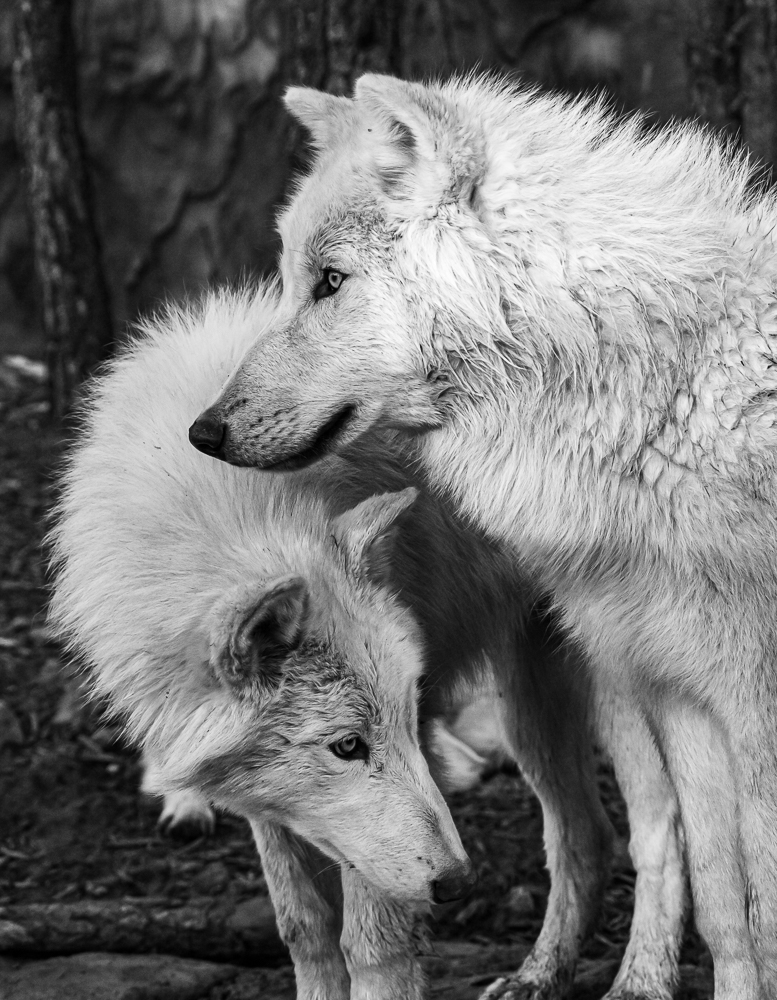
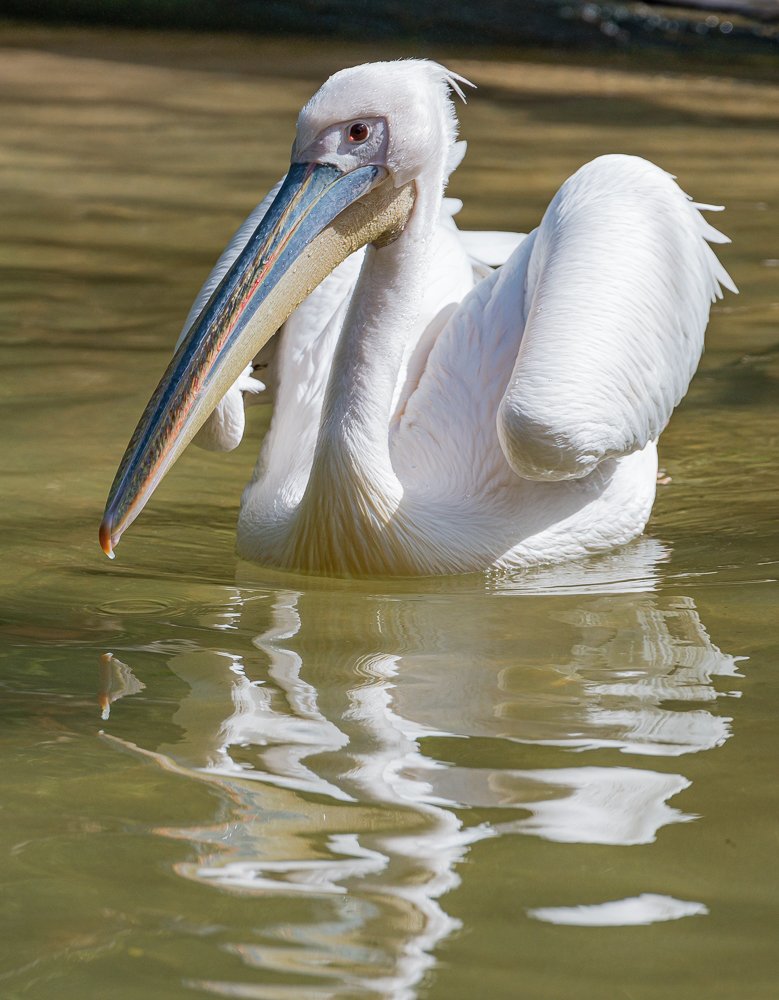
White birds against a dark background often produce strong B&W Images.
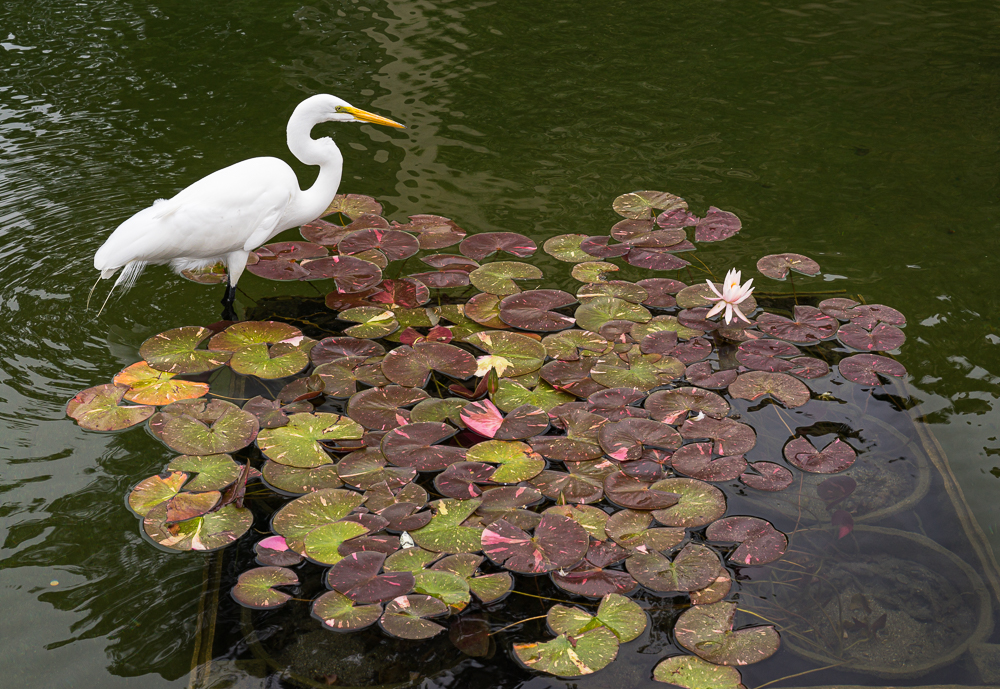
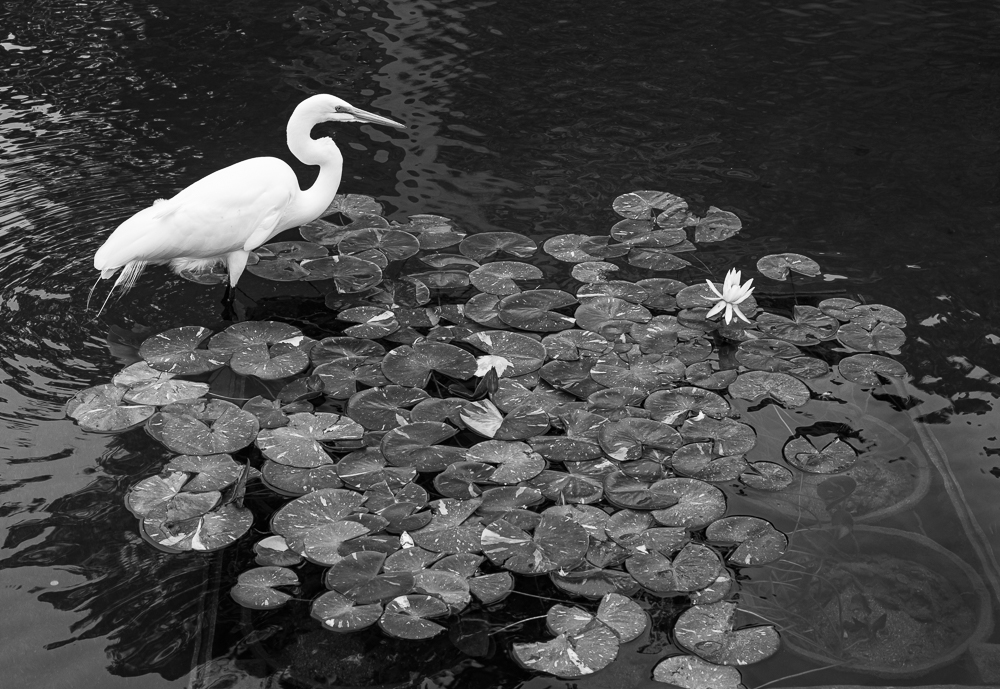
This is not a rare occurrence. Egrets often live near people and will frequent sources of food that humans unwittingly provide.
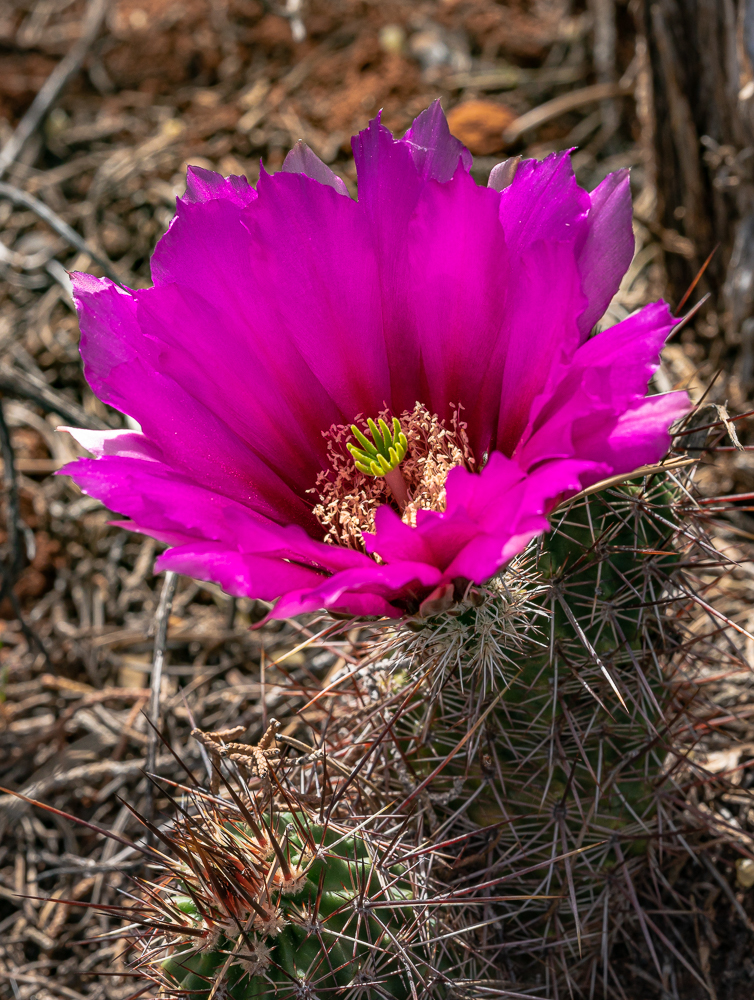
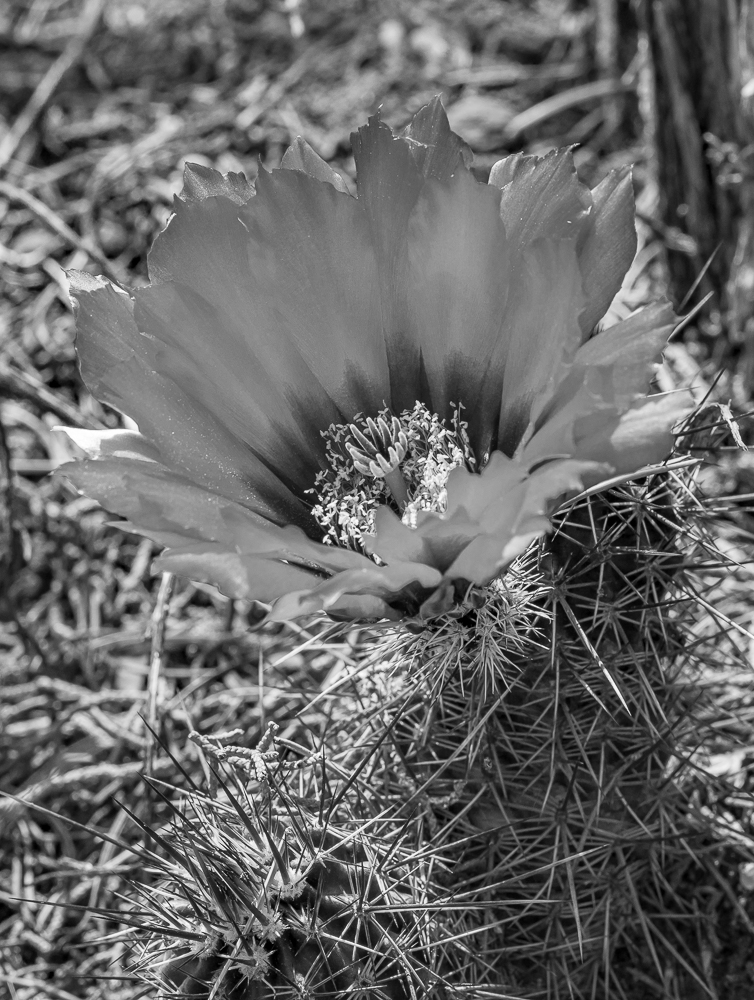
Large white flowers against a dark background work just as well.
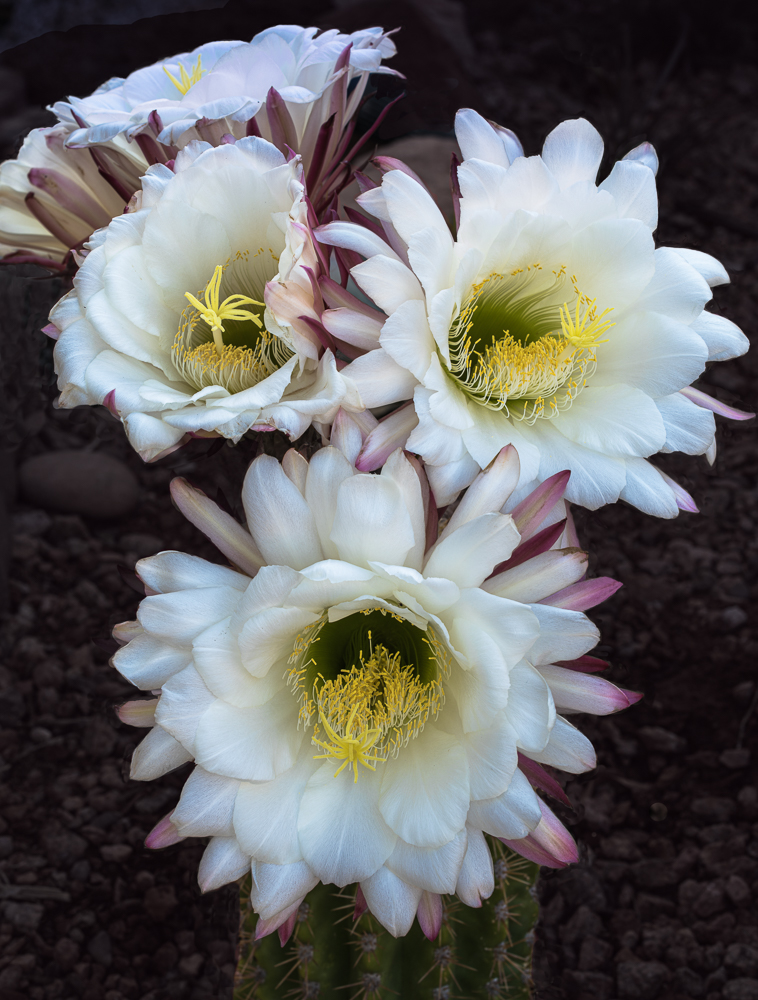
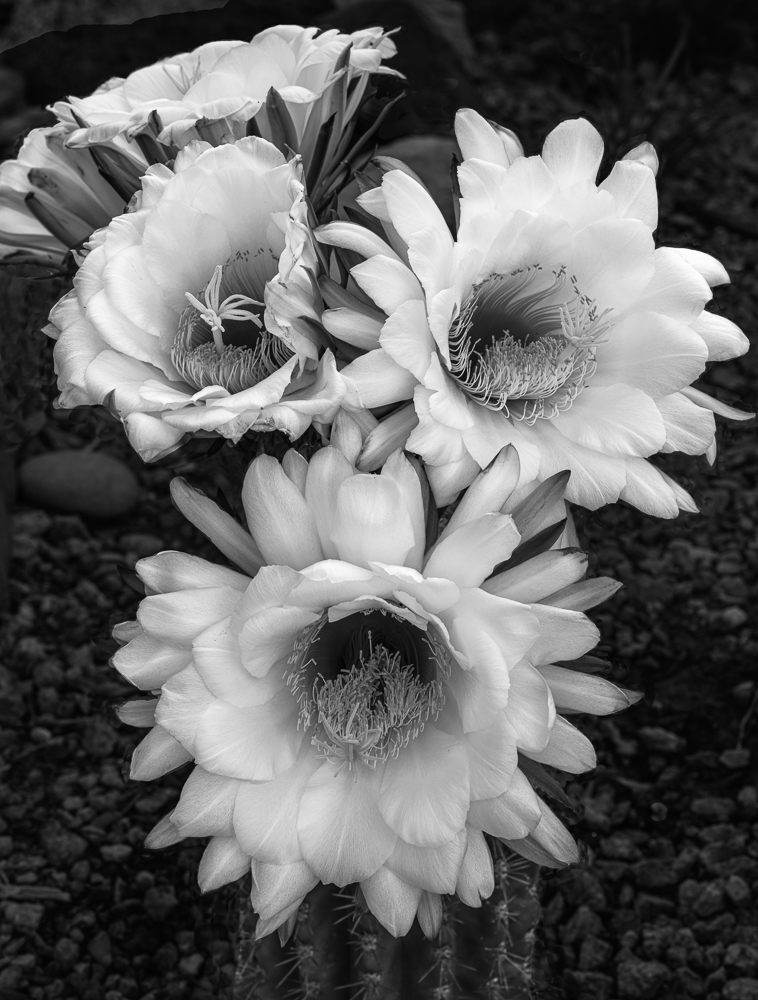
Executed properly, a white subject against a dark background provides maximum separation and subject detail, and almost always works well. The reverse, a dark subject against a light background, rarely works unless the subject is well defined and exhibits substantial detail.
B&W Principle # 4
- A dark-toned subject against a light background should have well-defined shadow detail.
Good B&W Images of this type are not common. But, when they work, they can be stunning. To improve the odds for this type of image, another principle is advised.
B&W Principle # 5
- Keep the composition simple.
The next image demonstrates this well. Note that while the water background exhibits mid-gray luminance, it is easily lightened in Lightroom, a simple process which will be covered shortly.
Scenes in which the subject has the same reflectance as the background almost never work well as B&W images. On occasion, they can work if the background is mostly cropped out. In the next image, the color version shows a Red Fox against a green out of focus background. Since these two colors are opposite each other on the color wheel, they provide maximum color contrast. However, they reflect roughly the same amount of light to produce a similar medium gray. Therefore, there is little separation between the subject and the background in B&W. Selective editing of this image doesn’t adequately resolve this issue. The only way to make this image work in B&W is to crop out as much of the background as possible. This is a major application of Principle # 5: Keep the composition simple.
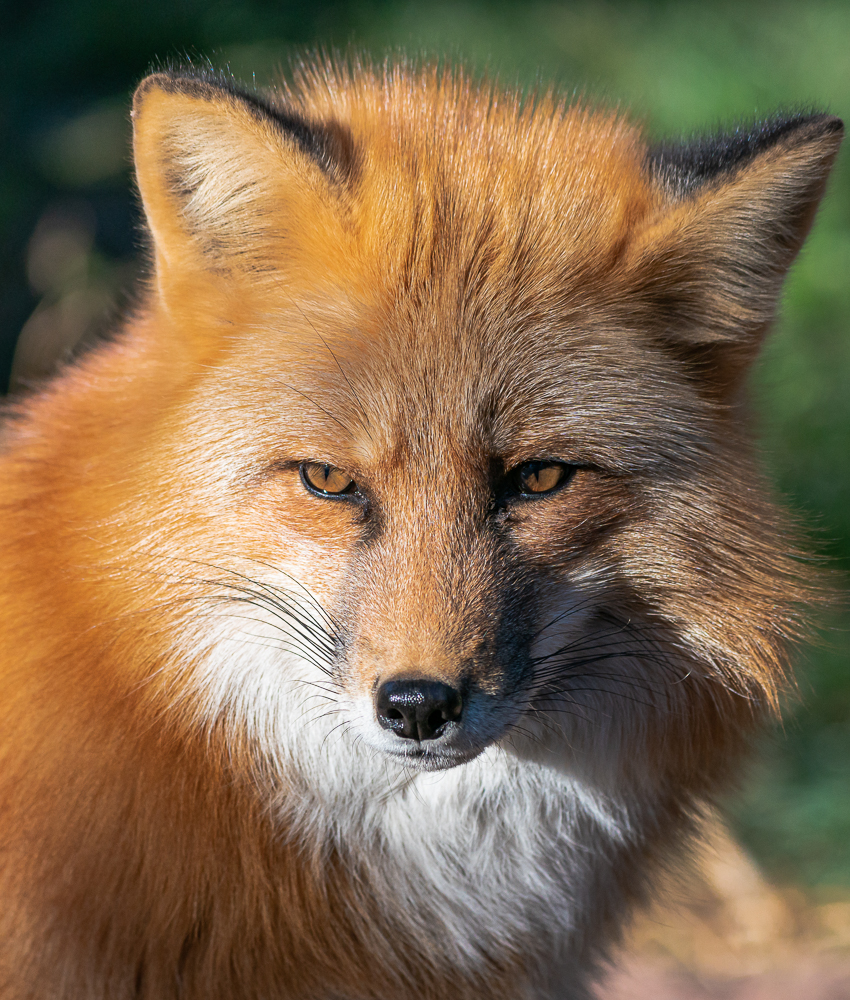

While the fur on top of the foxes head bleeds off into the background, the fox’s eyes and front-lit fur is strong enough to carry the image.
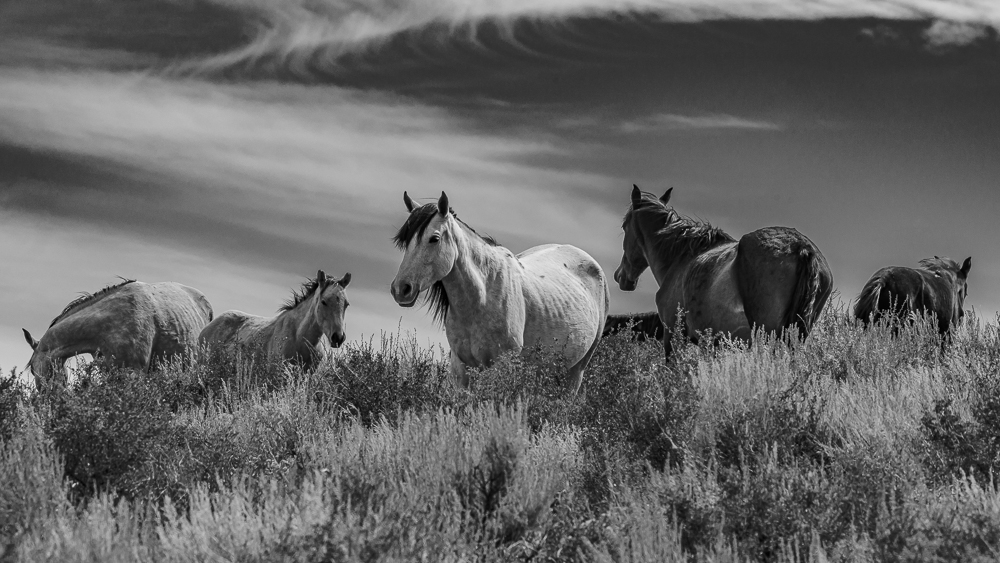
So, what happens when you have more than one subject standing against a blue sky and the subjects range from dark to light in tone, as in the following image?
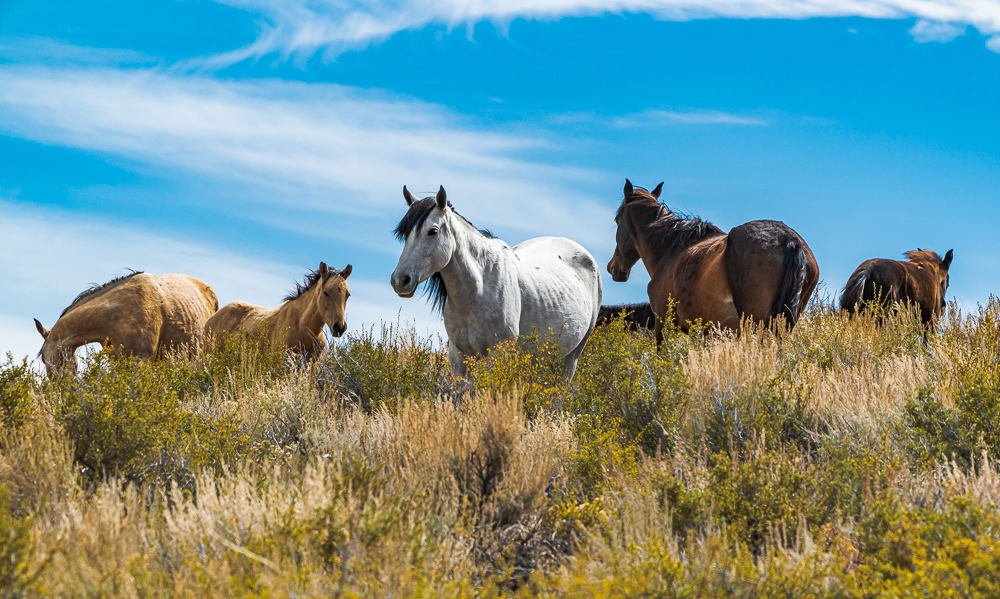
I was doubtful as to whether this would work. But, I liked the overall composition and decided to convert it to B&W. I was surprised that it worked quite well. The separation of the horses from the background was adequate, and the individual horses were large enough to stand out. The varied positioning of the five horses creates a dynamic composition that remains strong.
So this suggests another guideline.
Principle # 6
- You don’t know until you try it.
The purpose of my principles set forth in this article is to save photographers time and effort by weeding out poor candidates for both capture and conversion to B&W. Of course, with any rule there are exceptions. And as you get better in understanding what works and what doesn’t in B&W image making, you also develop instincts. If a composition is highly appealing, and something tells you “this might work”, then it probably is worth the small amounts of time and effort to try it.
One of the traps that a photographer often faces is when the subject is strongly colored, while the background is subdued and lacks interest. In the case of the following image, it seemed as if the strong visual contrast would carry over into B&W. But, again, colors are different than neutral tones. The next two images strongly illustrate this.
Furthermore, the chopped-up nature of the foreground and background was overshadowed by the flower’s color but becomes a glaring distraction when the flower is now composed of delicate light to medium grays. However, there is a way to avoid this. And that is to photograph just the interior of the flower.
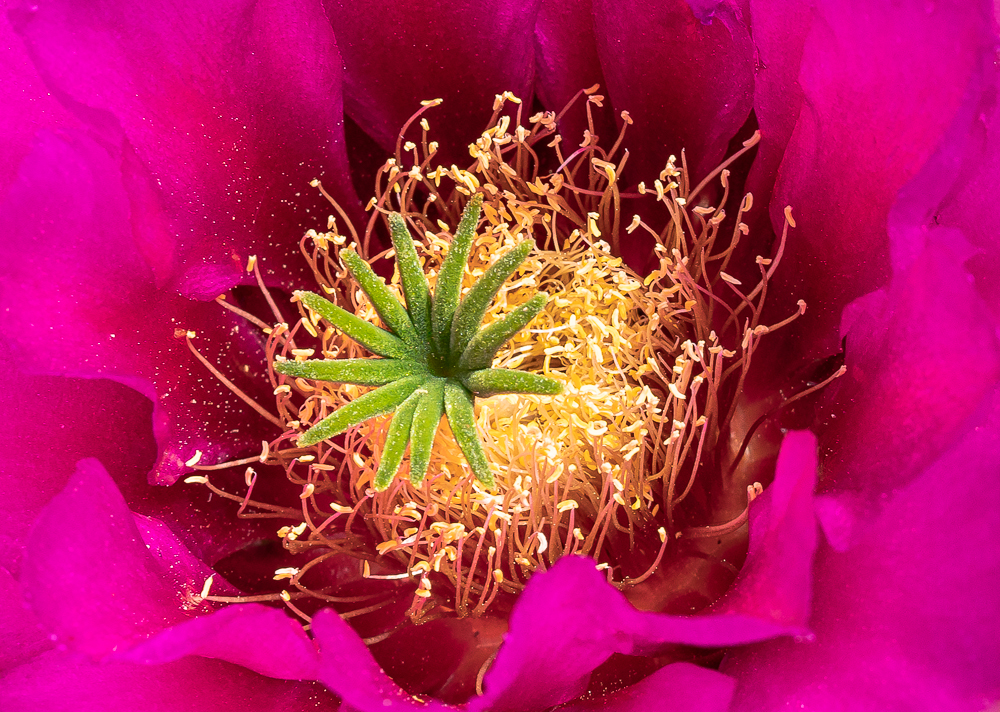
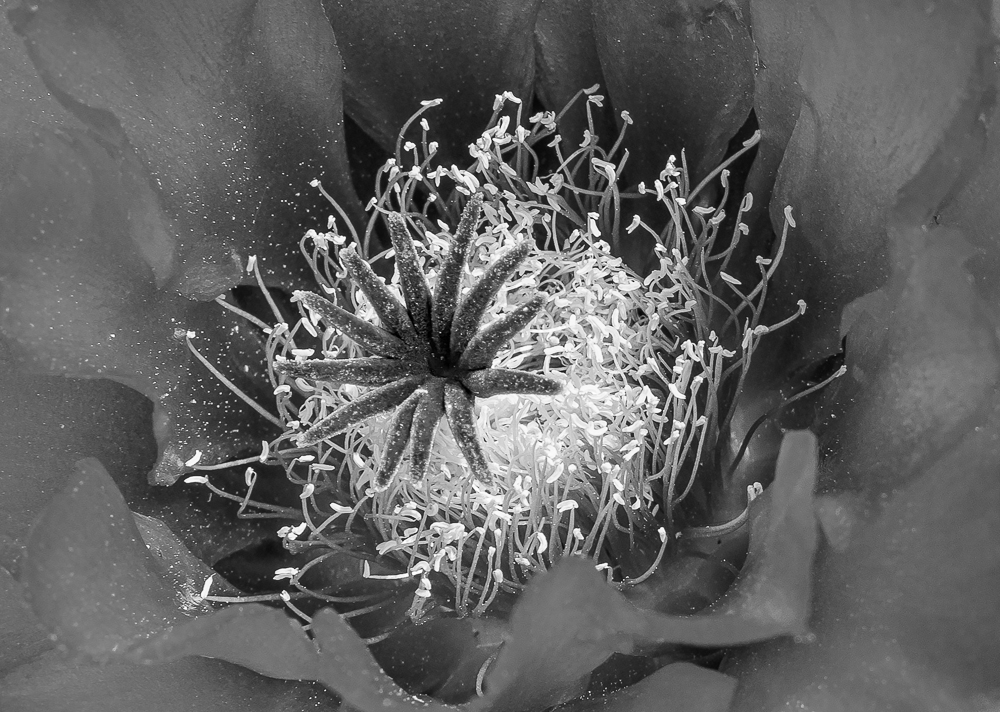
The difference between the two B&W images is startling.
Finally, if the subject is graphic in nature to start with, the odds are good that it will make a good B&W image without much editing. Ancient Native American dwelling sites and pictograms often fit in that category.
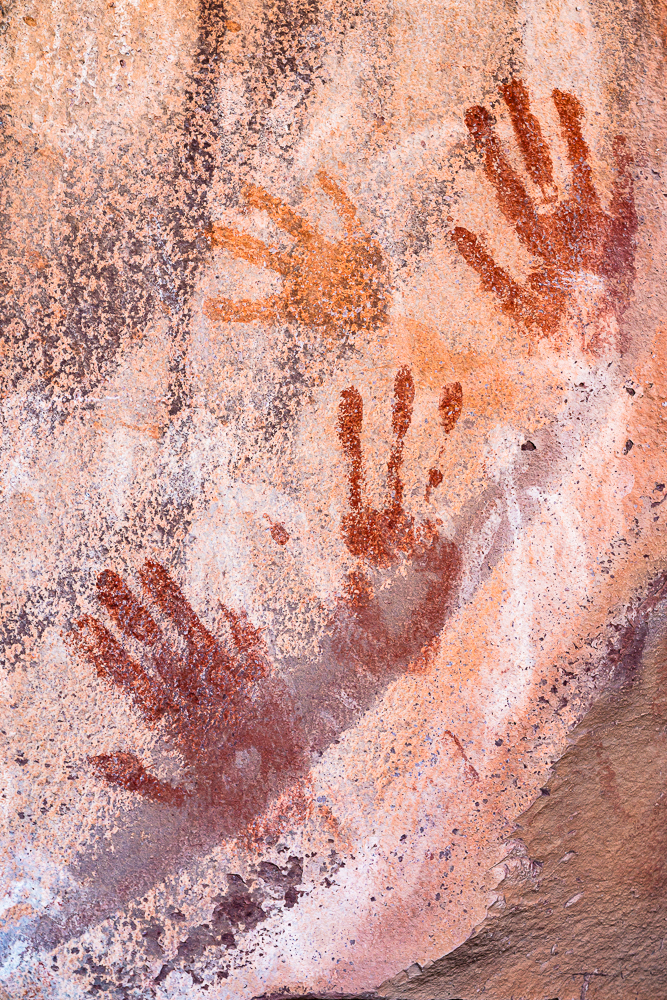
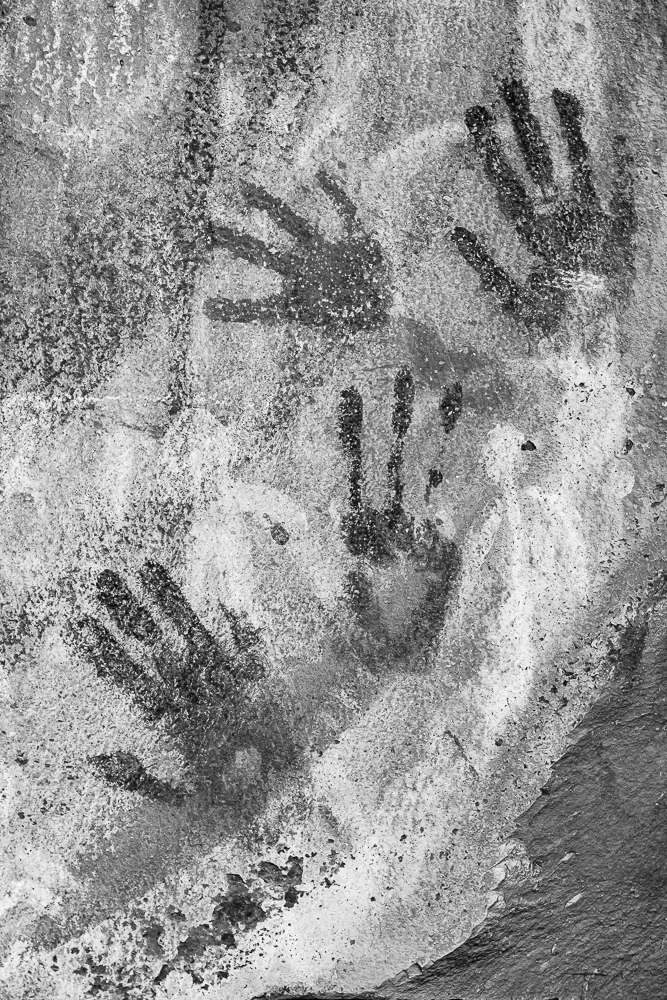
My favorite type of ancient Native American dwellings to photograph are those with richly textured and sometimes colored rock overhangs that shelter the dwellings from the elements. The effect is often very graphic as shown in the following Mesa Verde image.

Important B&W Editing Tools
After 50 years of working with B&W film and paper, I had a good working knowledge of which scenes and images work well as B&W images. What held me back from doing much digital B&W conversion was the inability to edit specific tones in a B&W image without elaborate masking and other cumbersome selective editing tools. That changed with a very recent Adobe Lightroom update.
Now, after you click on the Black & White tab on the upper right of the Development module, you can scroll down to an editing tool that is labeled “Black & White Mix”. This resembles the color editing tools in the color Development module which offer sliders to change brightness, saturation, and hue for eight colors including the three additive primary colors (RGB) and two subtractive primary colors, yellow and magenta.
In other words, in the current Lightroom Classic, the underlying color information is retained so that specific color ranges can be lightened or darkened while showing the luminance changes in the corresponding B&W tones. Along with the global contrast controls, this is all that is needed to increase the graphic appeal of a B&W image in Lightroom.
In case anyone thinks that this is “cheating”, I might remind them that a major tool used by Ansel Adams to move one intermediate gray tone to a lighter or darker level was the use of color filters. As an example, red rocks and green foliage look very different in Nature. But they both register as the same medium gray in B&W film and digital images. To separate the two masses, Adams, and others, used a red filter to lighten the red rocks and darken foliage, by allowing more red light to pass, and less green light to reach the film. Similarly, yellow, orange, and red filters were used to darken the blue sky in increasing amounts.
The modern digital equivalent is no different. And after all, B&W images are not supposed to represent reality. As stated at the beginning of this article, B&W is an abstract graphic.
Harvey Stearn
September 2020
Sedona, AZ
To see the scope and essence of Harvey Stearn's photographic art please visit www.CameraStops.com. Mr. Stearn began photographing Western landscapes and wildlife at the age of 13, spent 50 years pursuing his passion in the field and in the darkroom before fully converting to digital photography in 2002. He developed color prints as well as monochrome, but switched over to digital capture and editing in 2002. Though he was a top executive for two large scale land development and home building corporations, he always found time for his fine art photography which won many awards. His work was exhibited in art museums in Southern California and Arizona, and was also featured in billboard advertisements and published in magazines. Mr. Stearn served on the California Arts Council for nine years, including two years as Chairman and another two as Vice Chairman. In addition, he was the founding Chairman of the John Wayne Airport Arts Commission in Orange County, California. Mr. Stearn’s work was sold through Arizona galleries for 15 years. In recent years he wrote 33 illustrated articles for PhotoPXL.com and 14 articles for Luminous-Landscape.com. In 2013 he published a book entitled “In Search of the Old West” which has been widely acclaimed. He was a guest lecturer on photography on a cruise ship visiting Chile, Argentina, Uruguay and the Falkland Islands. His work was among the top 100 images printed in NANPA's Showcase publications in 2019 and 2020. Images have been edited and selected for two new books on Landscape photography which will be published in late 2024 and early 2025.