Technical Cameras – Using Camera Movements in the Field
Camera Movements

Early in the first article, I mentioned camera movements:
A primary benefit of using a technical camera is to apply movements and utilize the larger image circle associated with most of the dedicated lenses from Rodenstock and Schneider. There are three movement applications frequently used with technical cameras:
- Rise/fall: shifting the lens and/or the backup/down to frame the scene without tilting the camera. In general, this is done to keep the back and lens perpendicular to the ground, but there are many other applications. I use this on almost every image.
- Shifting Left/Right: Usually accomplished by sliding the back left/right. There are applications for perspective control, but most of the time this is done to stitch two images together. This is a simple and reliable way to create a panorama, and is something I do very frequently. It also allows you to shift the back in its portrait dimension in order to make use of the wider lens image circles, which increases the angle of view.
- Tilt: Apply lens tilt to adjust the plane of focus angle, which creates a depth of field wedge that keeps subjects at various distances from the sensor plane in sharp focus.
This is not just a feature, but for most of us it is the reason for shooting with technical cameras. The above movements play a key role not only in field workflow, but also in how we see . The simplest example of this is using rise/fall. I tend to set up the camera oriented perpendicular to the ground, then use rise fall for framing. That is completely foreign to most DSLR users. It’s not the “right” way or a better way; just a different way that results in a different perspective. You can use software to create essentially the same image without rise/fall by transforming the image later in one of the many programs we have at our fingertips. But, unless you have and employ all those software tools on location, using a technical camera is the only way I know of to see that framed image in the field with the finished perspective. For me, that is invaluable and something I have come to rely on and expect in my fieldwork. It also eliminates throwing away pixels during the warping process.
Rise/Fall

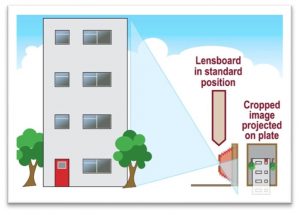
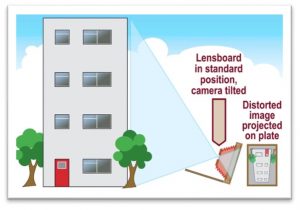
Lens rise/fall is arguably the most utilized movement, specifically lens rise. This is the movement that keeps buildings and trees straight up and down without looking like they are tipping over. Instead of pointing the camera up to include the top of the building or tree, we instead shift the lens up (lens rise) or the digital back down (back fall) to reach the bottom portion of the image circle that includes the building or tree top. First, some context on how I use these terms. Historically, the terms apply to the lens relative to the camera/film position. [Lens] rise means the lens is raised up. Because everything on the film/sensor is upside down, it is really centering the bottom portion of the image circle on the sensor. Many technical cameras, mine included,

employ back movements instead of lens movements. Performing a lens rise does essentially the same thing as dropping the backdown, or “back fall.” The difference is back fall keeps the lens in the same position, but drops the back into the lower portion of the image circle. I use these terms interchangeably, although they are technically different.
Below are several classic examples of rise/fall:


In many natural scenes, the differences are more subtle. The tufas below are a good example where tilting the camera down to raise the horizon would change the perspective and make the tufas look different, but not as obvious as a straight tree. Also, when trees don’t even give a solid linear reference, maintaining a perpendicular sensor plane makes a difference, but less obvious.


Shift

I use this term for horizontal left-right back movement. While shift can be used to change perspective, my standard use-case is for stitching two images together to either make a panorama or simply create a wider field of view with one lens. Most technical cameras are capable of shifting the back 12-25mm each way. The Alpa 12 Pano can shift a whopping 35mm left and right. That equals a 130mm image circle! I don’t know of too many lenses other than 4×5 / 8×10 that can handle that amount of movement, but the camera seems perpetually sold-out, so somebody must be using it.
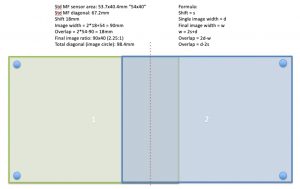
Shifting the back maintains perspective and eliminates challenges associated with auto stitching software when the scene includes flat horizons and moving clouds. Shifting left/right anywhere between 10-20mm will produce two images that can easily be aligned horizontally and stitched together. Stitching using back requires very little image overlap because the lens never moves, and therefore perspective does not change. In the case of 18-20mm shifts there is no need for a third center image.
For my use, shift amount is a very important specification in camera selection. I prefer panoramas in the 2.25-2.5:1 range. My minimum required shift amount is 18mm. I much prefer this technique vs nodal stitching because it is very quick and there is no chance of missing an area. I simply slide the back right first (for the left-hand image), then slide it all the way left (for the right-hand image). That way they match up in my image software library.
| Back Shift Stitching vs Lens Nodal Point Stitching | |
| There are excellent stitching options offered today for combining multiple images into panoramas or for multiple-image, high-megapixel results. One could argue (and many do) that it is just as good, if not better, to stitch images together by just moving the whole camera to cover the scene, then combine them in post. There are differences to the two approaches; which you use will depend on your individual preferences. | |
| Back Shift Stitching | Lens Nodal Point Shifting |
| Lens remains in one position; digital back is moved around in the lens image circle using rise, fall or shift; images are combined in postprocessing software. | Entire camera is moved to record different areas of the scene; movement centered around the lens nodal point is preferred but not necessary; images are combined in postprocessing software. |
| · No change in perspective; fewer stitching anomalies / warping when dealing with flat horizons and moving clouds or waves
· Final image structure and perspective is visible in the field · No risk of missing areas of the scene that will require unplanned cropping later in post · Combining stitching with focus stacking is significantly easier |
· Freedom to stitch any area; not limited to available range of camera movements
· Uses highest quality area of lens image circle (center) · Less issue with lens casts when using wide angle lenses |

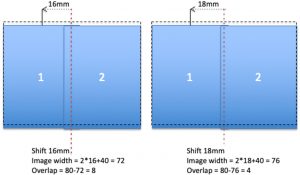
Another useful application of shift is to shift the lens in the short-side axis. Shifting 16mm along the short axis and stitching those two images together creates an image with a wider field of view; the effective focal length is 0.75 x the native lens focal length. For example, I use the following lens focal lengths: 35, 60, 90 and 138. Shifting 16mm and stitching two images together in each case creates a complete lens range of 27-35, 45-60, 67-90, 103-150mm. Each lens becomes a “mini-zoom” lens. This allows me to carry fewer lenses. When backpacking, I often just take two lenses: 60mm and 138mm. Combined with the STC’s 18mm shift, I am carrying the “FF” equivalent of 29-39mm and 67-90mm zooms. Not to mention the 150mp back allows me to crop some of the images if necessary and still have plenty of real estate for large prints. I have found as little as 4mm overlap from an 18mm shift to be enough to seamlessly blend images in Photoshop. Because you are not changing perspective, image alignment is simple and can even be done manually. Once you shift more than 18mm, a third, center image will always be necessary.
Tilt
There are many ways to control depth of field (DoF). For these purposes, I will narrow the goal to increasing DoF:
- Simply increase the f-stop to a smaller aperture. While this is simple and effective, it has two drawbacks: First, shutter speed can get quite long. We are normally on tripods so this is not a critical issue unless it is windy. Ok, it is always windy. Second, diffraction will gradually soften the image as the aperture decreases.
- Focus stack several images. This is a bit more cumbersome, especially with a bellows-type camera. Focus increments can be quite small and difficult to accurately step. With helical mount lenses it is quite easy; just rotate the lens in equal degrees between captures. It does take time, and on close inspection, there are often edge effects created because the perspective is changing slightly.
- Apply lens (or back) tilt. I love tilt and am completely biased. The disadvantage of tilt is that it can be difficult to understand and therefore manage in the field. It also does not work in all situations.

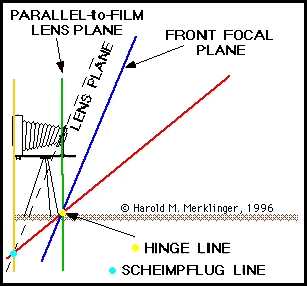
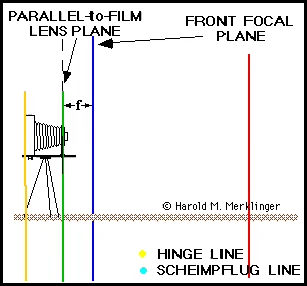
I have come to accept that lens tilt is easier to understand than quantum mechanics, but only slightly. It is hard enough to spell and/or pronounce the Scheimpflug Principle, let alone completely grasp all the dynamics of how it works. What I cover here is a cursory review. Still today, the best book on the Scheimpflug principle is by Harold M. Merklinger, Focusing the View Camera. He has graciously made it available free online HERE: along with other resources.
Here is a shorter version just on the subject of tilt.
As Harold points out in the above links, the most popular forum discussions are around the Scheimpflug Rule, which by itself does not tell us much. It is the Hinge Rule that is equally, if not more important. It is the combination of these two “rules” that is required to reach an understanding of how tilt really works.
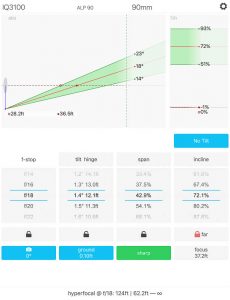
There are two apps that were invaluable to my understanding of the principle and its effects: First, the very simple Snapi Tilt Calculator; Second, the wonderfully full-featured and detailed Lumariver DoF app. I don’t find either app all that useful in the field, but the Snapi app does have a great, simple visual representation of what happens when you change focus and change tilt angle. It is good for illustrating a few simple concepts, which I use below. Lumariver is much more useful, and the ability to customize it for your digital back, lenses and preferences is almost unlimited. It can be a bit confusing at first, but it is a great tool for learning the dynamics of tilt.
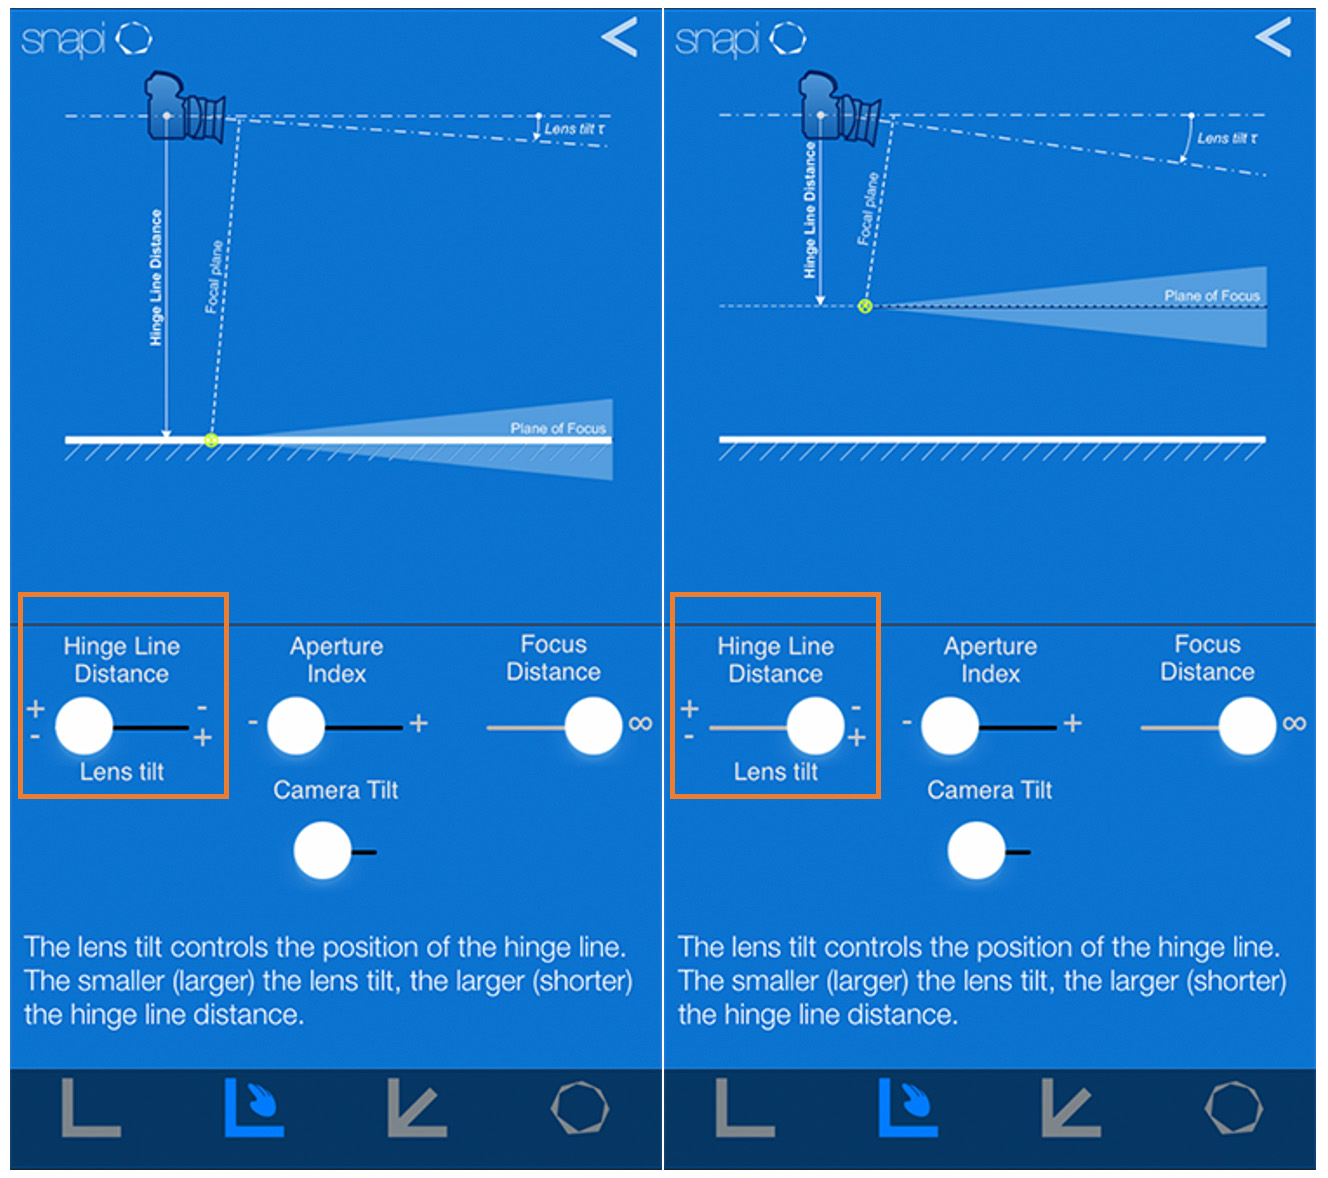
Now the gloves will come off. I have a somewhat “unique” way of explaining tilt. If you bear with me, I will hopefully shed some light on the Black Hole of Tilt. I start by going after some false concepts that are hard to let go. First, I suggest a simple experiment for anyone trying to learn tilt: Find a very flat level place like a parking lot, long hallway or big yard of grass. Set up your tripod 5 feet off the ground and mount the camera perpendicular to the ground. Set your lens focus to infinity. Turn on live view and begin to dial in tilt. Continue until the ground magically comes into focus. it doesn’t matter where you look on the ground because as you slowly dial in more tilt, all the ground in your scene will come into focus at the same time! For a 30mm lens this will occur at about 1 degree of tilt, 60mm 2 degrees, 90mm 3 degrees. Is this not what you expected? It certainly wasn’t what I expected when I first did this. I like this experiment because it destroys the idea most of us have with tilt as beginners: As you dial in more tilt, the plane of focus “lays down.” That’s not really true, and as you just found out it is certainly not true when the lens is focused at infinity. There is a lot to unpack here. I use the Snapi app to illustrate what is going on.
- When your lens, my lens, any lens is focused at infinity and you are using tilt, the plane of focus is perpendicular to the sensor plane no matter how much tilt you have dialed in. Period. End of story. This is a bit like the double-slit experiment in quantum mechanics; it is quite hard to digest and accept.
- Again with the lens focused at infinity, as you dial in more tilt the plane of focus moves up closer to the bottom of the camera, always perpendicular to the sensor. In other words, dialing in more tilt brings up the plane of focus closer to the camera, but it remains horizontal.
- It is the often under appreciated Hinge Rule that is at work here. Scheimpflug is just lurking in the background.
Now we will complicate things and change the focus distance. This is difficult to see in an experiment, so I will again use the Snapi app.
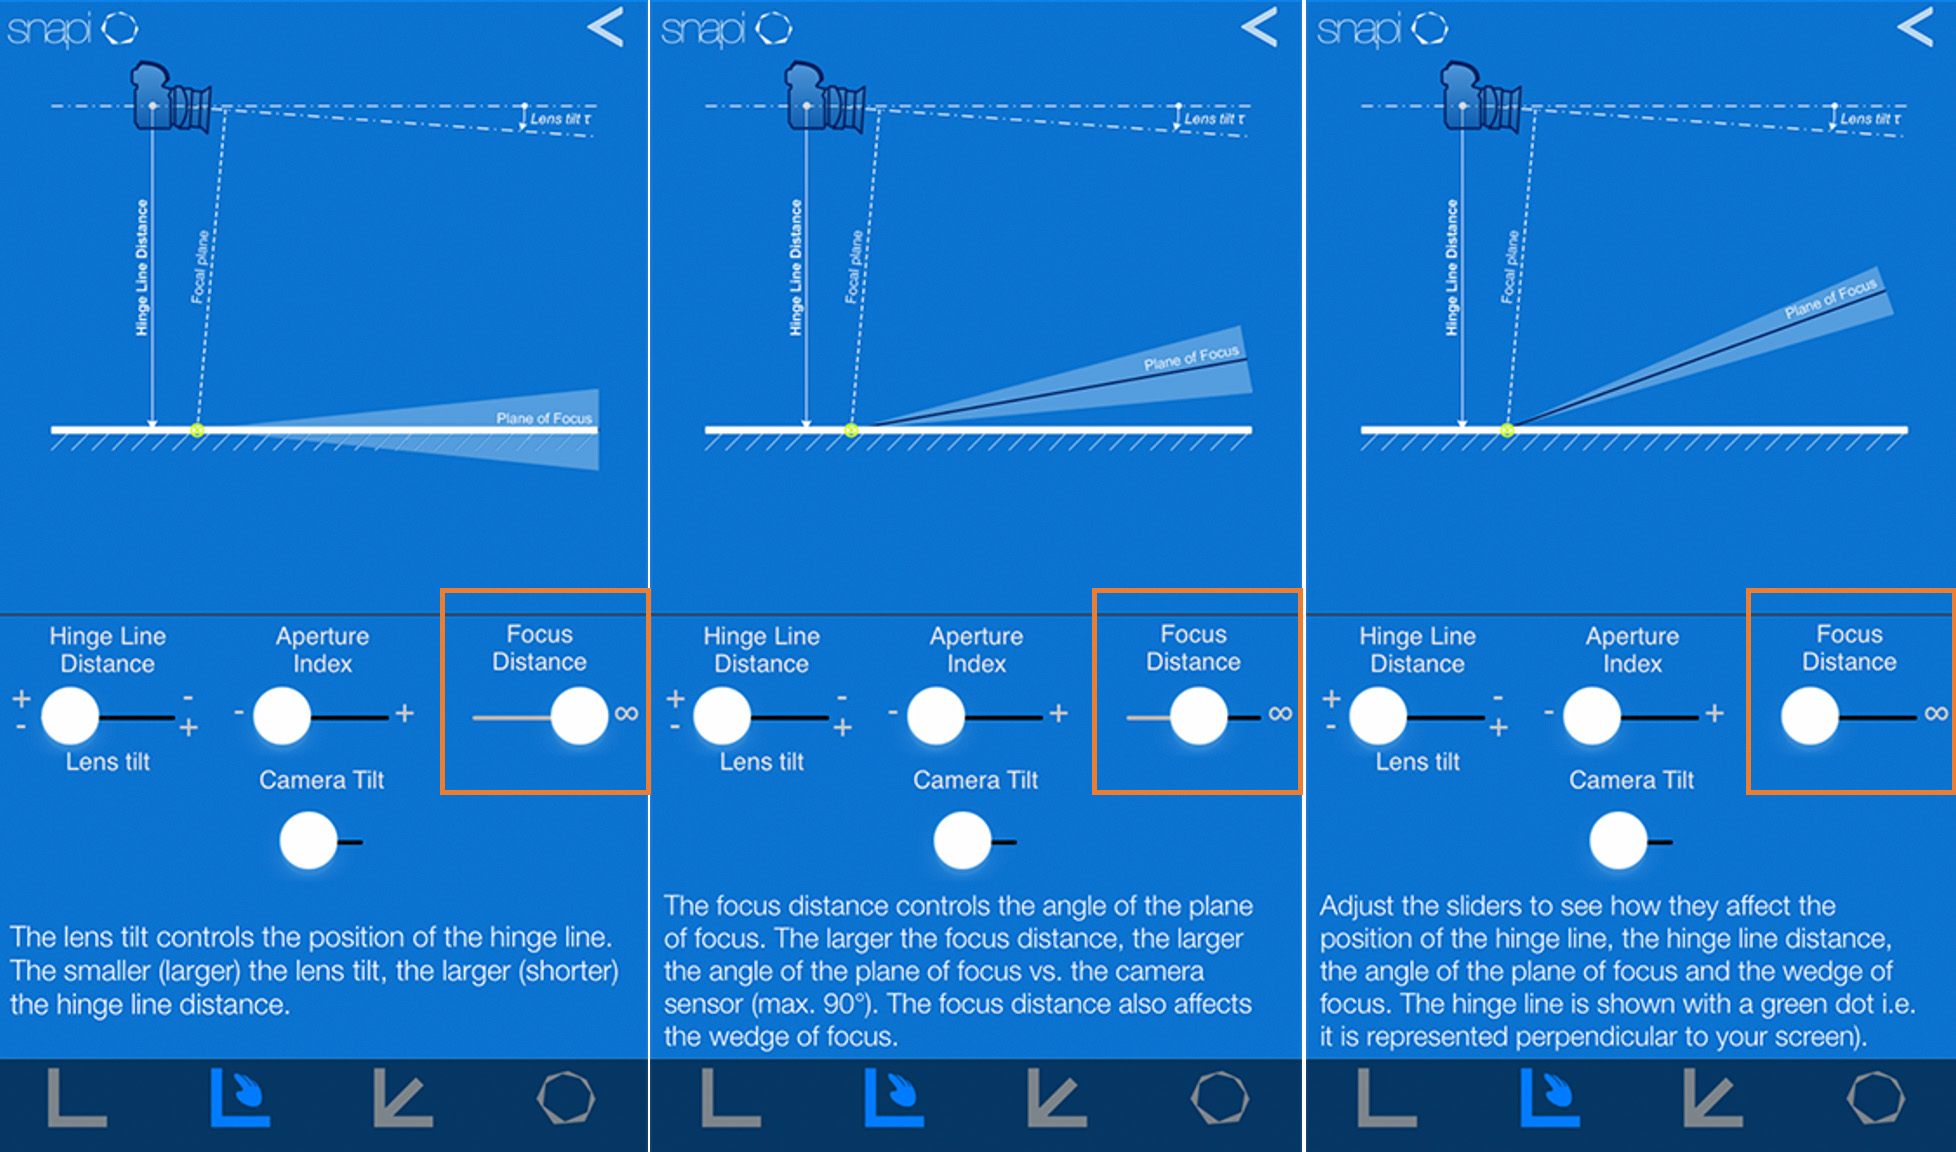
Note what happens as you simply rack in focus from infinity without changing the angle of lens tilt. Starting at the left, with the lens focused at infinity and some amount of tilt dialed in, focus is dialed in closer as we move from the left image to the right image. Racking in focus from infinity pulls up the plane of focus angle, making it “steeper” or more acute. Again, the amount of tilt has not been changes in the three images above; only focus. The above descriptions are facts that apply to all lenses, focal lengths and apertures. They do not explain everything associated with the Scheimpflug Principle and Hinge Rule, but they are quite interesting.
I struggled grasping tilt because I looked at the dynamics the way I think most people do: as you dial in more tilt, the plane of focus “lays down” and becomes more horizontal. While that is sort-of true, it certainly is not true when the lens is focused at infinity. The other thought that many first-timers have with tilt is that changing focus moves the plane of focus back and forth in front of the camera in a kind of parallel-plane movement. This is definitely not the case. It is what we are familiar with when there is no tilt, but it is not at all true with tilt.

Ok, so I’ve managed to show you some things to dispel basic incorrect convention. How does it actually work? This is the best way I have to describe tilt:
- You are a pole vaulter holding the pole out in front, ready to start your approach. The pole is your plane of focus, your front hand is the amount of tilt dialed in and your rear hand is the the focus distance set by the helical / rail.
- Setting a focus distance further away pulls your back hand up, flattening down the plane of focus. With focus set at infinity, the sharp plane of focus is perpendicular to the sensor plane. Setting a close focus distance pushes your back hand down, pulling up the plane of focus to a steeper angle (same as above).
- Dialing in more tilt raises both hands. The relative amount depends on the set focus distance. If the distance is set to infinity, both hands move up and down at the same rate, and the plane of sharp focus remains perpendicular to the film plane. With a focus distance set in from infinity, the back-hand movement speeds up relative to the front hand when tilt angle is increased / decreased. It helps to think of tilt angle affecting the plane of focus in two separate operations:
- Dialing in more tilt moves both hands up, moving the overall plane of focus closer to the bottom of the camera.
- If the focus point is set in from infinity, the rear hand moves faster than the front hand as tilt is adjusted. Dialing in more tilt effectively “flattens” the plane of focus because the rear hand is moving up fast compared to the front hand.
It is still confusing; I wish I could come up with a better analogy. The above description is useful because your front hand follows the Hinge Rule while your back hand represents the Scheimflug Rule. I find this analogy helps to understand how the two operations, tilt and focus, affect the plane of focus angle. Changing focus distance does not affect the position of your front hand at all. The Hinge Rule is independent of focus point.
Technically, lens tilt measured relative to the film plane determines the distance from the lens to a line about which the plane of sharp focus pivots. There are other things that happen when you change tilt angle and dial focus in and out:
- Dialing in more tilt makes the depth of field wedge narrower. The more tilt, the less depth of field.
- All other things being equal (aperture, focus distance, degree of tilt), a longer lens will have a narrower depth of field. The piece of pie is getting smaller.
- A longer lens will require more tilt to pull up the plane of focus a specific distance from the bottom of the camera. For example, a 40mm lens requires 1.6 degrees of tilt to bring the plane of focus up to 5 feet below the camera. A 60mm lens requires 2.25 degrees, and 90mm requires 3.4 degrees to bring the plane of focus up to 5 feet below the camera.
- Without tilt, the traditional depth of field range extends about 1/3 in front of the plane of focus and about 2/3 behind the plane of focus. Unlike traditional depth of field, when using lens tilt the plane of focus is exactly in the middle of the depth of field.
What does this mean? Well, if you want the (flat) ground to be in focus from the tripod to infinity, simply focus at infinity and dial in tilt until the ground comes in focus. You can zoom in and pick any point on the ground; it doesn’t matter. The ground will be in focus everywhere. Because the depth of field is a wedge that can be set at almost any angle, you have to pay attention not only to how far subjects are in the scene, but also how tall they are. This is the crux of learning tilt. Because the ground directly below the camera is not in your scene, you typically want the DoF wedge to start well underground, penetrating the ground just before the ground appears in your live view or ground glass. Remember, more tilt brings the DoF wedge up closer to the camera from below, but more tilt also scrubs DoF; it makes the wedge more narrow.
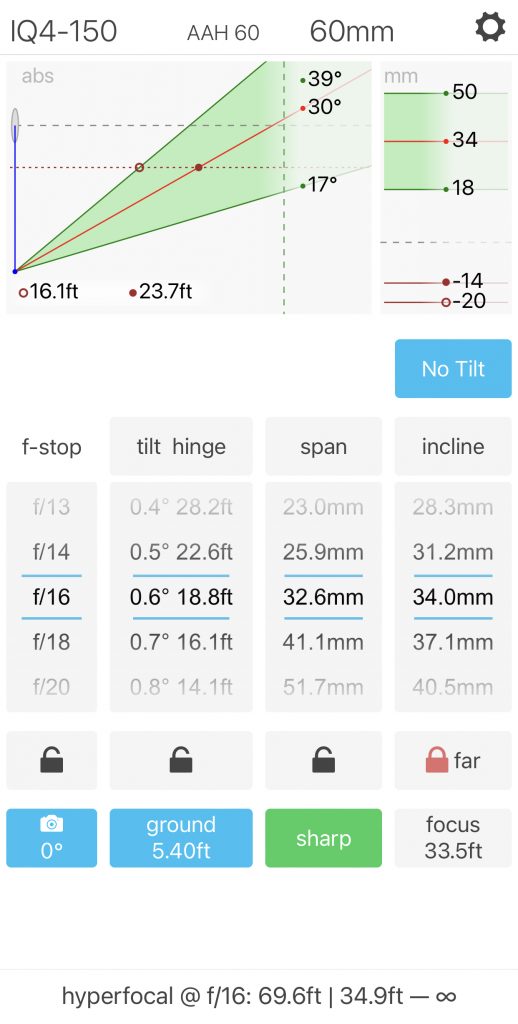
In general, the less tilt you can get away with the better because the DoF wedge will be wider and it will be easier to get everything in focus. That means starting the wedge underground at an acute angle. Below is a great example with the Rodenstock f/5.6 90mm HR-SW; if the depth of field wedge was too narrow, the top of The Totem Pole could have been soft and the bottom sharp (or vice versa), even though those two points in the scene are the same distance from the camera.

 Here is the scene rendered on Anders’ Lumariver DoF app. Because I’m standing below the scene, the camera is at about ground level in the scene, which is roughly 30 feet in front of the camera and where the front edge of the DoF wedge cuts through the scene. At 100% view you can easily make out each grain of sand. The DoF wedge then angles up through the bush; it is equally sharp. By the time it reaches the totem it is wide enough to render the totem sharp through its entire length. The base below the totem does get slightly out of focus but I don’t really care about that; the viewers eyes are not drawn there, at least initially.
All this is interesting, but how do we go about focusing in the field with tilt? I find the above explanations helpful to understand the dynamics and provide quick starting points. Some use the apps to calculate precise numbers and dial those in. The apps are useful as learning tools, but I find them too cumbersome, combined with the fact that it is difficult and time-consuming to get actual distance data from several different points in the scene.
Instead, I use this tried and true process used by many and modified based on my tests and experiments:
- With the lens wide open, dial in 1 degree of tilt, regardless of focal length.
- With the lens wide open, Zoom in and focus on something about 1/3 into the frame (close to that spot where the plane of focus rotates in Harold’s gif movie). Note where the helical is.
- Zoom back out, zoom in and focus on the up close (usually at the bottom). Note where the helical is then turn it back to where it was.
- If the close/low object needed a closer distance setting, you need more tilt. If the close/low object needed a farther distance setting, you need less tilt.
- If you had to dial in to a closer distance setting on the lens for that thing up close (at the bottom), add more tilt until it comes back into focus.
- If you had to dial out to a farther distance setting on the lens for that thing up close, subtract tilt until it comes back in focus.
- Check the thing high / in the back. It is usually spot on. If not, repeat.
- Set the lens at the f-stop you want and shoot!

The easy way to remember how to adjust tilt based on the close-focus change is this mantra: Focus in, tilt in; focus out, tilt out. Starting with one degree of tilt reduces the chance of falling into the most frequent tilt error: dialing in too much tilt.Tilt doesn’t work in all situations, but it does give you another tool to accomplish your goals.
Camera movements and technical cameras go together like peas and carrots. They can be mimicked in post-processing, and there are other ways to accomplish all the results of shifts, rises, and tilts. But, I cannot imagine shooting a technical camera without movements. Notwithstanding the cute Alpa TC.
Many thanks to Harold Merklinger for his wonderful book and valuable resources made so graciously available for our benefit.
Dave
David Chew
June 2022
Chagrin Falls, Ohio
I was born and raised in Northeast Ohio where my outdoor experiences defined my life from an early age. From living in Western Geauga County next to what became one of the Western Reserve Land Conservancy’s oldest and largest holdings, to spending summers on staff at Camp Stigwandish and family vacations that included backpacking, climbing and mountaineering, I developed a deep appreciation for the wonder and diversity of the outdoors. My photography represents an effort to notice, appreciate and celebrate the incredible detail of the natural environment. While living in Northern California, I took a camera backpacking in the Sierras. That experience brought so many questions and so much curiosity around how cameras and film see the world. More importantly, it gave me an entirely new view of the world that made me notice and appreciate the outdoors at another level. I then learned that my office in Emeryville was two blocks down from Galen Rowell’s studio. Galen quickly became a great mentor, and he and his staff were an endless, patient resource. I am a chemical engineer with a career in the industrial, municipal and residential water industry.