Projects and Presentation: Using a Virtual Gallery to Display Photographs
About four months ago, my wife Evelyn yelled across our shared office space, “Take a look at this.” Each year the Chicago Pastel Painters (CPP) stages an exhibit featuring its members’ work, but due to Covid-19, there would be no 2020 exhibit in a traditional gallery space. CPP had found an alternative: an online exhibit in a virtual gallery. I took one look at the exhibit, and said, “Get me the name of whoever developed that platform.” It was Kunstmatrix GbR, a German company. My journey had begun.
The Plan
In this article, I will recount my experience to date. I will begin with the preliminaries, providing a brief history of Kunstmatrix and an overall assessment of its platform. Then I will undertake a four-part analysis to outline how and why I have created virtual exhibits using the platform. I will (i) describe the three projects I have chosen for Kunstmatrix virtual exhibits; (ii) provide links to those exhibits, so you can judge whether virtual exhibits are for you; (iii) cover basic considerations, including pricing, mechanics, documentation, deficiencies, and publishing exhibits; and (iv) offer some tips and tricks for creating a Kunstmatrix exhibit.
Kunstmatrix
In 2007, two German computer scientists, Christoph Lauterbach and Hartwig Bentele, began collaborating on 3d-modeling applications. They added Dr. Kristian Hildebrand to the team one year later. In 2009, Kunstmatrix was formed. It claims to be the first company to have offered self-curated exhibitions (2009), an augmented reality app for previewing art in a buyer’s home, office, or other space (2012), and a virtual art fair (2014).
The European art market was initially receptive to the technology but was slow in digitizing visual artworks. In 2017, Kunstmatrix shifted its focus to the international art market, particularly the United States market. This shift proved to be fruitful. As of November 2000, the company’s product has been used to create 6,000 public exhibitions in 130 countries.
The Bottom Line
Before proceeding any further, I believe an overall assessment is warranted. When I took a marketing course 25 years ago in the Northwestern University’s Executive MBA program, the professor singled out Neiman Marcus’ Surprise and Delight catchphrase as an excellent brand-positioning maxim. Although Neiman Marcus has now fallen on hard times, that catchphrase extends far beyond retailers. Whether they know it or not, the Kunstmatrix team has adopted that maxim as its guide star. Its web-based solution for presenting artwork Surprises and Delights both photographers and their audiences.
Despite my love of this technology, I will be candid as I describe it, pointing out existing deficiencies when appropriate. As is true of all software, there is room for continual improvement.
The Projects
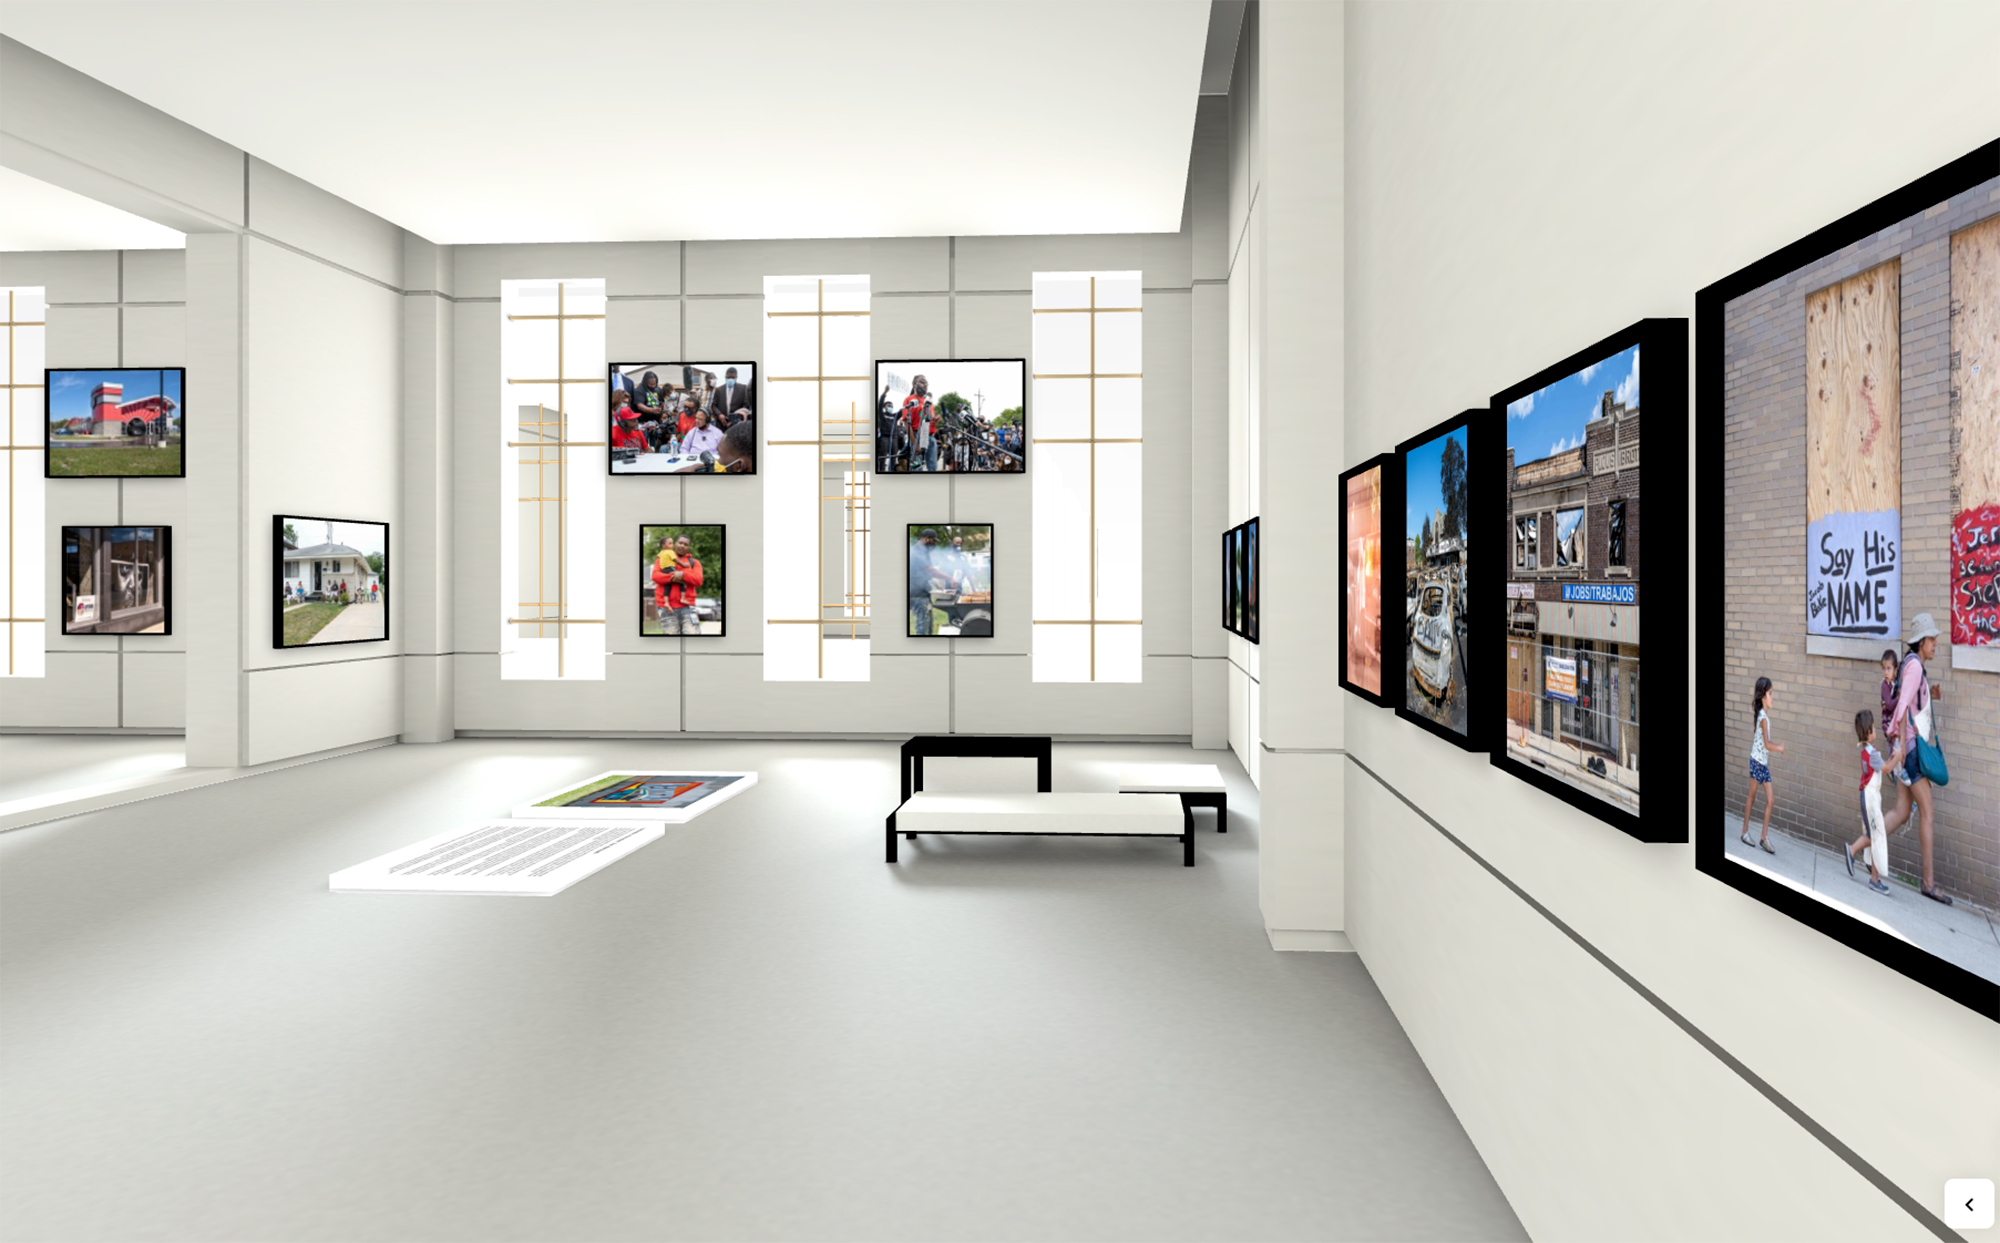
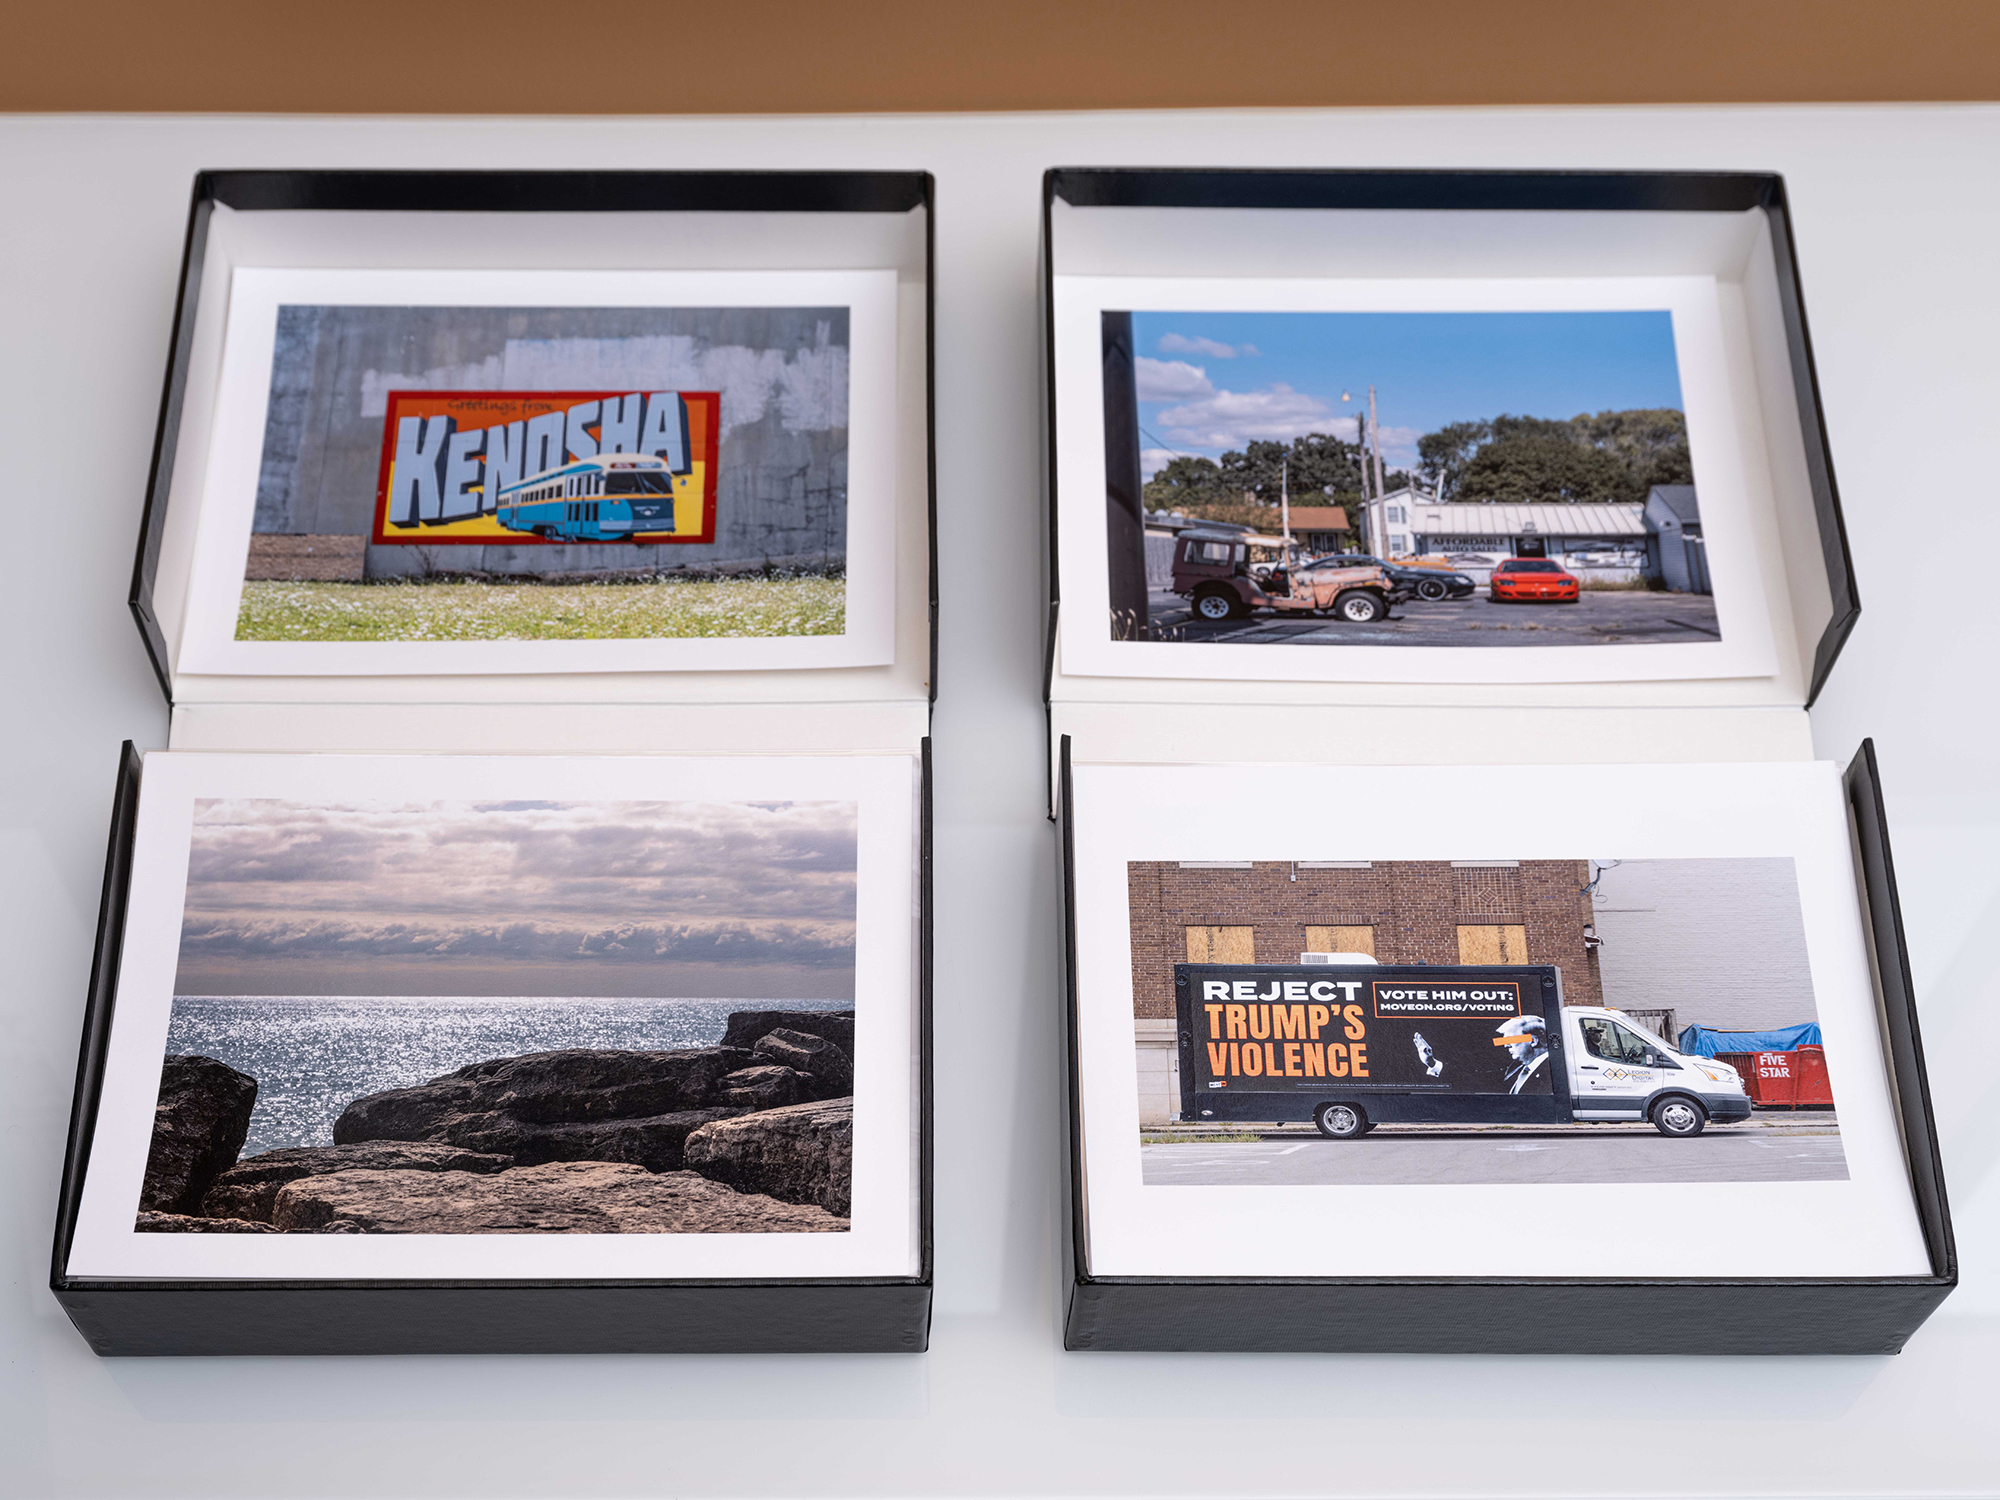
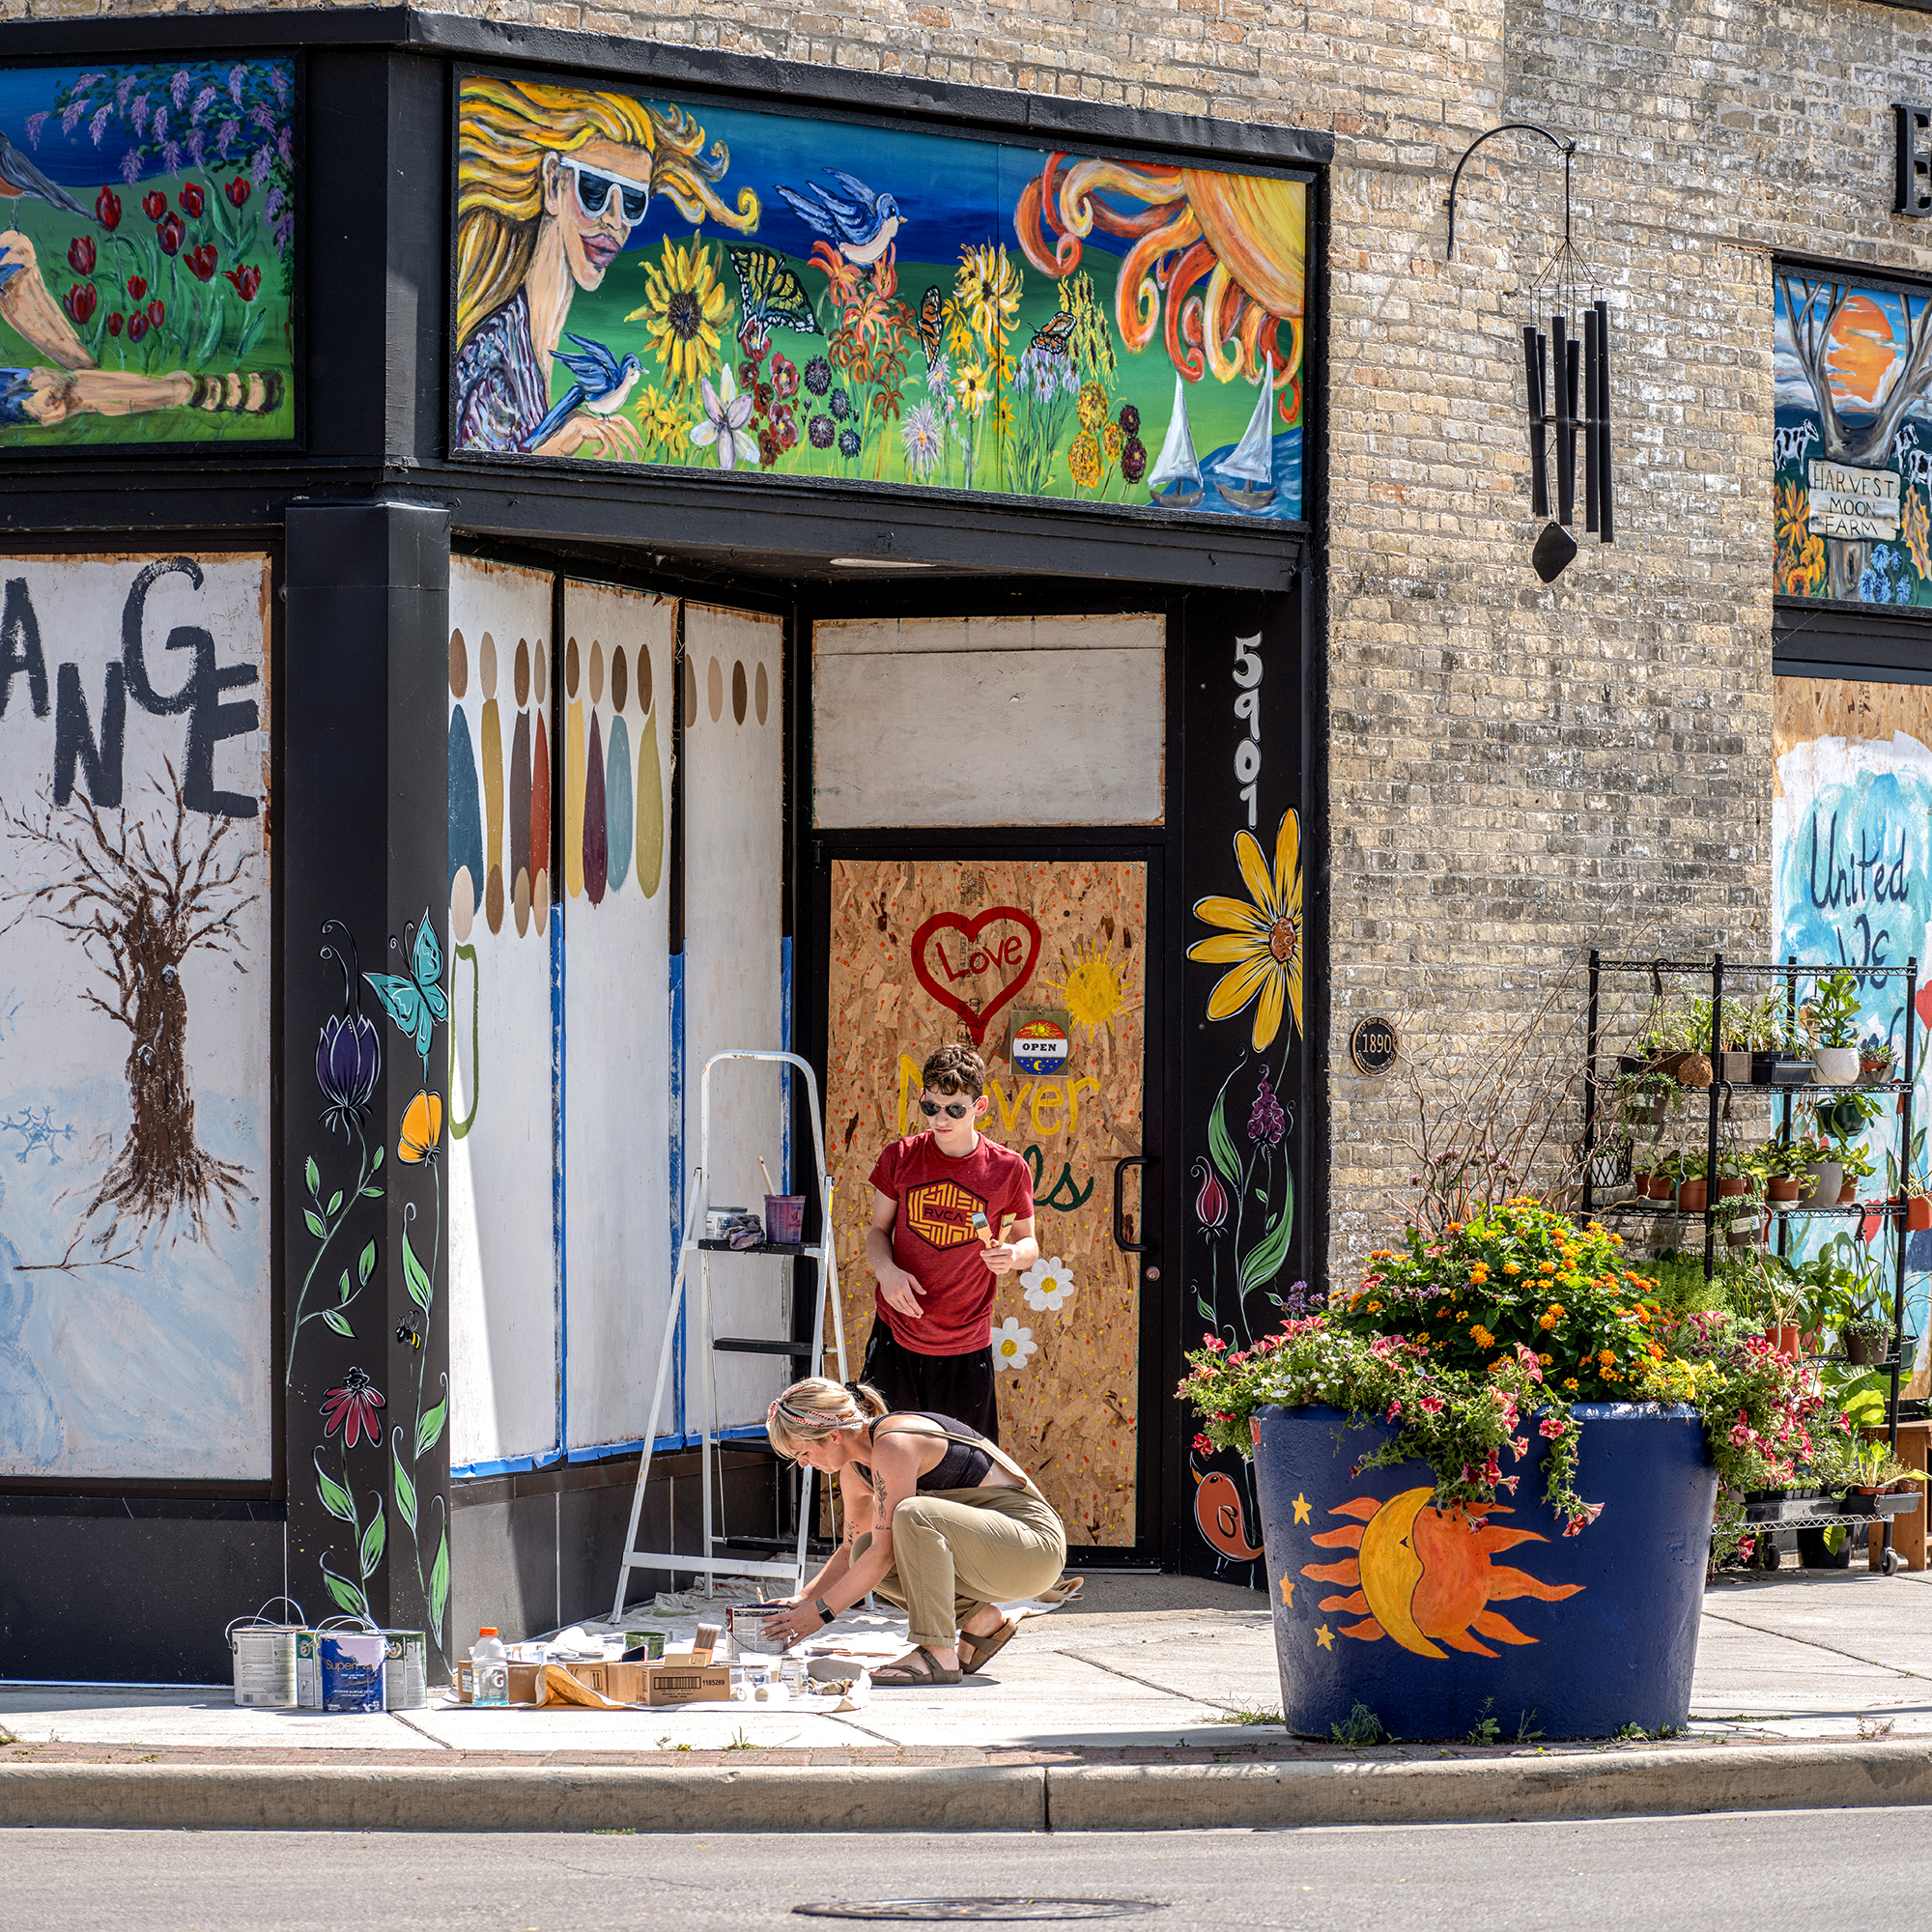
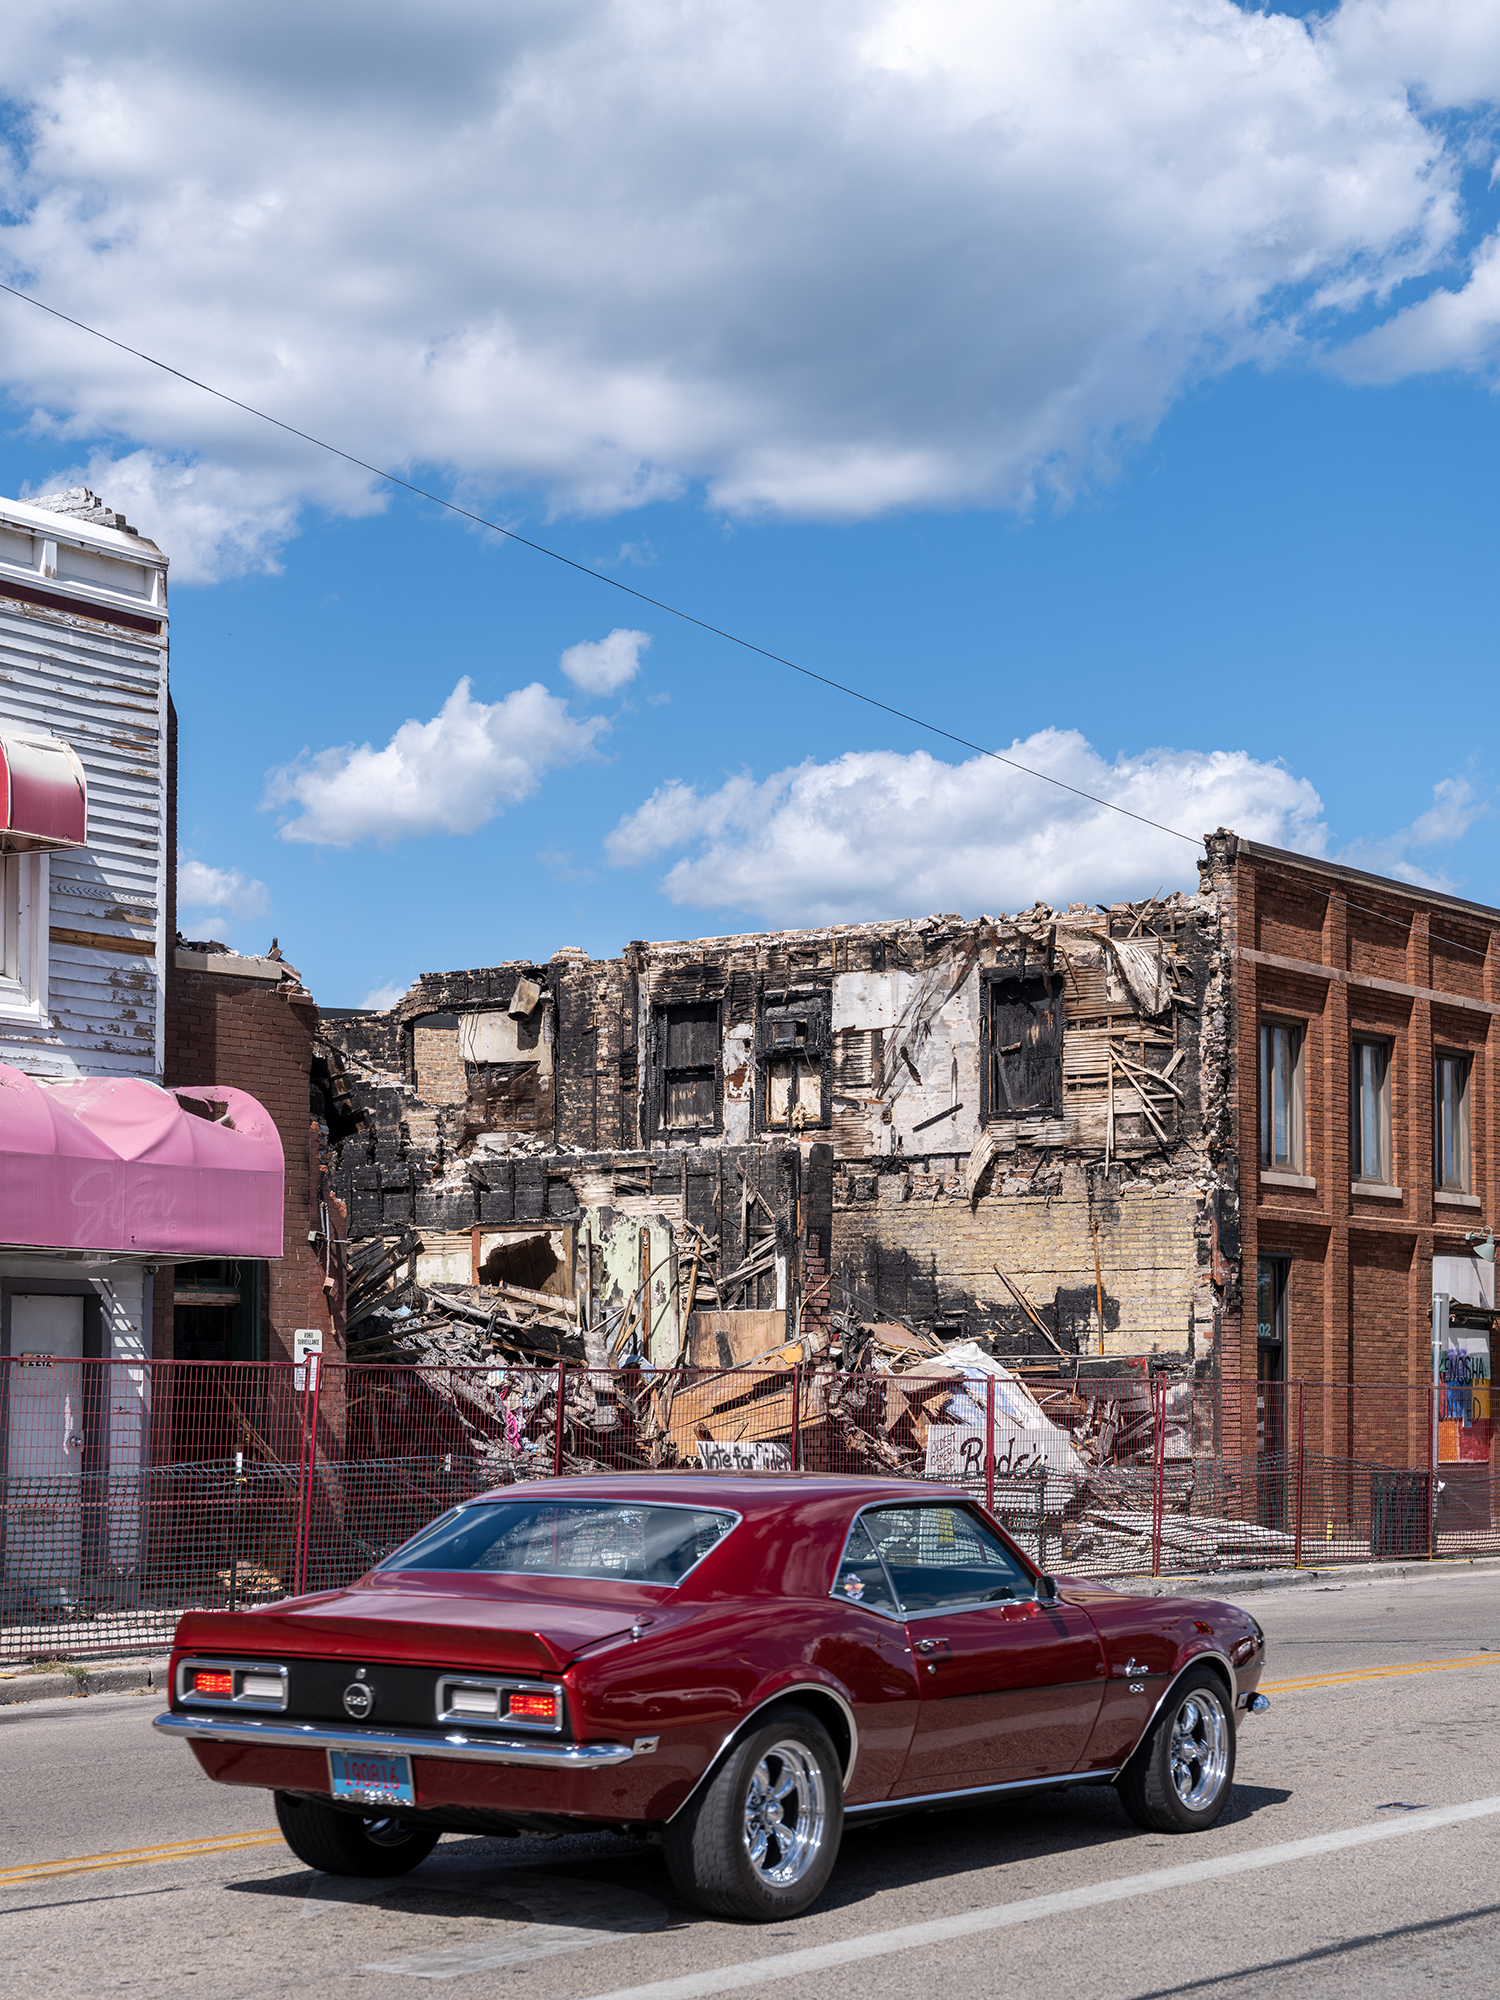
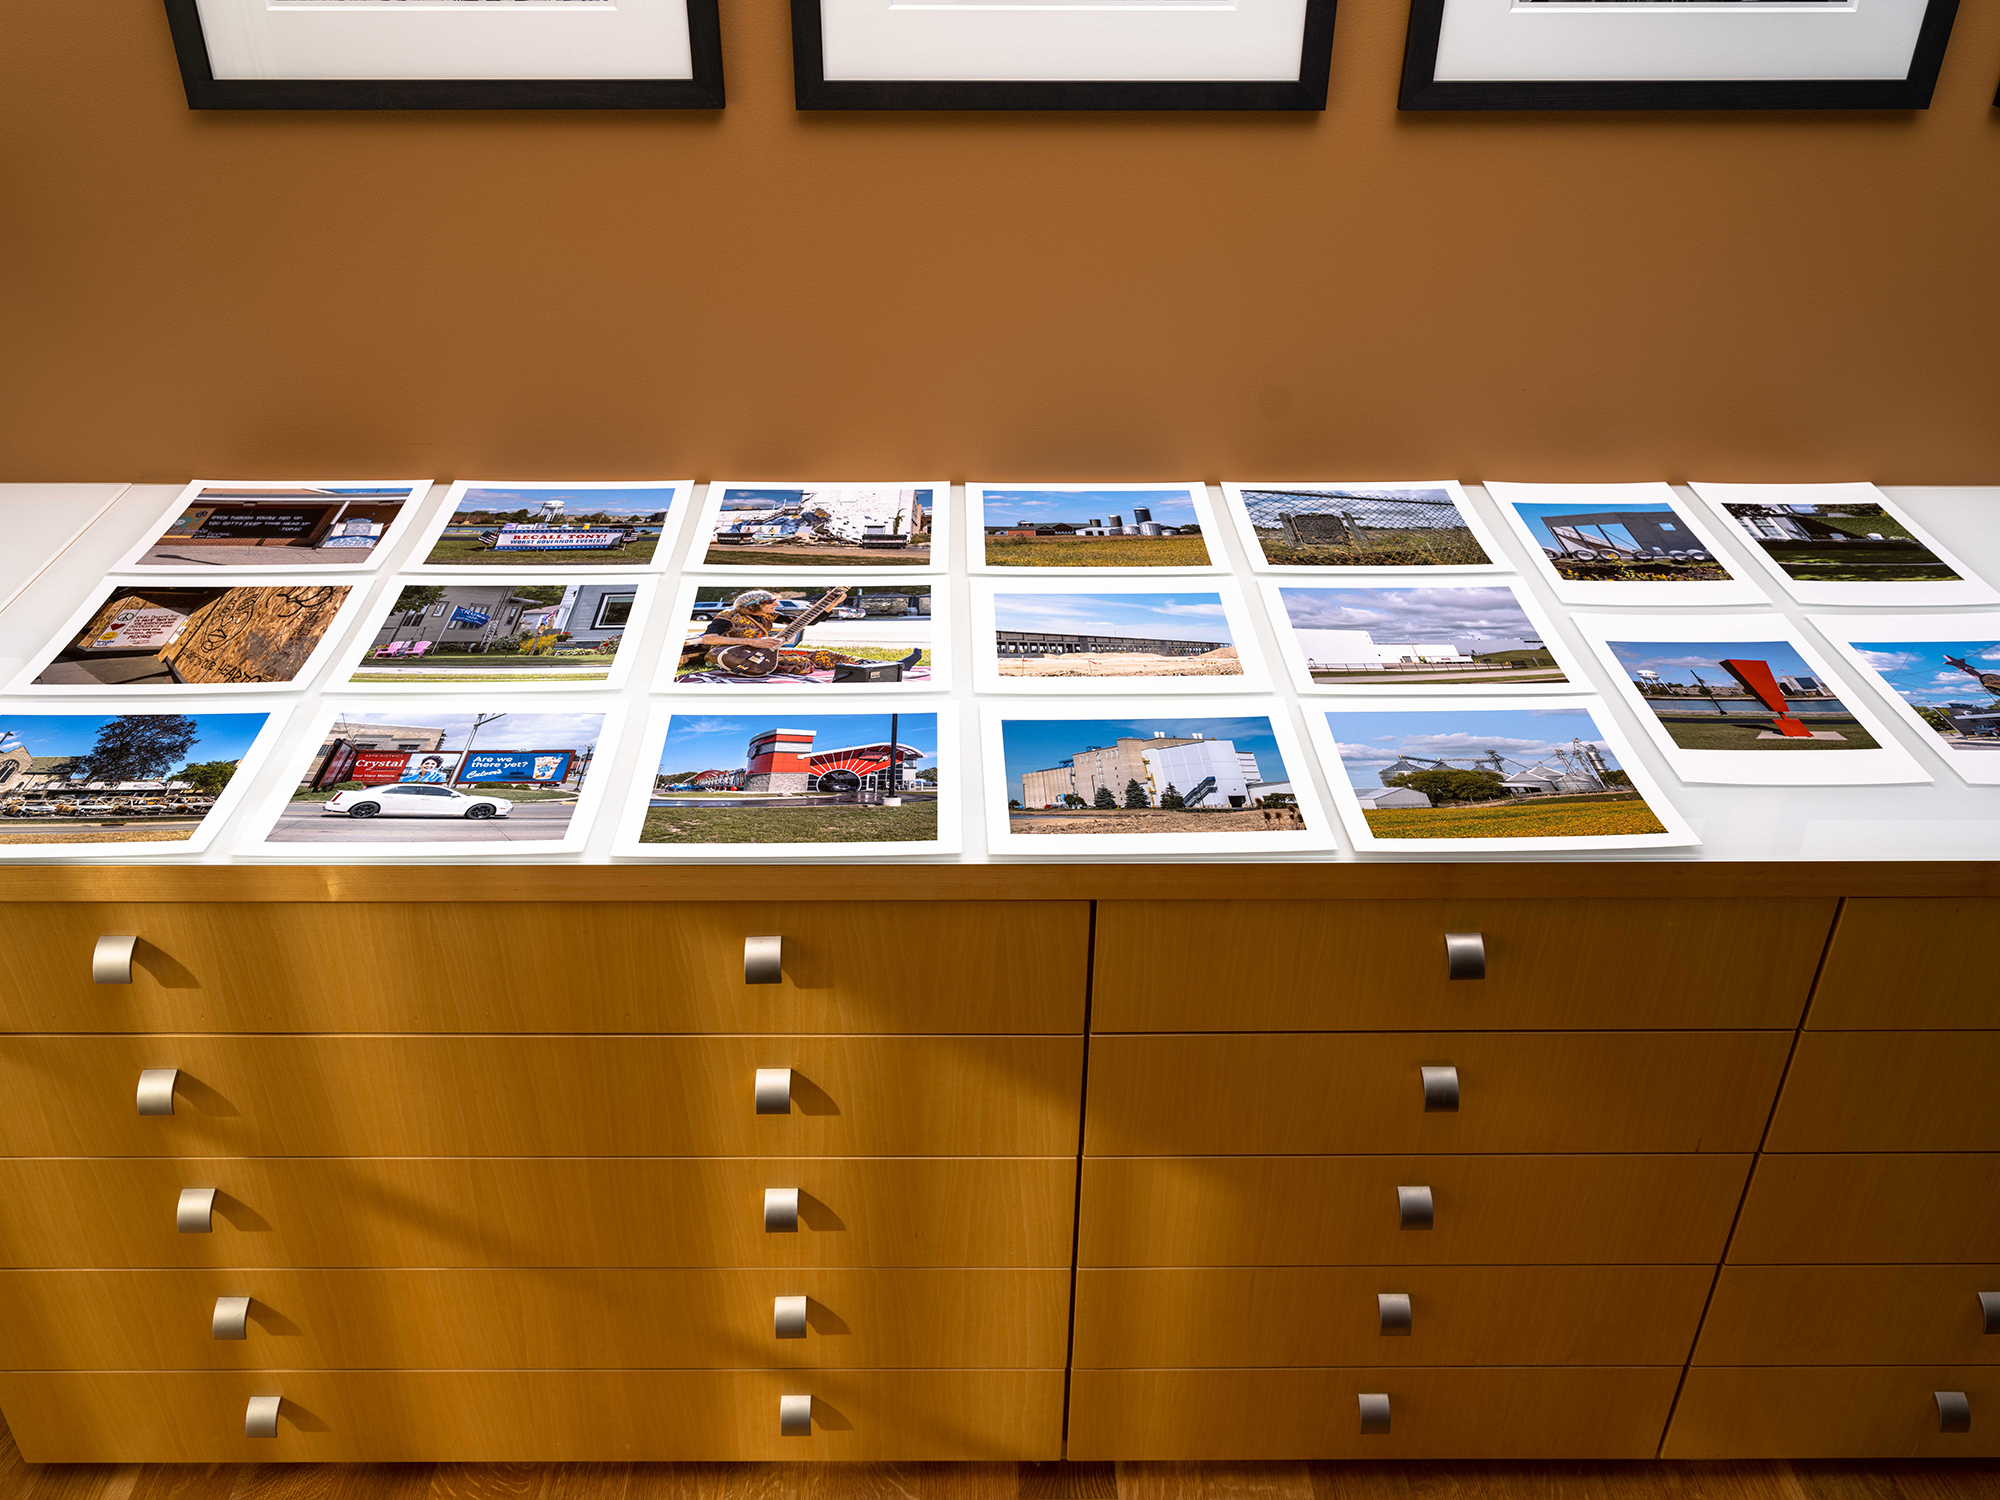
The Kenosha Project. By mid-June of last year, I had expanded my post-lockdown photographic efforts beyond my Chicago neighborhood to locations in northern Illinois and Wisconsin. During the last four years, I had photographed countless Trump-inspired and BLM demonstrations, so on August 28, 2020, just five days after the police shooting of Jacob Blake, I headed to Kenosha, Wisconsin. As planned, I photographed the burned-out buildings and the coterie of the remaining demonstrators. As I walked around the downtown area, I saw a community visibly attempting to heal itself, something that I had not anticipated. An arts group had organized a Friday effort to paint flowers, faces, and upbeat slogans over the plywood covering virtually every store and office window in an eight-square block area. Dozens of people were participating. Not great artwork, but there certainly were positive vibrations.
I had stumbled into a project. I made four more trips to Kenosha over the next three weeks, focusing more on the community than on the damage. As the project progressed, I made 140 prints (8.5 by 11 inches) from the hundreds of images I had captured. Doing that gave me ideas for additional images to seek out during subsequent trips. Over that three-week period, I spent time not only sequencing images, but also reading about Kenosha’s history, demographics, culture, and business environment.
I was pleased with the prints, but I wanted to do more with the images. Having just learned about Kunstmatrix, I decided to give it a try. I loved the results, and so did everyone I shared them with, particularly my friend and fellow photographer Gary, who offered copious amounts of encouragement and then immediately signed up for a Kunstmatrix account to display his work.
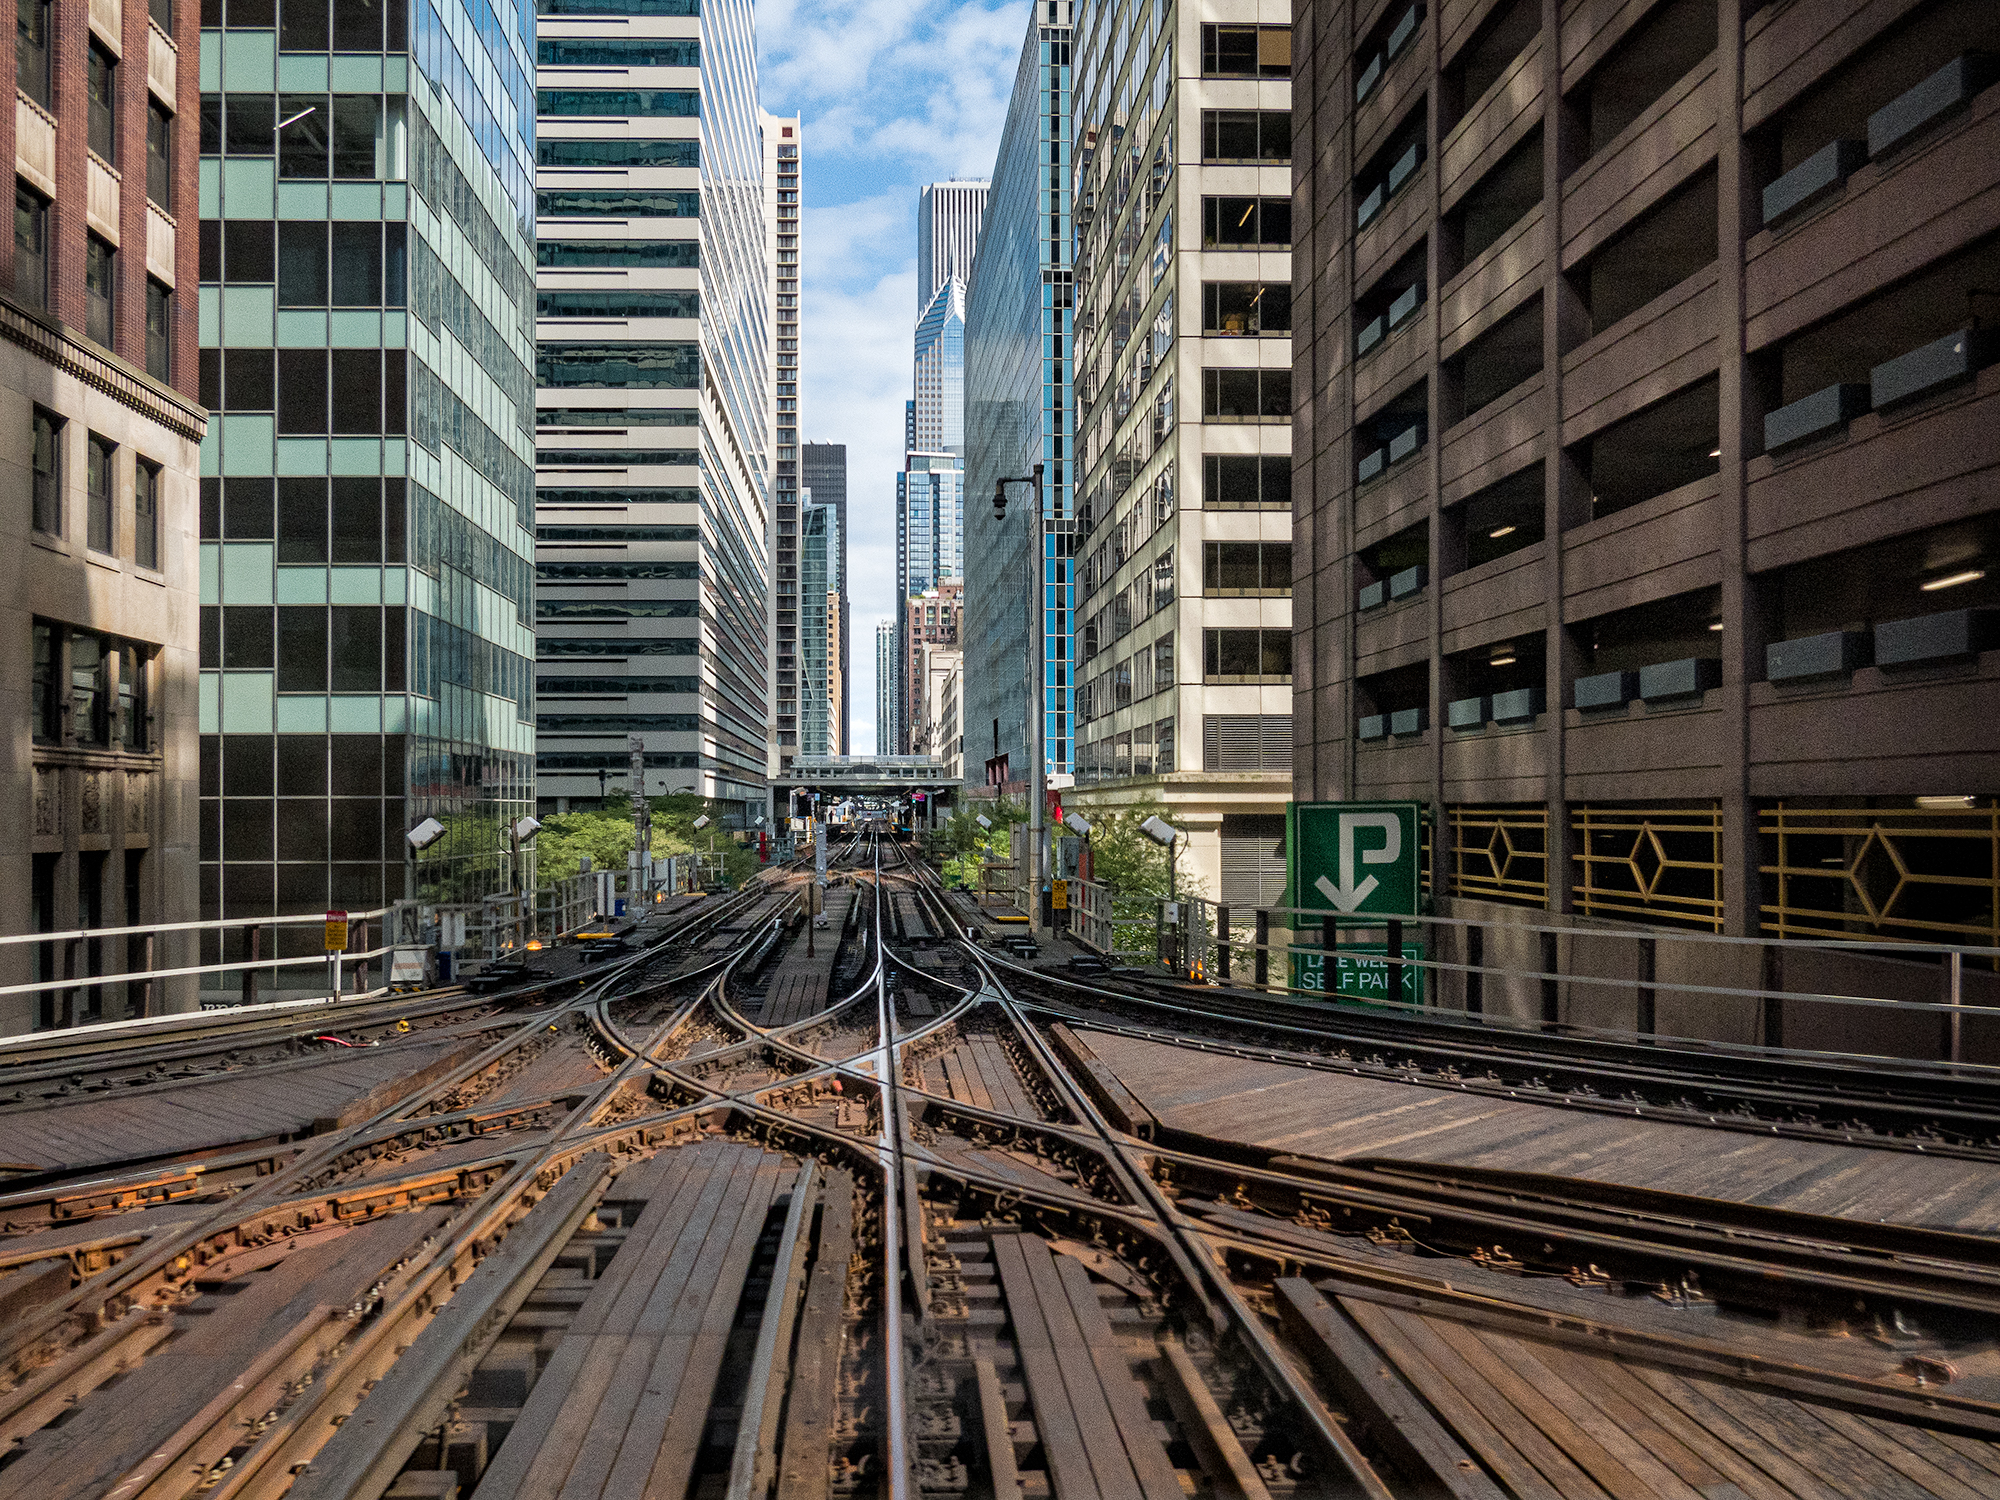
The “L” Project. Over the Christmas weekend, I was reviewing my portfolio, as I often do. I realized that I had accumulated several hundred images of Chicago’s elevated and subway system, which is referred to as the “L.” Prior to 2019, those images had been made from the street and on station platforms. During the summer of 2019, I took a different approach, one that was inspired by Japanese photographer Daidō Moriyama. Using a point-and-shoot camera, I photographed the journey looking out smudged windows, with preset shutter speed, ISO, aperture, and focus. I did this until Covid-19 made riding the L unsafe. I will resume once I have been vaccinated.
With the temperature dropping, I organized those images into a narrative in early January, resulting in a second Kunstmatrix exhibit.
The “Impromptu Portraits” Project
I don’t like the term “street photography,” but over the years I have accumulated hundreds of images of people going about their daily business as I hunted light and shadow in cities around the world. Inspired by my L project, I recently sorted those images, building a third virtual exhibition.
By the time I started assembling the third project, I had learned a lot. The Kenosha project took about a week to assemble once I started to build the virtual exhibit. I estimate that I put somewhere around 20 to 25 hours into that project. The L exhibit took about 10 to 15 hours over two or three days. I completed the Impromptu Portraits exhibit over one 24-hour period. In each case, I made adjustments as I reassessed the results.

The Exhibits
Before continuing to my description of what is required to produce an exhibit, take a “stroll” through my project galleries—you can get up close to an image, or stand back and see how it relates to the surrounding images, just as you would be you walking through an art gallery. When viewing the exhibits, I recommend just entering the galleries and avoiding the guided tour. The galleries can be viewed on a computer, tablet, or even a cellphone. I prefer tablets because navigating with your fingers is quicker and more intuitive than with a mouse.
Kenosha Project Exhibit
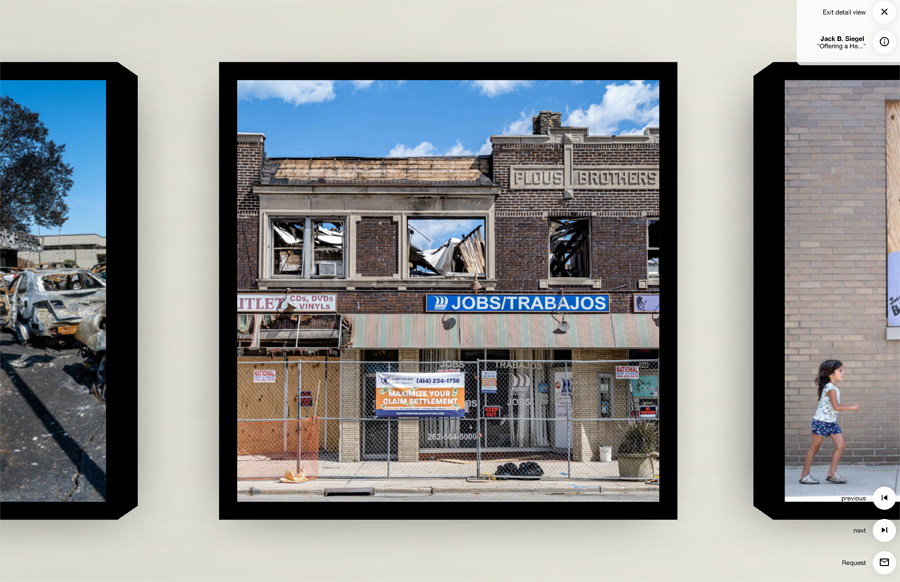
View The Kenosha Project Exhibit by clicking the link or photo A new window will open with the virtual exhibit
Chicago L Exhibit
To view this virtual exhibit Chicago L Exhibit please click the link or photo. I strongly suggest you click the button on the new screen START GUIDED TOUR. Please enjoy.
Impromptu Portraits Exhibit
To view this virtual exhibit Impromptu Portraits please click the link or photo. I strongly suggest you click the button on the new screen START GUIDED TOUR. Please enjoy.
The Basics
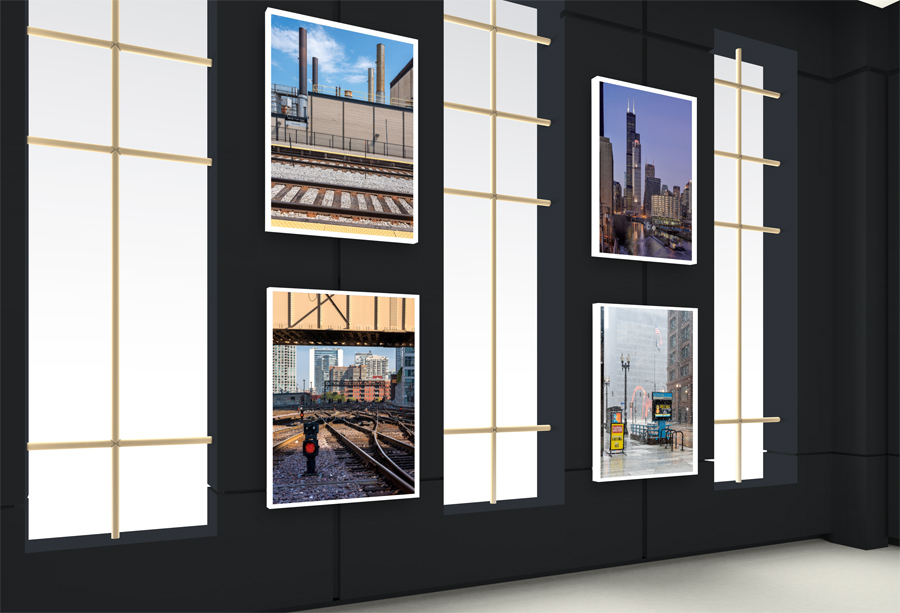
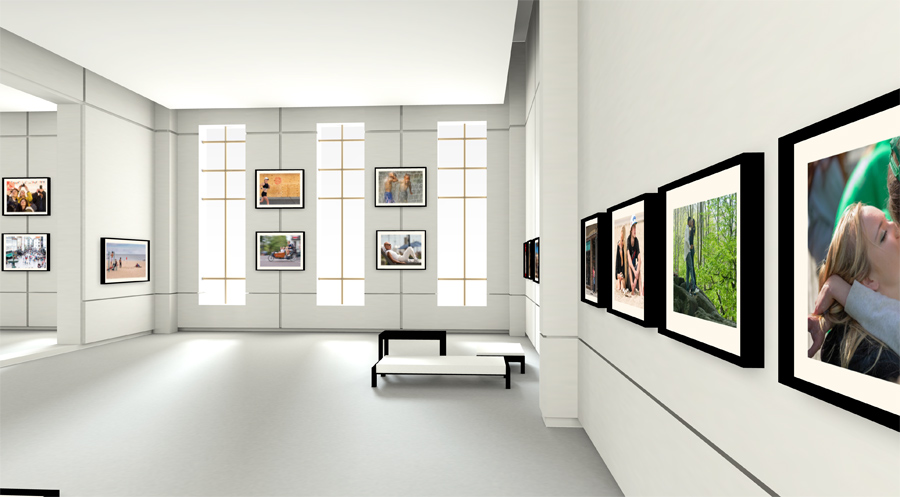
Utilizing a “room” metaphor, Kunstmatrix is a web-based application that relies heavily on templates. It is just over a decade old, with some kinks warranting Kunstmatrix’s attention. The concept is relatively straightforward. First, you upload the artwork—I will substitute “photograph” for “artwork” from here on. As each image is uploaded, you are given the option to add a title, a date, your name, the image size, and the artistic medium. You can also select frames for and attach audio files to each photograph.
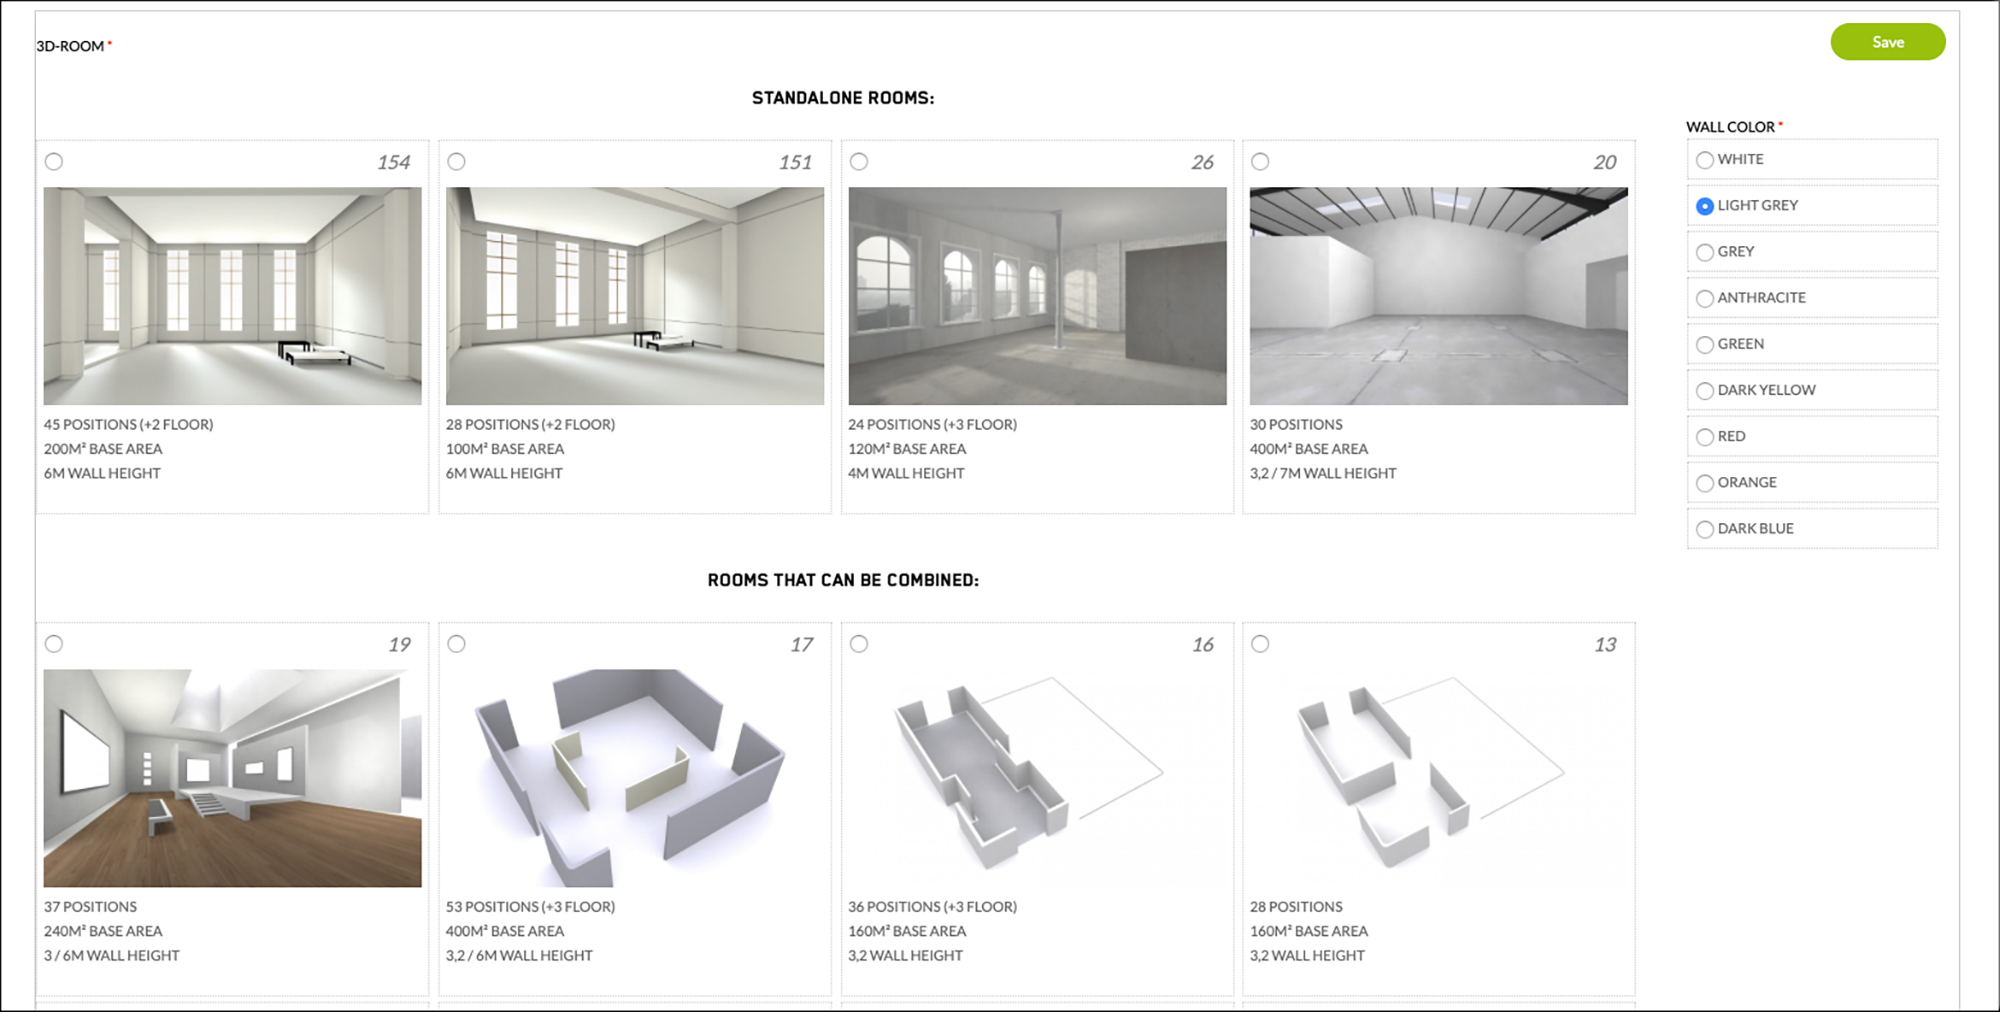
Second, you select a “room” from one of two categories. The first category includes stand-alone rooms, and the second includes rooms that can be combined with other rooms.
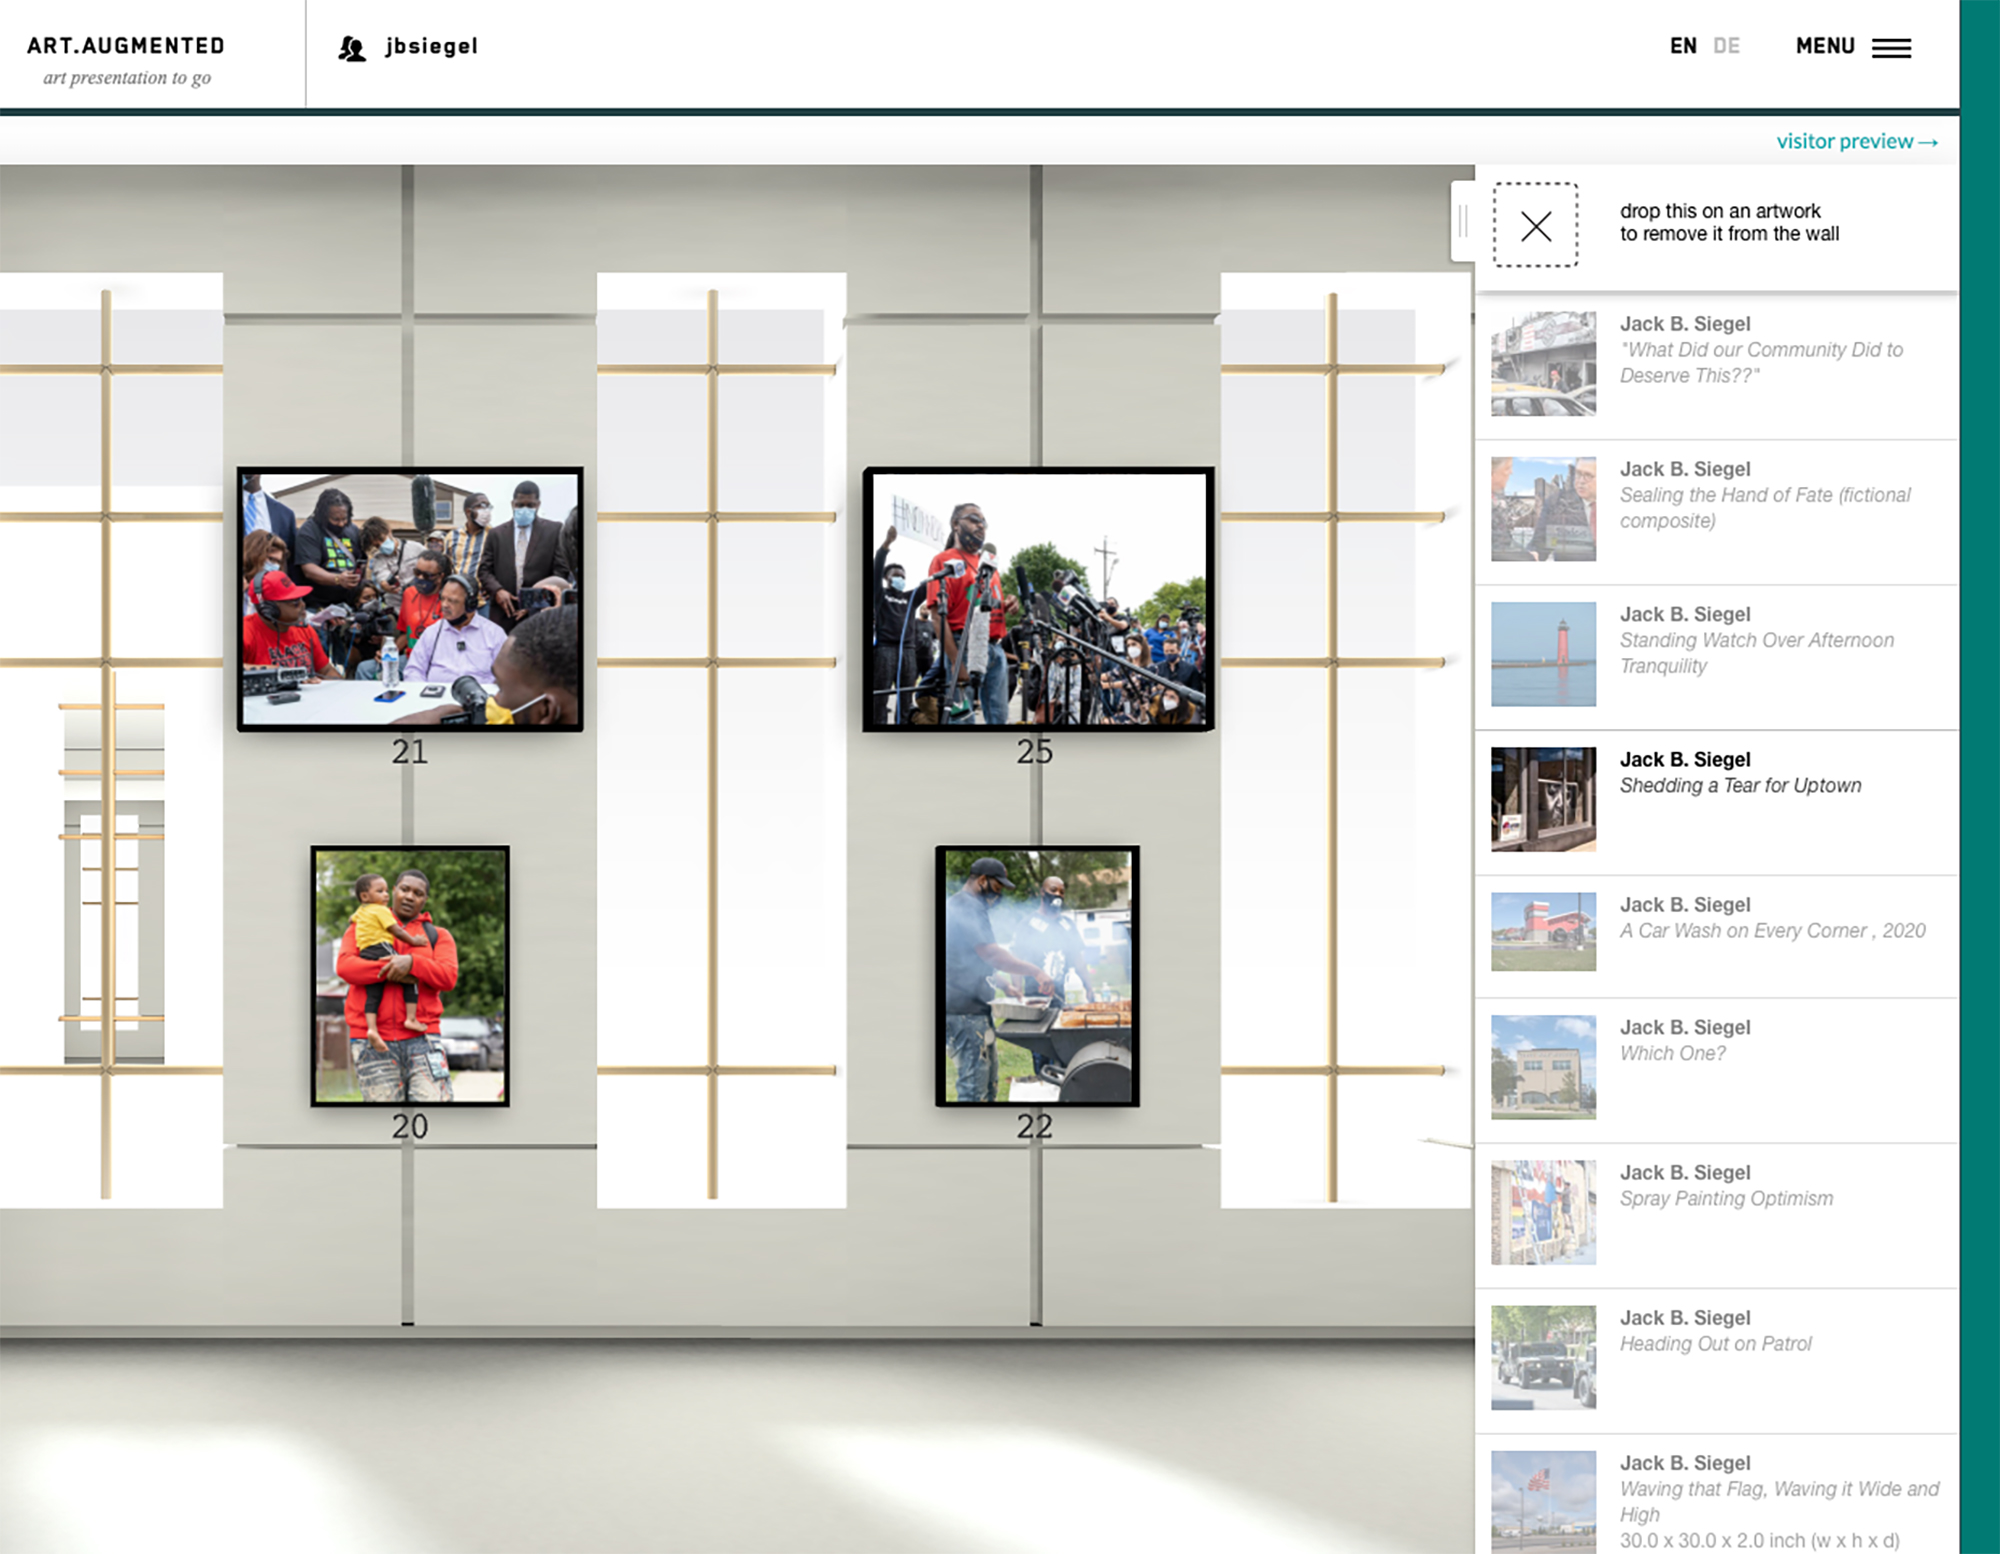
Third, after you have uploaded your images—additional images can be uploaded at any point in the process—you click on Curate Exhibition. Then, simply drag an image from the list of images on the right-hand side of the screen to the numbered location on the wall where you want to place the image.
Fourth, when everything is in place, click on Publish to post your virtual exhibit to the web.
Kunstmatrix Pricing. Kunstmatrix offers the following five plans—all fees are denominated in U.S. Dollars:
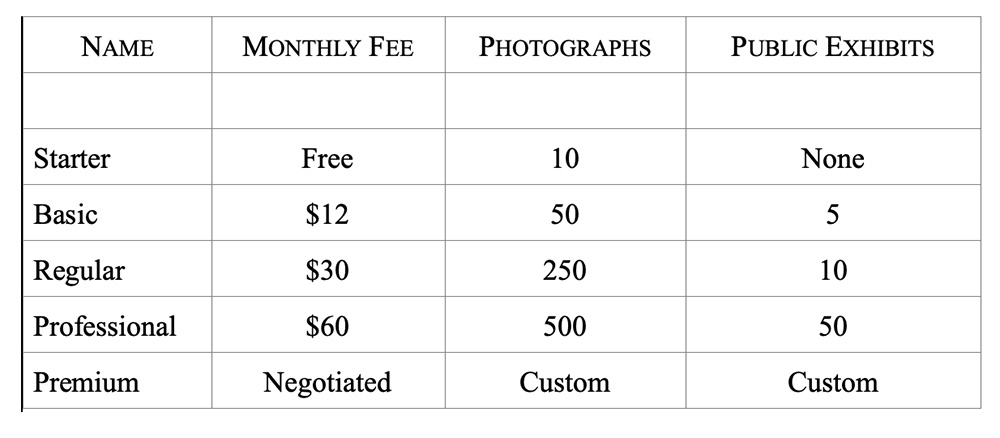
I started with the Free plan, but within an hour or two, I signed up for the Basic one. For $12, I had a month to fully test the system by creating the sort of exhibit I had in mind for my Kenosha project. If I didn’t like the results, I could simply cancel the plan.
I am currently operating under the Regular plan. Payment is through PayPal. I received a slight discount by prepaying for twelve months.
Creating Exhibits
Kunstmatrix offers four stand-alone rooms, as well as 10 rooms that can be combined. Rooms vary by the number of permitted images and dimensions. Many of the rooms permit two or three words to be displayed on the floor rather than on the walls. The floor feature doesn’t make much sense for photographs—although I have used it—but sculptors can take advantage of the floor slots to display their works.
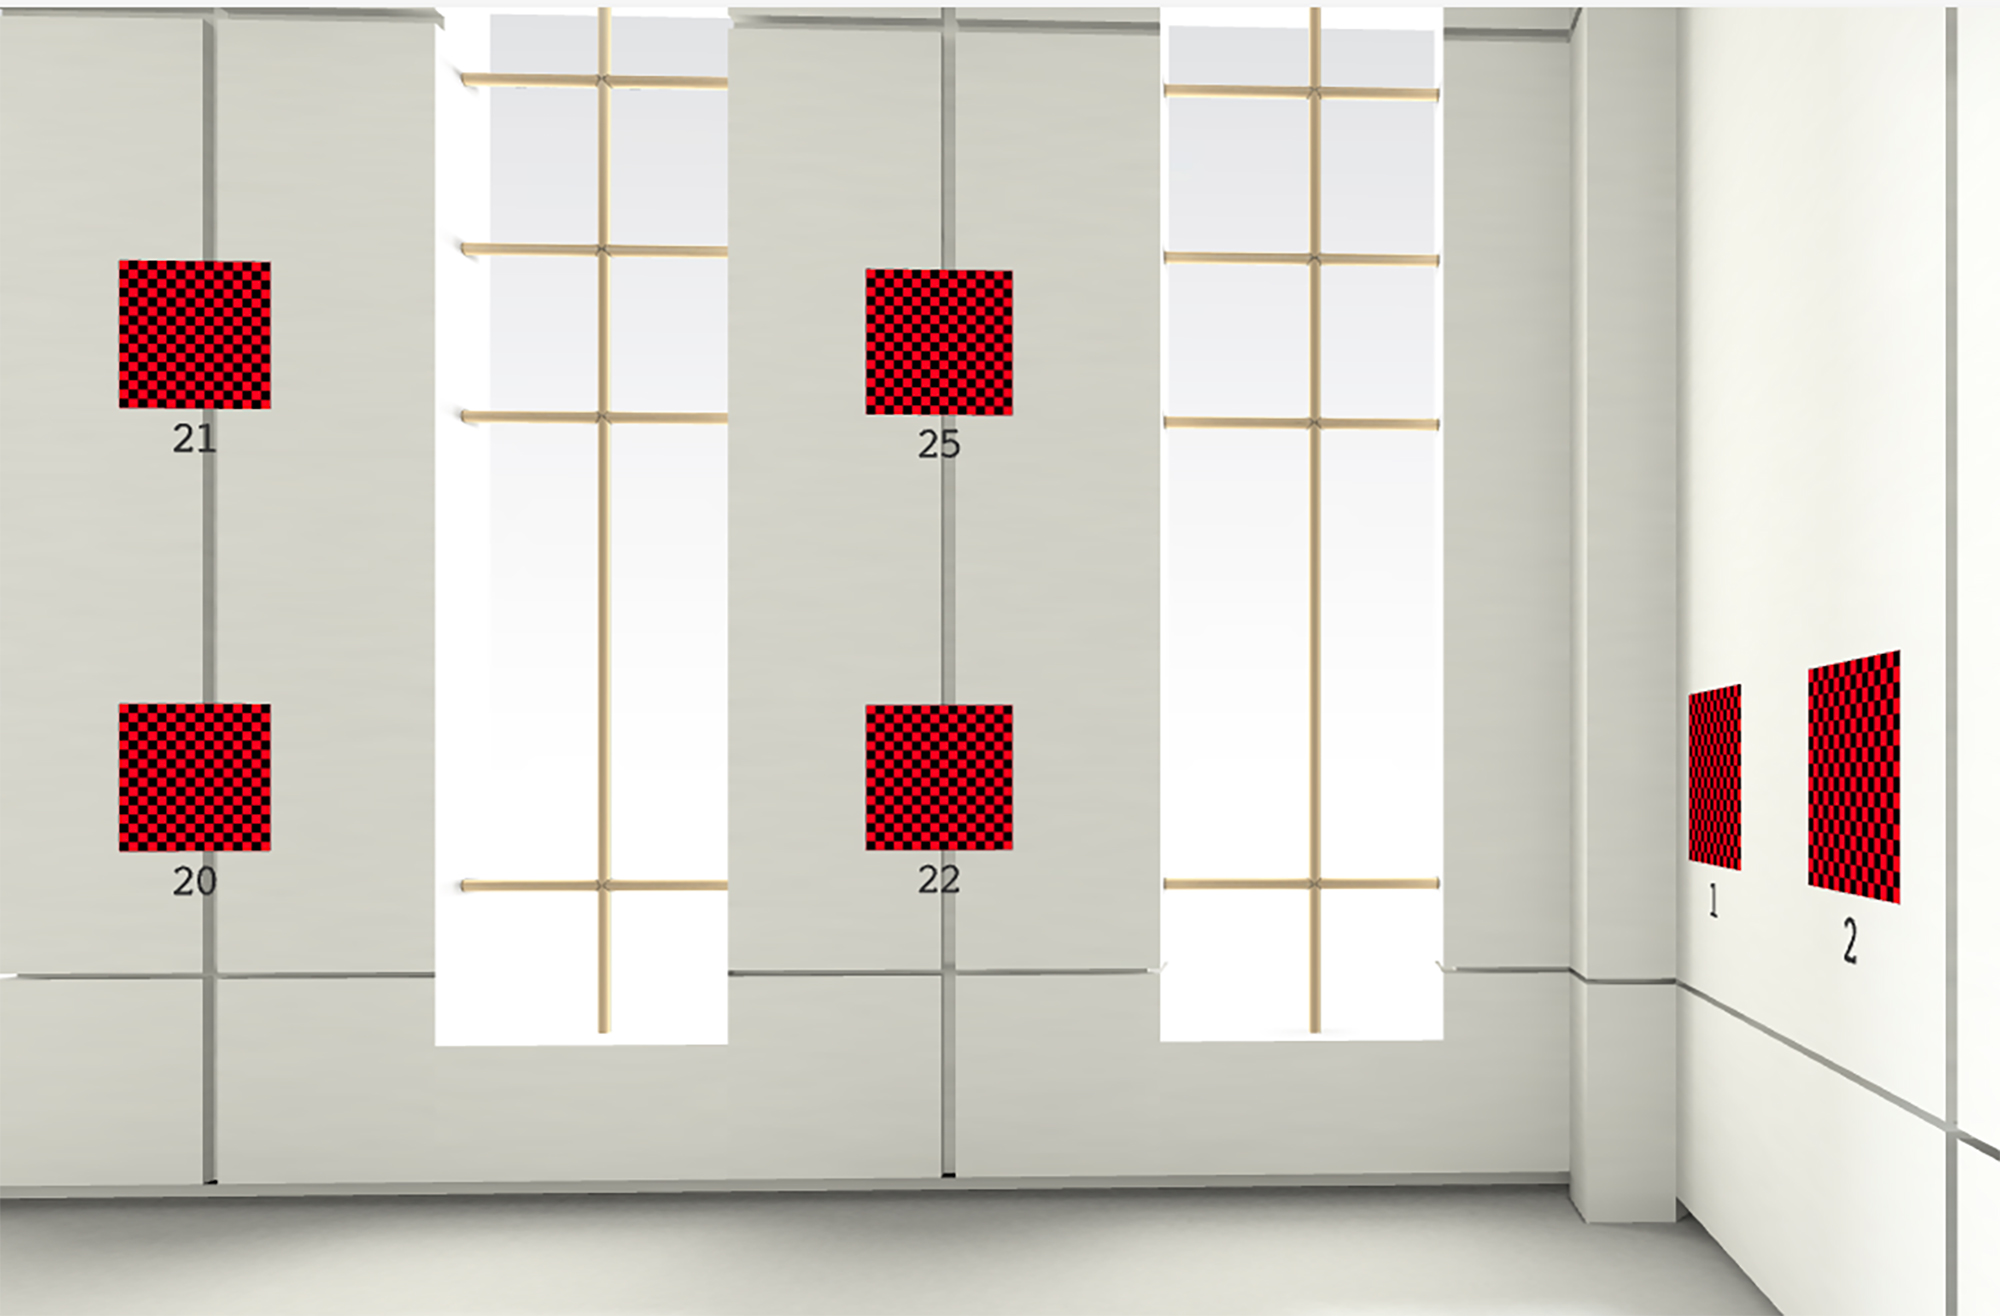
I have a strong preference for the stand-alone rooms because three of the options have windows, which simulate outside light streaming into the gallery space, creating an airy feel. The rooms that can be combined allow for larger exhibits, but none include windows. For each of my three exhibits, I chose the stand-alone gallery with 45 wall positions, plus two on the floor (no clutch).
Kunstmatrix offers nine wall colors (white, light grey, grey, anthracite, green, dark yellow, red, orange, and dark blue). I opted for light grey based on what I have learned about setting up my Lightroom and Photoshop interfaces. Light grey offers a neutral background, placing all the emphasis on the photographs. With the exception of white and grey, the other colors overwhelmed the images. Kunstmatrix could streamline color selection by including color swatches at the selection point. Under the current system, you must select a color, and then load the room to see the color. As we all know, there is not one Red when hue, saturation, and luminance are taken into account.
In one iteration of my L project, I combined two rooms, which provided me with about 70 positions. It took just two clicks to combine the two rooms. After sharing the exhibit with Gary and Evelyn, I concluded that 70 images were too many.
The user experience was fairly seamless when I used 70 positions unless the viewer ended at the 70th position and wanted to return to the first position. When the two rooms were combined, each room retained its position numbering, which meant duplicated numbered positions. I suspect the duplication was what caused the glitches.
Adding Audio. It is also possible to add an ambient audio file to each room. The audio plays in a continuous loop when the viewer enters the exhibit. The audio file format is limited to mp3 and cannot exceed 5mb.
I did not add an audio file to my Kenosha project, but I decided to add music to my L and Impromptu Portraits projects. I licensed the music from the Premium Beat website, which is affiliated with Shutterstock. One tip: I downloaded the trial version of the music I was interested in using. It contained an audio watermark. I then purchased the license and downloaded the unmarked file, but the audio watermark was still audible. I am a Mac user, so I had to delete the copy of the watermarked file that is automatically imported into Apple Music, as well as any other copies stored on my computer (in my case, the Downloads and Desktop folders). It took me two emails to Premium Beat tech support to figure that out. Windows users may have similar issues.
It is also possible to attach an audio file to one or more photographs. I saw one exhibit where the artist offered a brief explanation of a particular work. The viewer can activate the file with a mouse click, or the system can be set to activate when the viewer comes within a certain distance of the particular work.
Kunstmatrix does not provide the viewer with the ability to turn off the audio associated with a room (as opposed to an individual work) when viewing an exhibit. Obviously, the viewer can turn the sound down on her computer, but that is not an elegant solution.

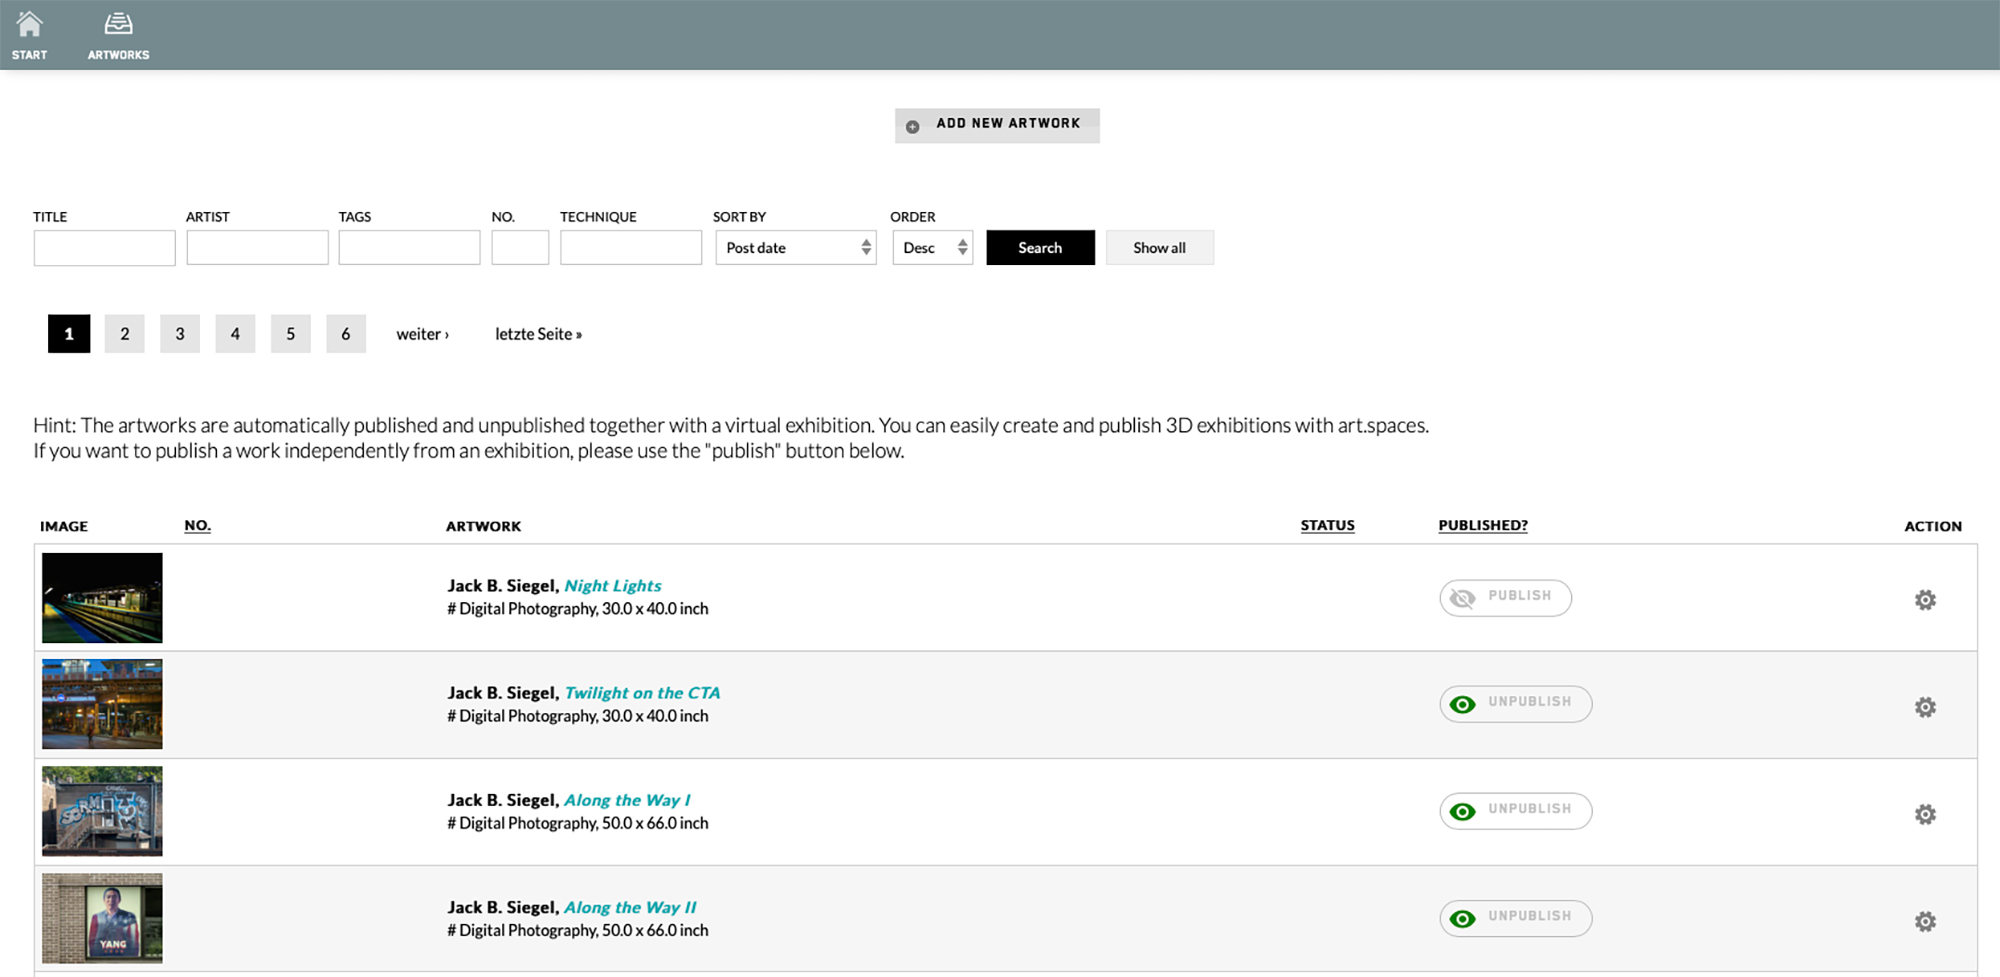
Uploading and Working with Images. The web interface has a banner running across the top of the screen. To manage photographs, you click Art.Depot, giving you two options—+Artwork and Managing Artworks. By selecting +Artworks, you can upload images to your account for addition to one or more exhibits. File size is limited to 5mb and the files must be either jpeg or png. I haven’t found that the 5mb maximum adversely affects image quality. The limit is necessary because of the 3D-nature of the presentation and the fact that multiple images are visible at one time. Moreover, the platform is designed with mobile devices in mind. Those devices often have a more limited processing capacity.

As noted, when tagging an image for upload, you enter information about the image and select the frame (if desired). The most important decision you will make at this point is image sizing. If you leave the size parameters blank, the system sizes the images. This works fairly well, but there can be aesthetic issues. Some walls have positions for three or fewer images, while others have positions for five or six. The walls that accommodate more images display them with pleasing and natural proportions; on walls with fewer positions, though, the images often look too small. I prefer to enter size parameters for each image, which eliminates sizing issues altogether.
It is necessary to experiment, but I find that 40 inches on the long side is a good starting point. Sometimes I adjust to 50 inches on the long side and other times to 20 or 25 inches. Dimensions can be entered in inches or centimeters, with centimeters being the default. I could not find a way to change the default to inches, which means that when I forget to select inches, my image is much smaller than I expected, necessitating a correction.
There are two notable omissions in the interface’s features: First, attributes cannot be applied globally, which often means reentering the same information (e.g., your name, the year the image was created, the medium) for each image. In all likelihood, you will use the same frame color and depth for each image, but you must enter that information for each image.
Second, the system contains rudimentary alignment, positioning, and spacing tools. It shows black guidelines when you move an image, permitting alignment with other images on the wall. There is no tool for evenly spacing images on the wall. In practice, this hasn’t been a major impediment, but more robust tools would be welcome.
At this point, I should note that there is a limited ability to move the images on the wall. To be candid, I have not fully examined this capability. A few things are clear: First, you cannot convert a floor position to a wall position. Second, you cannot move a position from one room to another. Third, you can “stack” positions—for example taking a single row of four positions and creating two rows with two positions. Finally, I don’t think you can move a position on one wall to another wall in the same room, but I am not sure.
The documentation does not specify a color space, but I have been uploading files in sRGB, which has worked fine. It would not surprise me if the upload process automatically converts other color spaces to sRGB.

The Major Deficiency. The Kunstmatrix system has one major deficiency. The templates contain pre-numbered positions for placing the images on the gallery’s walls. The viewer can choose to view the exhibit either by “wandering around,” or through a guided tour which starts at Position 1 and moves sequentially through all the positions. Unfortunately, the design does not reflect how people proceed through a physical experience—at least it does not reflect how I move through an exhibit.
In one room, for example, the viewer lands at position 24 when first entering the gallery if she chooses to wander through the exhibit. I placed a text panel in Position 1, so my viewer saw the introductory text only after she had looked at other images. On the other hand, if she took the guided pathway, she started her journey at Position 1. At a minimum, the developers should give more careful consideration to how people wander through gallery space so as to better align the two approaches. More importantly, the developers should redesign the system so that the photographer can assign a number to each position rather than having a static pathway imposed on the sequencing. My concerns may not matter to an art gallery that is using the technology to sell art. I, however, am interested in developing a visual narrative, so I am much more concerned about how the guided tour progresses.
The Kunstmatrix FAQ indicates that Kunstmatrix can customize the templates. I inquired about this, and as I expected, Kunstmatrix indicated that a customization is an option for a fee. I plan to submit a proposal.
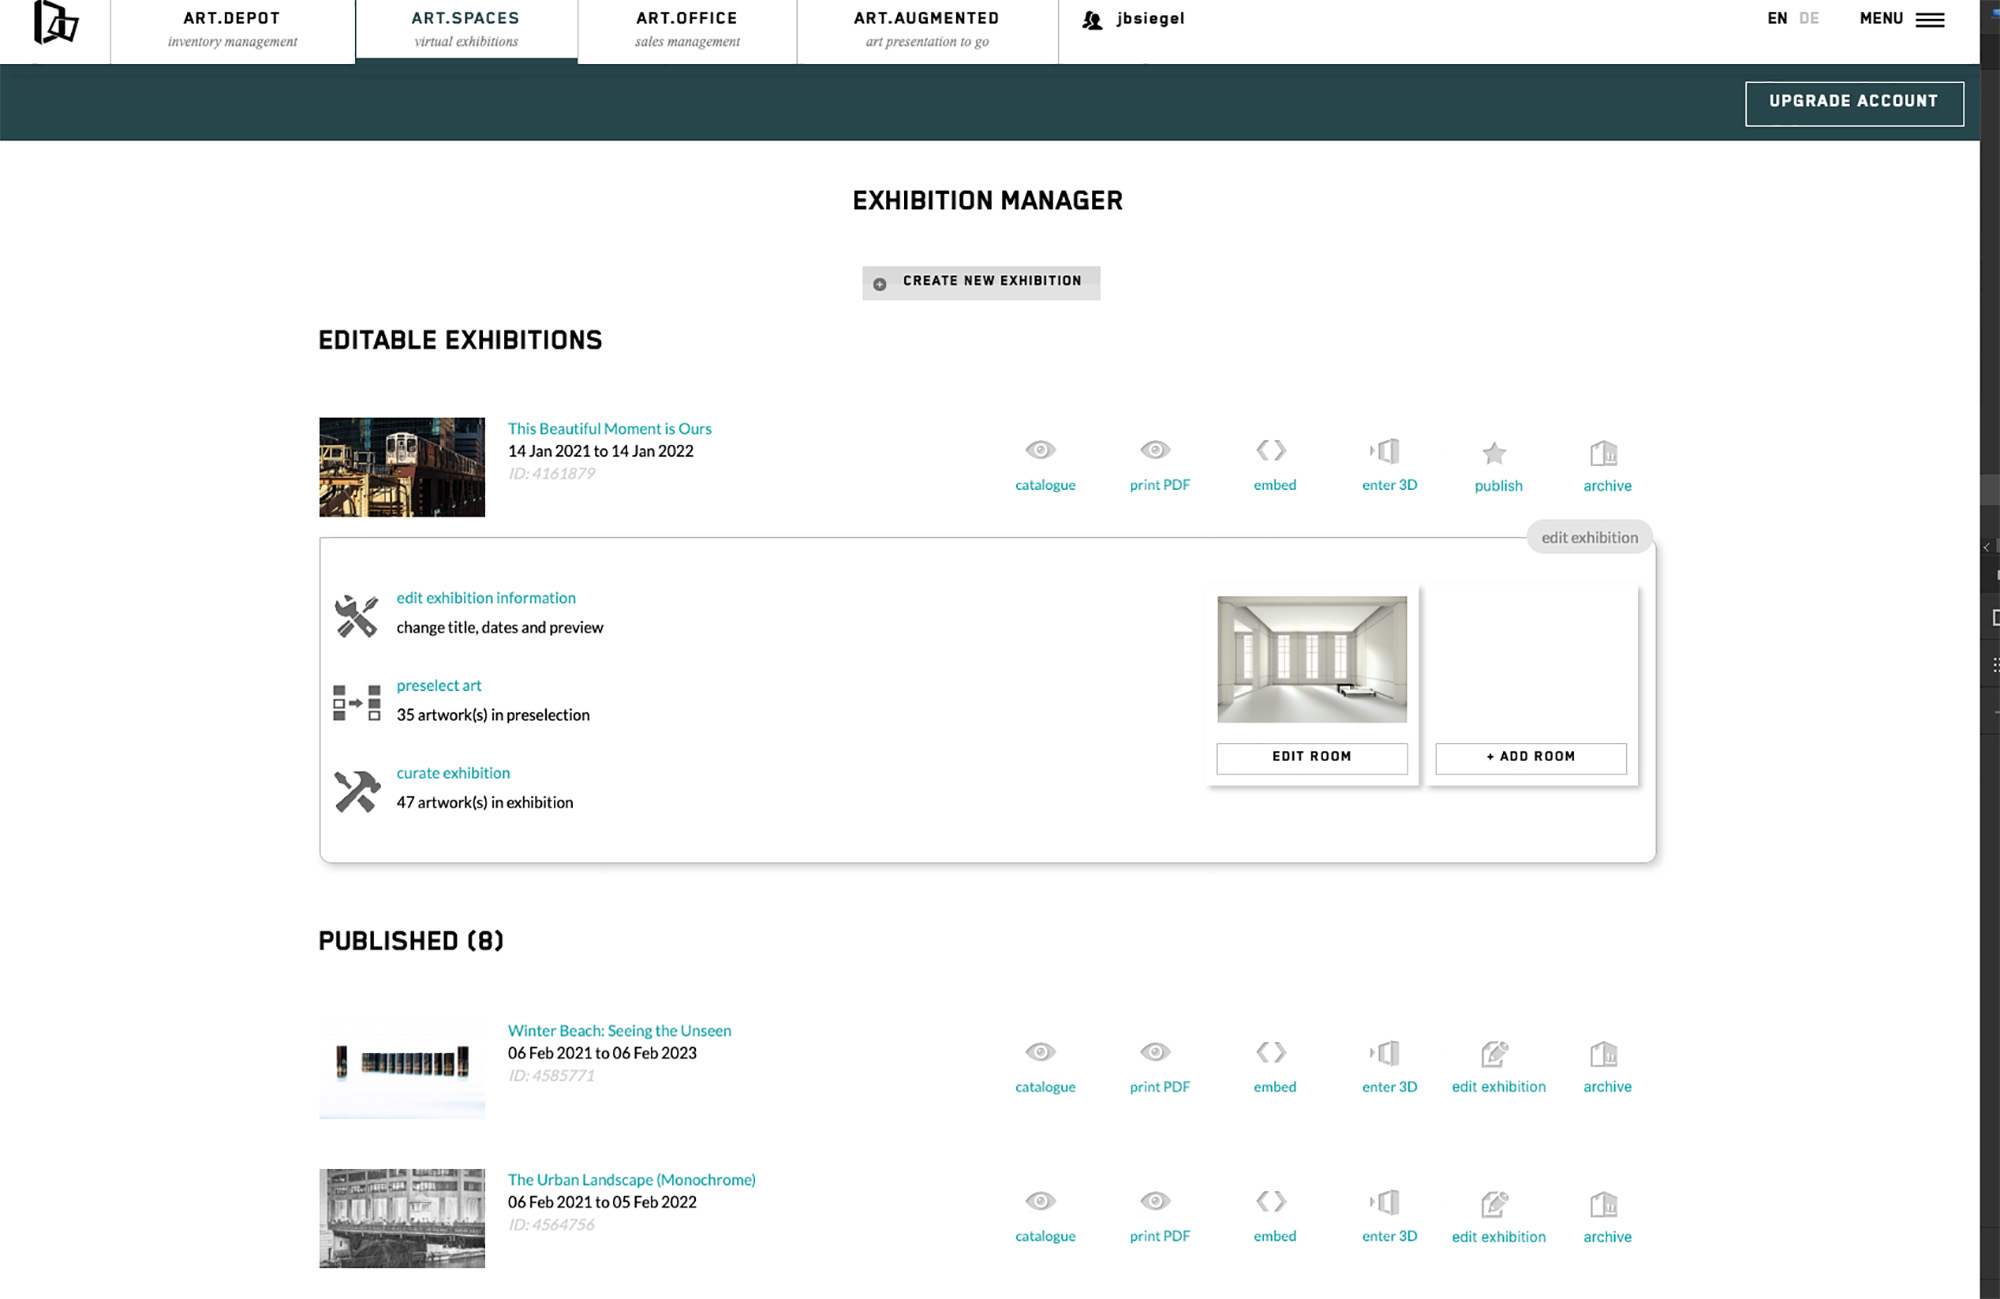
Publishing an Exhibition. Publishing an exhibit is a one-step process. On the Exhibition Manager screen, there is a row of teal blue buttons relating to the exhibition. The fifth button is labeled Publish. Just click it, and the exhibition goes live. Your exhibit will appear for the world to see in a list of published exhibitions on the Kunstmatrix website unless you opt-out. In that same row of buttons, there is a button labeled Embed. Clicking that button produces five or six lines of code that include the exhibit’s web address. I use Squarespace for my photoblog. I simply added the code to a SquareSpace post using the SquareSpace Embed content block. I also copied the web address into e-mails to friends, social media posts, and in links on my portfolio website.
The exhibit resides on Kunstmatrix’s servers, so there is no obvious way to “brand” the address as your own website. This should not come as a surprise. The exhibit is available so long as you continue to make the monthly payments. I have mirrored other websites (created using the PhotoShelter and SquareSpace platforms), so that the web address carries my brand, but I have not determined whether that is possible with Kunstmatrix exhibits.
One important tip. When you decide to edit an exhibit after publishing it, you must go back to the Exhibition Manager. After you click the Publish button, it is relabeled Edit Exhibition. You must click this button to return to editing mode. After you finish editing the exhibit, you must republish the exhibit before the exhibit and the revisions are visible. This is not obvious.
Finding Documentation. Back in the mid-Nineties, I developed software as a sole proprietor. I learned quickly that technical support calls from users are time consuming. To reduce those interactions, I spent large amounts of time making the user interface as intuitive as possible, and I developed a robust “Help” system using the then industry-leading product. Kunstmatrix should take a lesson. Its documentation is inadequate, comprised of a FAQ and several short video clips. There are several interesting features that are largely undocumented. I have complained about the documentation and was recently told that there will be a rewrite of the FAQ as Covid-19 permits.
Before starting to build an exhibit, I recommend spending about 20 to 30 minutes clicking menu items and watching the videos. If you are like me, you will “hack” your way through the process, and within an hour or two have a good sense of how to build an exhibit.
Kunstmatrix does offer email technical support, which is fairly responsive. I normally receive a response in five to six hours, but because of the time difference between Chicago and Berlin, the response sometimes arrives the next day.
Taking Advantage of the Marketing Tools. Because I am not selling my images, I have not experimented with two marketing features of the Kunstmatrix system. The first “module” is called Art.Office. It includes tools for managing customer relationships. The second is called Art.Augmented. As I understand this tool, a customer can hold up an iPad in his home or office to visualize what a particular piece of artwork will look like in that space. This tool also might be of use to those deciding how to hang a gallery show in the physical world. Both tools are included in the monthly fee.
Discovering Design Examples. As noted above, Kunstmatrix features customer exhibits on its website. You can get design ideas by exploring the virtual exhibits created by a variety of art galleries, festivals, workshop groups, and photographers. To find these exhibits, go to Menu in the upper righthand corner of the Kunstmatrix main webpage. Under Discover Kunstmatrix, select 3D Exhibitions.
Tips and Tricks
Here are a few tips and tricks that will expedite building a virtual exhibit:
Sequencing Images. I highly recommend frontloading organizational and sequencing efforts. You should have an order and structure in mind before uploading your images. The online part of the process will go much faster because it is easier to sort photographs on a dining room table or in a Lightroom collection than it is online in a Kunstmatrix exhibit room.
For my L and Impromptu Portraits projects, I first built a Blurb book using Lightroom, which forced me to think about the relationships among the images, particularly those on a two-page spread. The ordering changed, though, when I transferred the book projects to the virtual galleries. Now I had to think about the relationships in a three-dimensional space, where more than two adjacent images would be visible at once. Separately, I found differing aspect ratios more problematic in three-dimensional space, as described next. Nevertheless, the Blurb exercise gave me a time-saving head start. Remember that you don’t need to publish the Blurb book to use the Lightroom feature.
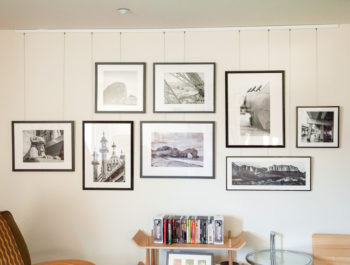
Selecting Aspect Ratios. When I purchased my first digital camera in 2005, I also purchased a printer. I probably have between 3,000 and 4,000 prints stored in flat files and boxes. Given my workflow and philosophy, each image stood on its own, so it didn’t matter whether it was square, or in a 4/3 or 3/2 or another aspect ratio. I used the aspect ratio that worked best for a particular image.
I quickly learned when I assembled my first book and again when I designed my first Kunstmatrix exhibit that showing photographs with different aspect ratios is not always aesthetically pleasing. For example, four images hung on a virtual wall in a horizontal row will look horrible if three of them are in a 4:3 aspect ratio while one is in a 3:2 ratio. The aesthetic problem can become more pronounced when two images with different aspect ratios are stacked vertically, although that is not always the case (e.g., horizontal on top and vertical on the bottom). I often adjust crops and aspect ratios in Photoshop or Lightroom to impose consistency.
Setting File Sizes. As noted, files uploaded to the Kunstmatrix site cannot exceed 5mb. To satisfy that requirement, I first open the image in Photoshop using Lightroom’s Edit in Photoshop command. I then resize the image so that the longest side is 20 inches or under. (The size depends on native file size—for example, a 2005 Canon raw file vs a 2020 Fuji GFX 100 raw file.) I then export the image.
I find that exporting the image from Photoshop is faster because Photoshop calculates and then shows the size of the file in the export dialog box. Although you can limit file size as part of the Lightroom export process, Lightroom is less transparent in terms of displaying the file size. Additionally, I have received error messages in Lightroom during the export process—”inadequate file size” as I recall the message. Because your exhibit viewers will have the opportunity to examine each image in Detail View mode, you will want to output the image as close to 5mb as possible.
Adding Text. You can add text to your exhibit—for example, an introductory statement. To do so, write the text in Word; format the aspect ratio using Word’s Page Setup command; save the file as a PDF; open the file in Photoshop; convert the background from transparent to white or whatever color is appropriate; save the file as a png; and then upload the file as an image in Kunstmatrix. As an alternative, you can create a text panel in Photoshop, and save it as a jpeg file. One of the Kunstmatrix FAQs provides additional tips.
I am a big believer in combining words and photography—see my photoblog (Show and Tell) but the more I worked with the Kunstmatrix system, the more I realized that it really isn’t designed for large blocks of text. An exhibition title is one thing; three or five paragraphs of text are quite another. By and large, the images need to speak for themselves.

Adding Mats. I like matted photographs, so for my Impromptu Portraits project, I used Photoshop to add mats. I simply increased the canvas size, and I selected a creamy white for the mat color. I chose a simple approach to mat size—1.5 inches on each side, hoping for uniformity. In the end, I had to make minor adjustments, because the relative mat size changes for images with differing resolutions. I gave some thought to calculating the mat size by applying a fixed percentage rather than an absolute number, but if I did that, I would lose the uniform spacing on each side of the image (unless the image was square).
Exhibit Size. Like all photographers, I believe every one of my photographs is a masterpiece. To suggest that I not include every image I ever created in my project is heresy. Taking my tongue out of cheek, those two sentences reflect our starting positions as photographers when asked to cull our images to a manageable and meaningful number.
If a photo project is to be impactful, culling is necessary. The best way cull is first to limit the exhibition size. It also helps to have friends, fellow photographers, and family look at the proverbial pile. As hard as it often is, you just have to keep weeding out images until you reach the specified number. For my L project, I had close to 160 images in my Lightroom collection. I reduced that to 82 images for my Blurb book. The first iteration of my Kunstmatrix exhibit contained 70 images. The current one has 45. Each time the cuts hurt, but after a good night’s sleep, I realize the reductions improved the project.
Design as an Editor Rather Than as a Photographer. When putting together a sequence of photographs, you are constructing a narrative or telling a story, which means you must focus on the relationships among the images. Why does this image go first and this one last? Why is this photograph next to this one? Does placing a monochrome image next to a color one work aesthetically? In answering these and similar questions, you may need to discard your strongest image for one that you consider to be less notable, because two weaker images may result in a stronger narrative.
Always keep this in mind: You’ve lived with your images for months or even years. The viewer will only see what is on the walls, so she won’t yearn for the images that you omitted. In short, you see what is missing; the viewer only sees what is there. To the extent possible, become the viewer.
At the time I liked the second image much more than the first one—that may no longer be the case. I resisted using it because it didn’t project the sense of calm and safety I wanted at the end of the narrative. Too much concrete and not enough water.
Is a Virtual Gallery Worth It?
Each photographer will have to answer that question. I am still making prints and will continue to do so. For me, that is the best way to present my images. On the other hand, my Kunstmatrix galleries garner immediate attention and “wows.” Moreover, I don’t have to carry the prints around with me, and viewers don’t have to travel, so more people see my work.
A case can be made that Kunstmatrix may be just another variation on AI sky replacement. The technology is cool, but it will lose its wow factor as everyone becomes aware of and deploys it. All-new photographic technology converges to the mean. Whether printed, displayed in a slideshow, portfolio website, or a virtual gallery, an image must be great if it is to stand the test of time. If your images are great, Kunstmatrix is another tool to help you gain an audience, and if sales are your thing, increase your revenue. If your images are terrible, no amount of technology will save you.
 About the Author. Jack B. Siegel is a Chicago-based photographer who focuses his cameras on musicians, cityscapes, newsworthy events, Parisian cemeteries, and anything else that catches his gaze in Chicago or during his travels. Jack began life as a tax lawyer, went on to develop software, and then provided consulting services to nonprofit associations. Over the years, Jack has lectured extensively, written two books, and maintained a widely read blog focused on nonprofit governance and scandals. Jack’s greatest accomplishment is having married Evelyn Brody, a tax lawyer and internationally recognized legal scholar. For 27 years they have worked to prove Jackson Browne wrong—there are no screams or strangled cries emanating from their home. And they are forever indebted to President Bill Clinton for bringing them together when they served on his presidential transition team in 1992
Jack Siegel
February 2021
Chicago, Illinois
Jack B. Siegel is a Chicago-based photographer who focuses his cameras on musicians, cityscapes, newsworthy events, Parisian cemeteries, and anything else that catches his gaze in Chicago or during his travels. Jack began life as a tax lawyer, went on to develop software, and then provided consulting services to nonprofit associations. Over the years, Jack has lectured extensively, written two books, and maintained a widely read blog focused on nonprofit governance and scandals.