Sony a7R IV Pushed To The Limits
A week ago I returned from Antarctica and from a very successful workshop and adventure. We had wonderful guests as well as some incredible photo opportunities. One of these opportunities stood out as a high point and would also challenge most cameras beyond their capabilities.
The Set Up
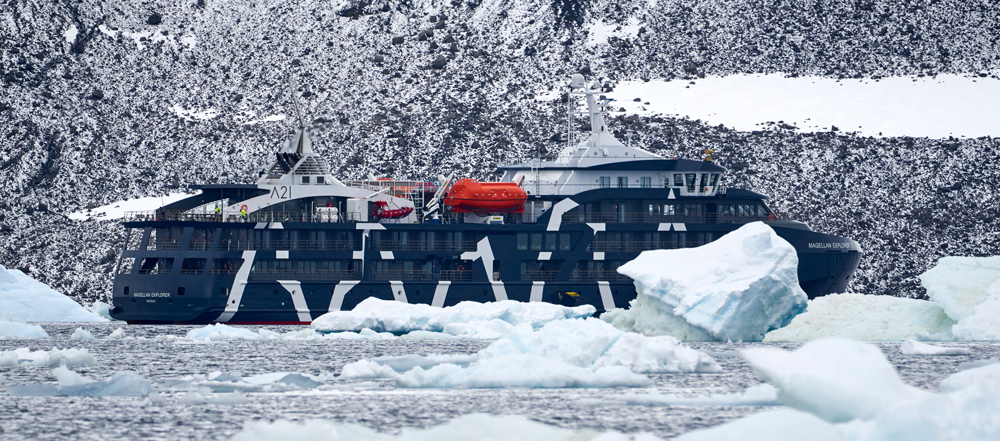
We did this trip onboard the Magellan Explorer. This is a brand new ship and we were doing the 15th trip on it. It is a true expedition ship for about 65 passengers and is beyond description. I’ll cover more about this ship in my article about the trip that will be appearing in the next few weeks. One of the features though are ceiling to floor windows in the dining room. It’s pretty cool to be eating dinner and watch Antarctica go by.
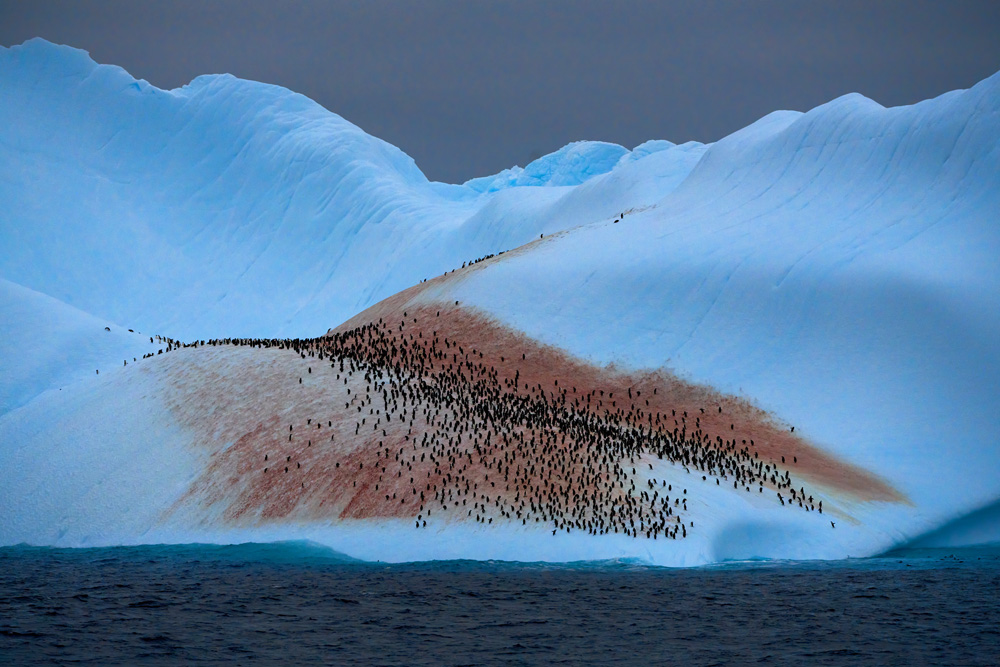
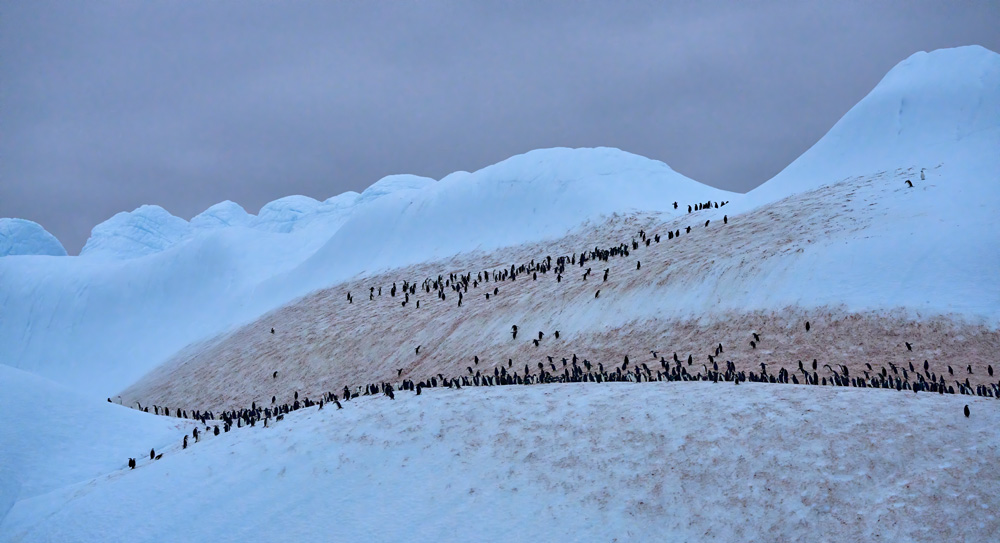
It was during dinner that while looking out the window we saw this giant iceberg with hundreds of chinstrap penguins on it go by a few hundred yards from the ship. It didn’t take long to react and head for the cabin to get our cameras. In the dining room was the Captain, and upon seeing this he immediately ordered the bridge to slow down and change course for the iceberg.
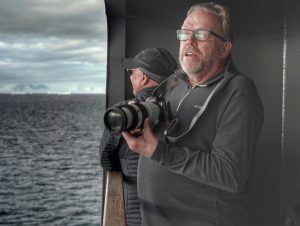
I hustled up to my cabin which I was sharing with Art Wolfe. He got there a minute before me and was already out on our balcony shooting this berg. One of the nice things about this ship was that the cabins had balconies with big seaworthy sliding doors. I grabbed my Sony a7R IV and 100-400mm lens and joined Art on the balcony.
It was late dusk and getting dark quickly. The ship was moving and I was shooting with a long lens. I set my camera on manual and the shutter speed of 1/1000th of a second at f/8 and switched the ISO to auto mode. With approaching darkness I knew it would push my ISO up to as much as 12,800. I knew the Sony could handle it as I shot a frisbee match at these kinds of high ISOs and high shutter speeds. I was amazed at how well the Sony sensors could handle these high ISOs, but that was with the Sony a9. My initial tests when I received the a7R IV showed it did high ISOs really well. So, I photographed away with the confidence that my cameras and lens could handle the situation. This was not the case with some others on board with different camera systems.
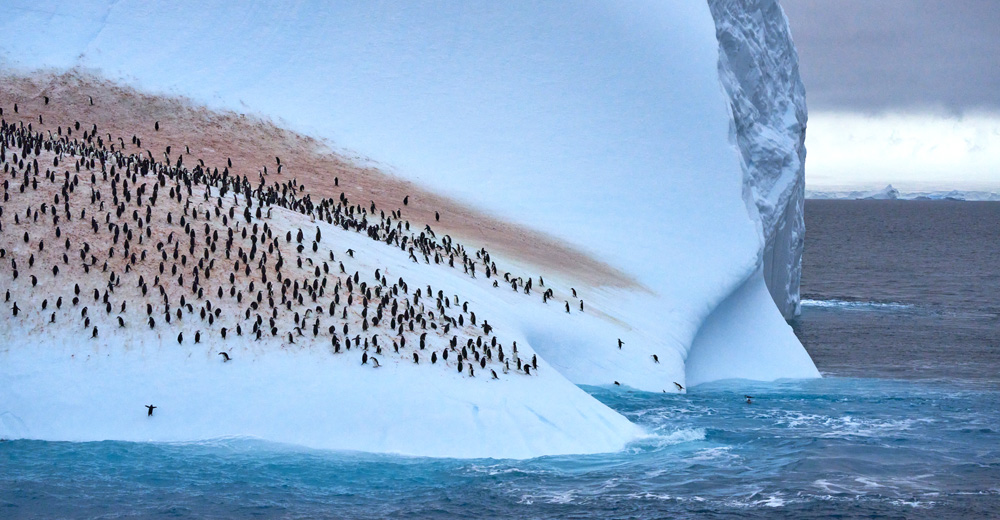
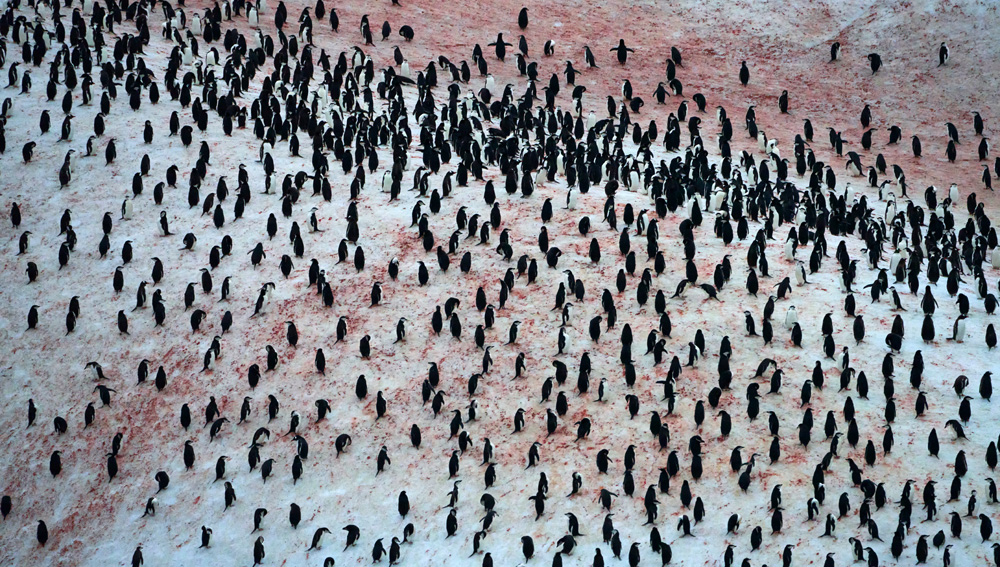
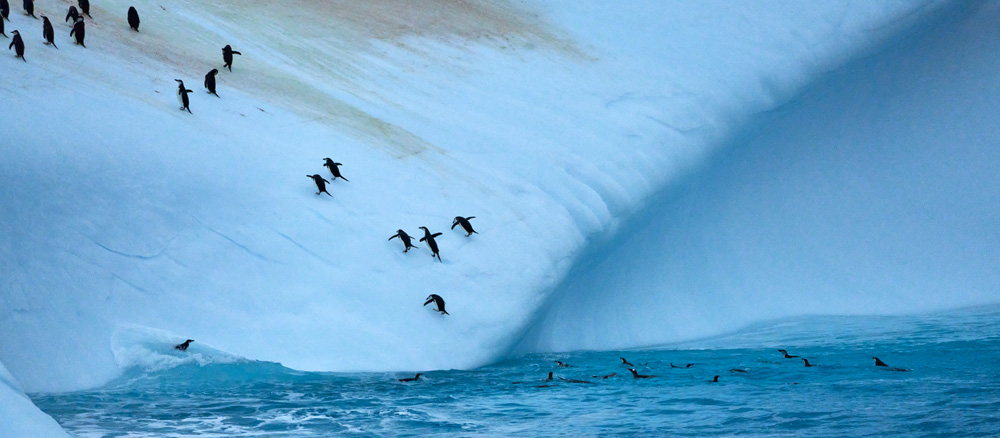
Fortunately for us the ship’s approach to the iceberg allowed us to stay on our cabin’s balcony for the whole shoot. As we crept closer to the iceberg I was able to zoom to 200mm and shoot. It was really a sight to behold. There were hundreds of penguins on this iceberg and they had been there a while. The sight of all the penguin poop proved that.
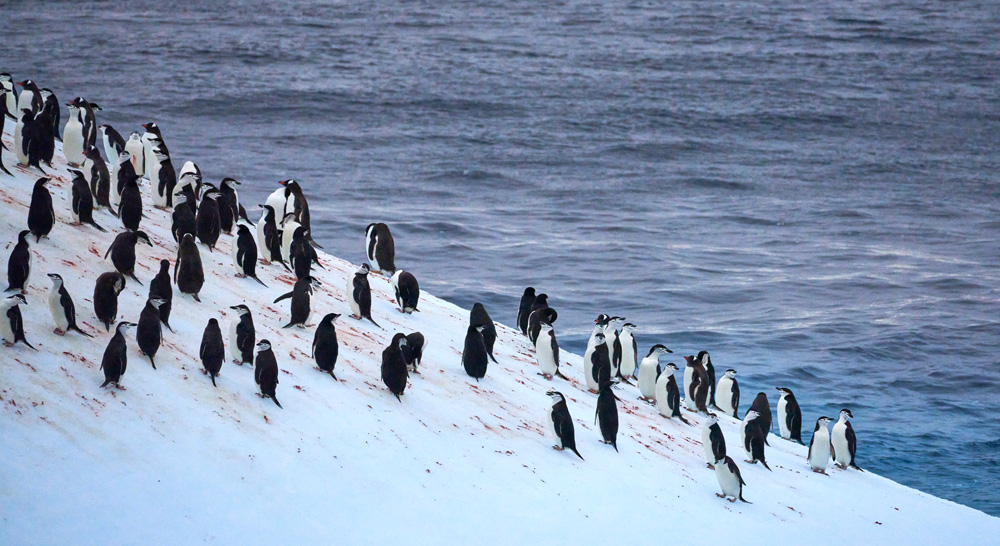
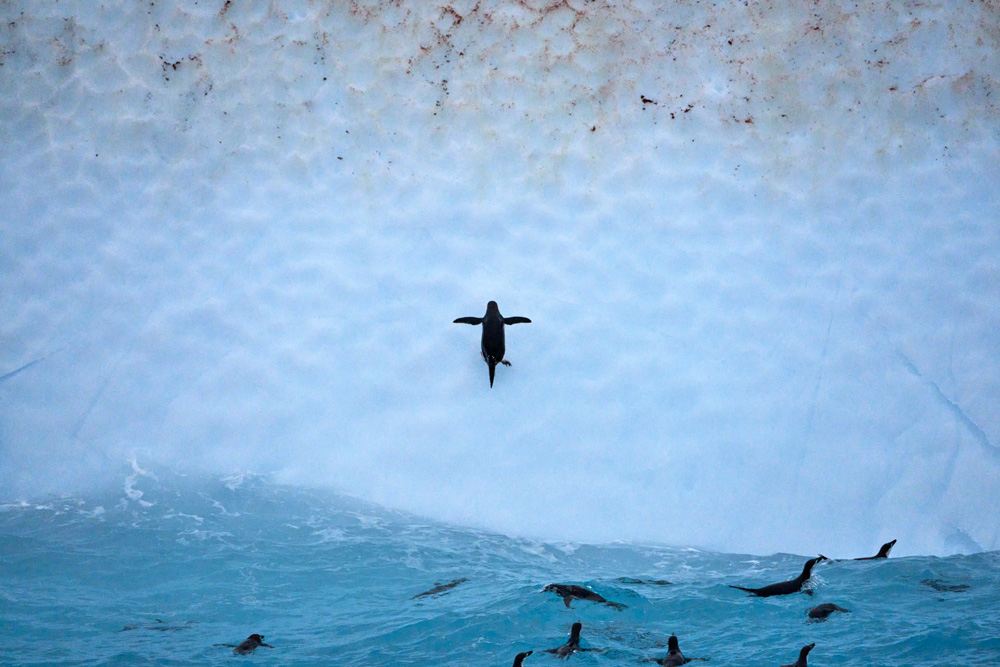
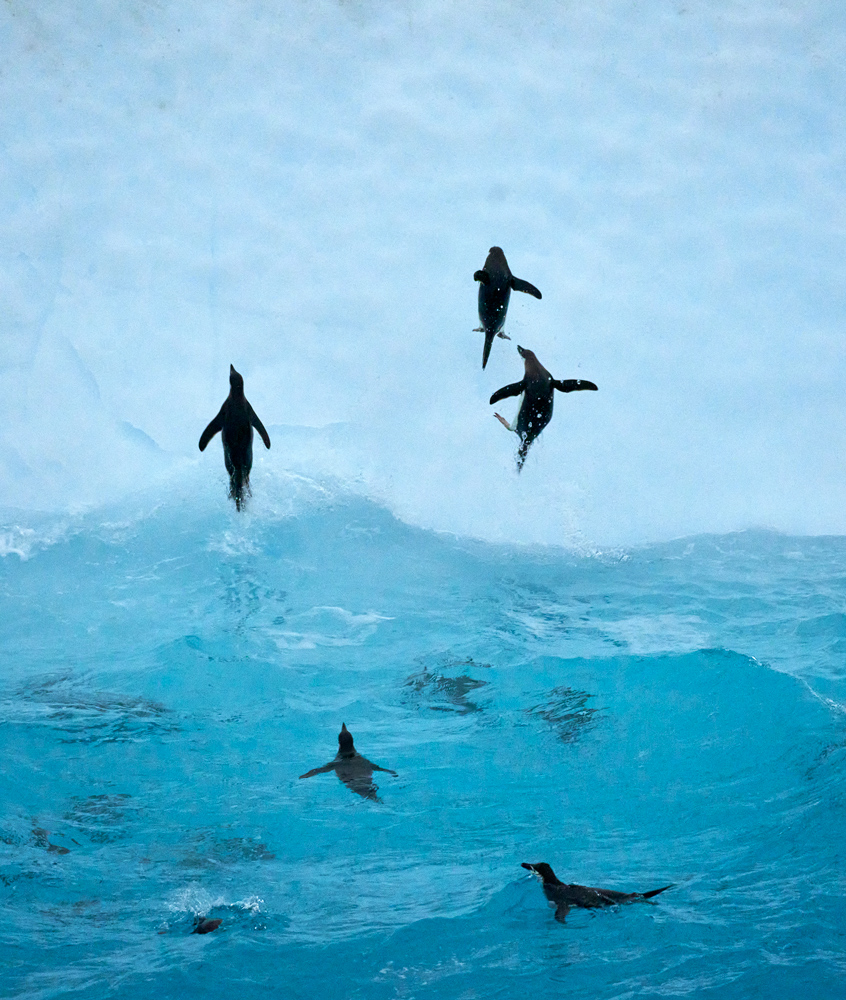
As we got closer to the iceberg—now only a hundred to two hundred feet away—we were blessed with a show of how the penguins landed on this iceberg and had to make a mad dash to get past the waterline. A swell would carry maybe ten penguins to its crest, and these penguins would make a mad leap onto the iceberg. They did an immediate hustle to get to the top, and along the way, many of them would slip and fall over and slide back into the ocean.
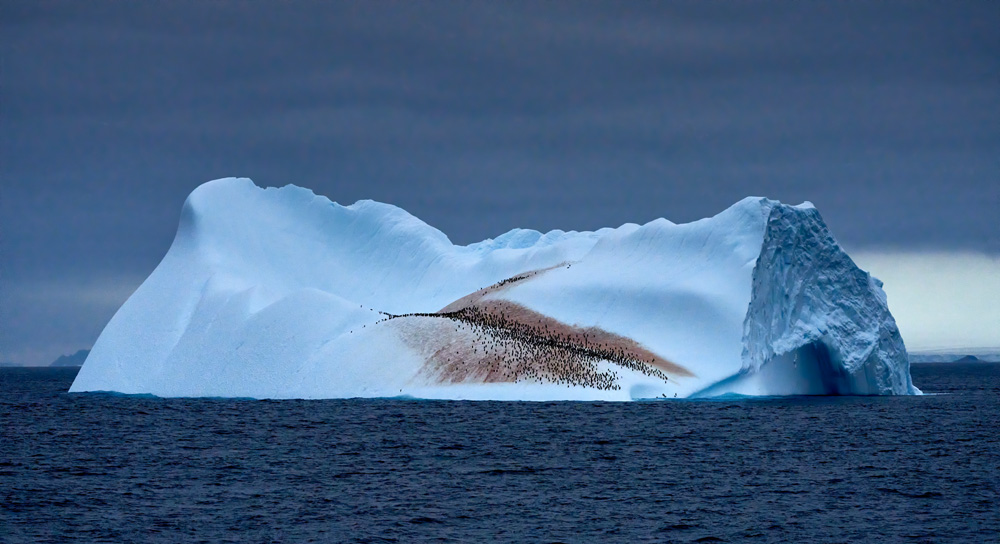
It got to be a lot of fun cheering the penguins on as they made the mad dash time and time again. Some would finally make it and then casually climb the iceberg like it was just another day in the park. All this time it was getting darker and darker. I switched my shutter speed down to 1/500th of a second and hoped the high ISO and IBIS would perform. And—that it did.
After about an hour, when it became too dark to shoot anymore, we finished and went back to the dining room to have a dessert and talk about what a cool experience we just had.
The Proof Is In The File
I returned to my cabin and immediately downloaded my images, hoping for the best. I downloaded my files into Capture One, my RAW processor of choice. There were so many and they looked surprisingly good. I did initial edits and did a lot of zooming in to check focus and check the expected high ISO noise. Wow, I had sharp images and low noise. The a7R IV came through. Many appear in the article and two sets are available for download at the end of this article.
I knew I had the shots and I rated them and would tackle serious processing once I got home. It was now time for a drink and to visit with our workshop attendees. We were all talking about the experience. Some of the others shared their images and I was surprised that they had serious high ISO and noise issues shooting this berg. For many Canon and Nikon shooters, the high ISO was a major challenge. Even with some de-noise software, it would be a challenge to pull some good shots.
Back Home, Time To Edit
Once I was home and settled in, I loaded all my files—which were in the thousands—onto my iMac Pro and began the long editing process. Editing images is something I love to do and find it a nice after dinner activity. I edited the images from this encounter and wanted to see what the results were.
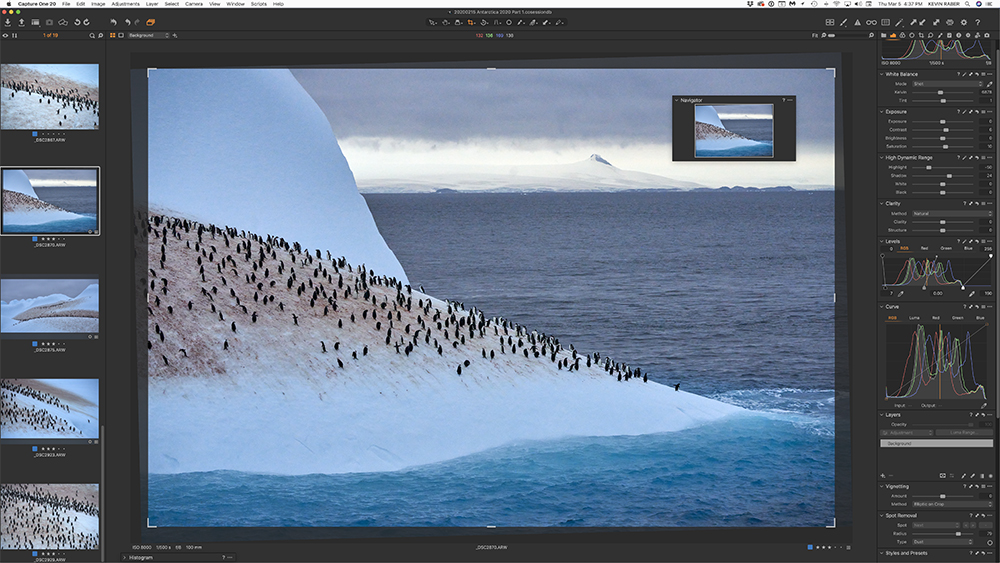
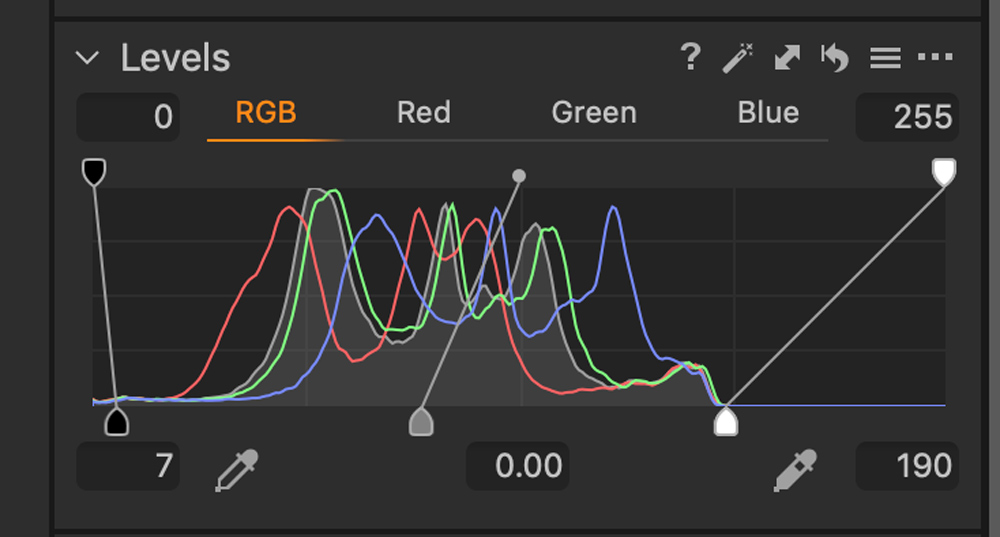
Using Capture One, the first step was to decide on a good white balance. Then I remapped levels. The levels feature in Capture One allows you to take white and black points and re-map them to ) and 255, thus giving you the full ability to work with tones. For me, this is one of Capture One’s biggest features. You can do it in Lightroom, too, but it’s a different process.
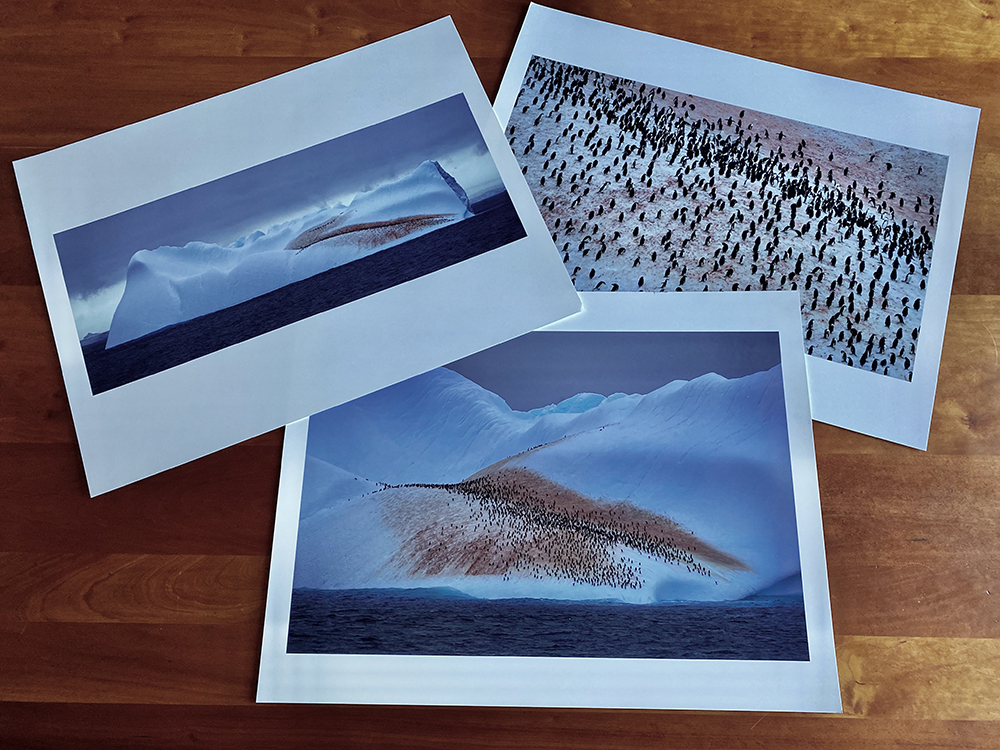
After that, I would adjust the contrast, saturation, and a bit of clarity. Once I got a setting that looked good, I copied those settings to the clipboard so I could apply them to the other images. This got me most of the way there with the other images, and also had the benefit of keeping the same color balance across the full set of images. I did a final crop and adjustments, and then had a collection of images that I could use for this article. Most of all, they were ready for printing, which I will be doing on Friday night at my gallery in Indianapolis.
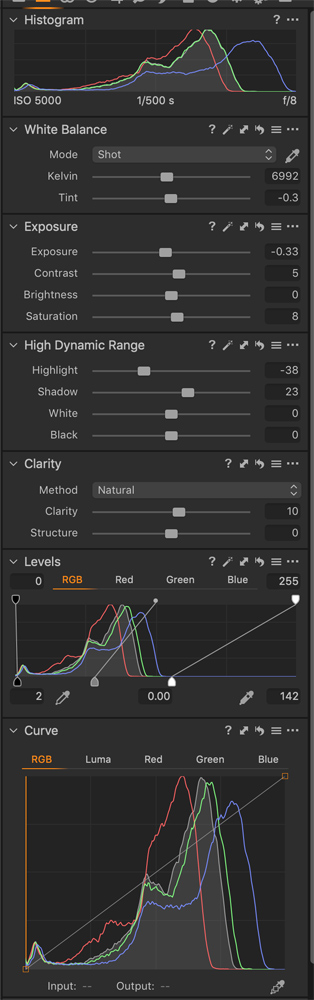
Just for the record, I used default noise settings and did no noise adjustments in Capture One. Frankly, the images were pretty damn good as they were and had more of a grain structure than a noise issue. Once I selected my finals—which went from three stars to four—I was ready to process the images and push them into Photoshop.
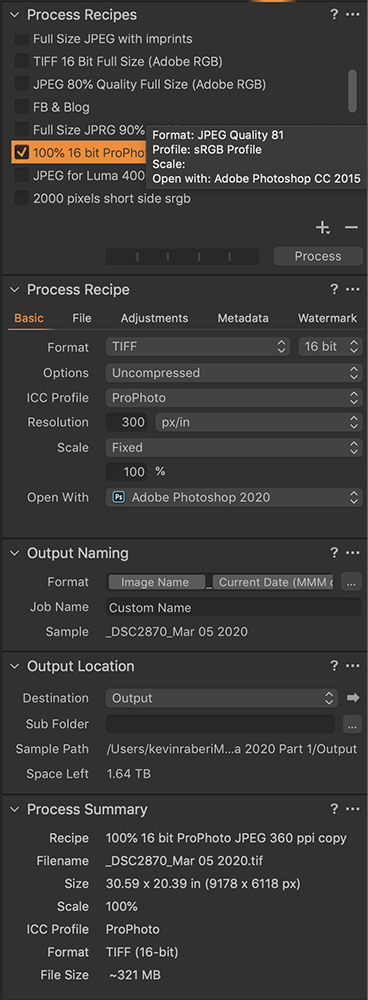
My process recipe for these was 100% actual size in ProPhoto workspace 16 bit at 300ppi. I process images for printing at 360ppi, but because I was setting these images up to go on my storefront they were set at 300ppi, and eventually, I would resave them to a JPEG and adobe RGB. In case you are interested, you can visit my storefront at rabereyes.com. I will have the images in this article up early next week, as I usually work on the storefront on weekends. I’ll do a whole story about my storefront in the future.
Also, at the end of the article (so you can view these files on your hardware), I have set a few images up for download. I hope you enjoy these.
Fine Tuning In Post Processing
I have the process recipe in Capture One to open processed files in Photoshop 2020. By doing this, I have the chance to review the image one more time. The first thing I do is go to at least 100% and pan around the image to catch any pesky dust pots or anything else I might want to fix. I am a big fan of content-aware and healing brush.
Then it is time to see if any of the third-party post-processing apps I own are needed. The most popular ones I have are Nik, Skylum Luminar, and Topaz Studio.
In the case of some of these files, I thought I would give Topaz DeNoise AI a try. I haven’t played with this app before as I usually do not have any noise issues that need to be corrected. However, even as good as the files were without any work on them, I thought I’d see if Topaz DeNoise AI could make these images just a bit better.
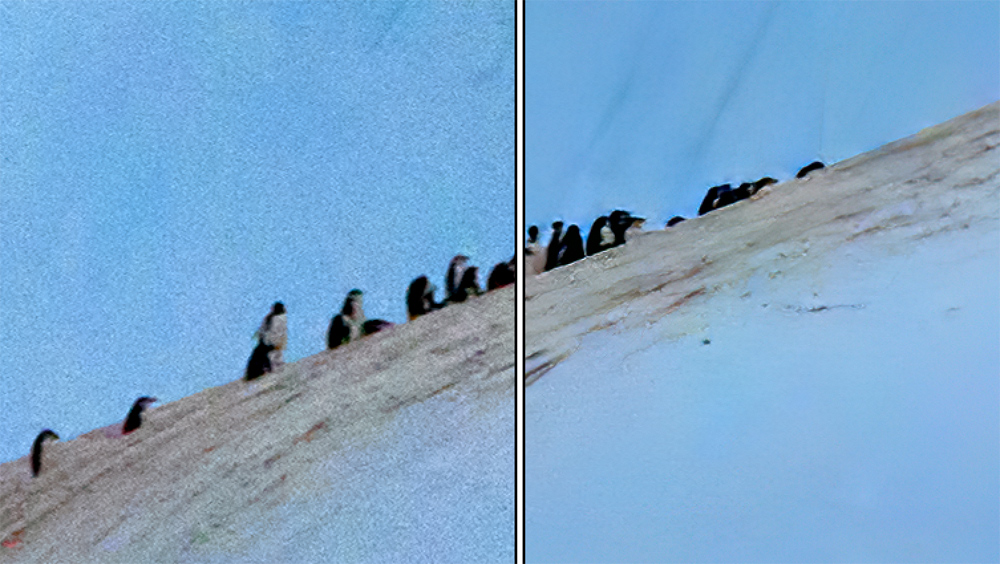
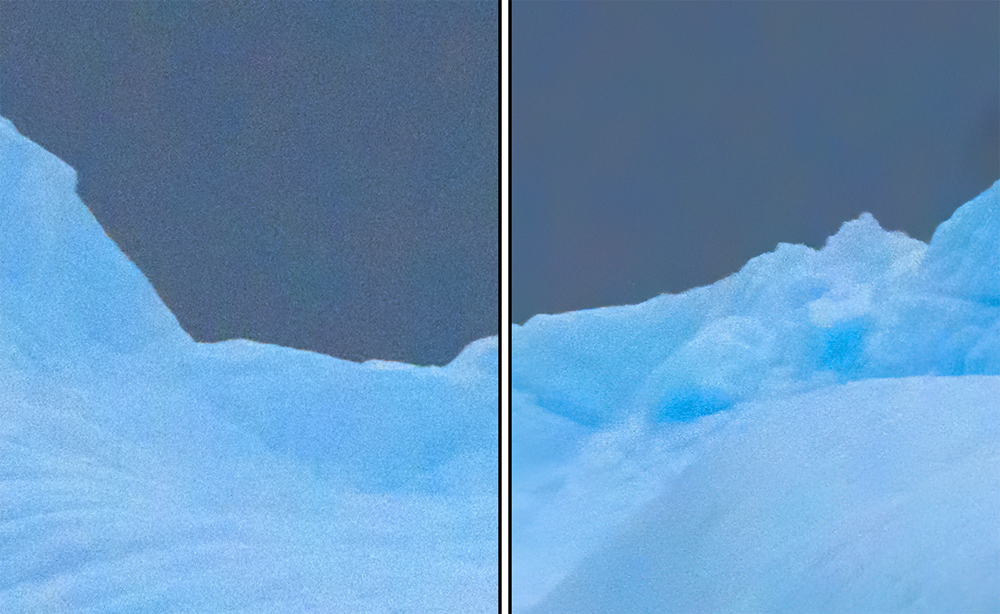
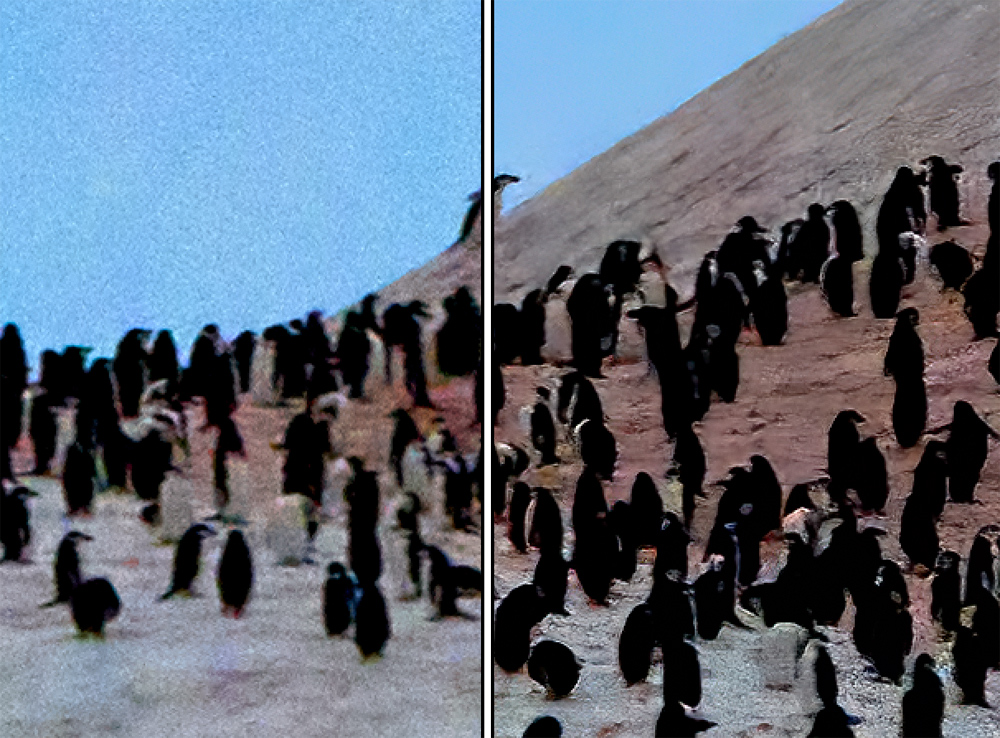

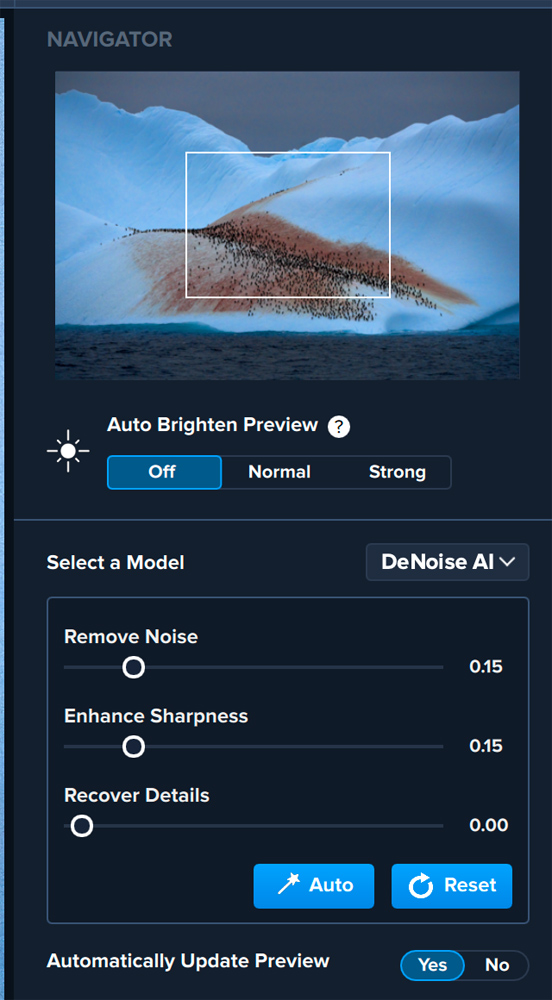
I have a plug-in in Photoshop for Topaz DeNoise as well as a stand-alone program, and I started with one file and opened it up in DeNoise AI. There are only three main sliders to use once the image is open. For the most part, I used the auto-adjust button and was quite surprised at how well Topaz DeNoise worked. In some cases with penguins and the iceberg, it made great adjustments, except for details between penguins that were spaced closely together. I’ll be inquiring with Topaz about this and will do a more in-depth article about Topaz DeNoise.
You can see the settings I used to create this photo. One I made the adjustments to my taste, I applied the settings and processed my images.
Some Images

The Final Word
While I talked a lot about third-party software and in particular Topaz DeNoise AI, this article is more about camera purchases and knowing camera and lens performance characteristics. So many times reviewers talk up cameras without really testing them at extremes. Almost any camera out there will perform well under normal lighting conditions. It’s how well they perform at extremes which makes the difference. When I selected Sony cameras as my Full Frame solution, I did so because I knew it could perform when I needed it to under difficult lighting conditions.
I have taught workshops where I have watched attendees not even try to shoot a setting because they knew the best they might get out of their sensor would be 3200-6400, and even then they might be pushing it. So, when you are looking for new camera gear, set and push the gear to the limit. Try high ISO so you know how it performs. Try third-party software so you know how far you can take the image in post-processing.
Then let‘s talk about lenses. As I have mentioned in previous articles, the Sony G-Master 100-400mm is my favorite lens. I know it is fast AF and optically will get me the sharp and usable image when needed. I prefer the zoom against prime lenses as I can make adjustments quickly to accommodate the subject in a dynamic situation.
And, while I am on my soapbox, let me add this. Most lenses these days can perform at all f-stops. While every lens has its sweet spot, you should also know how it would perform when stopped all the way down. I have had attendees at workshops not shoot a picture that required f/22 because they said the image would be ruined because of defraction. I’ll call BS on that as most people/customers wouldn’t even know what defraction looked like. To this, I say don’t give up the shot because you read somewhere that you shouldn’t shoot under f/8. Once again, many lenses today are engineered to perform at all f-stops. Just get the shot.
Oh, let’s talk tripods—or the lack of one. This is another thing I hear a lot. Somewhere along the way many photographers have read or have been told to always use a tripod. Everything you see in this article and in my upcoming Antarctica article was shot handheld. With IBIS (in-body image stabilization) on most cameras, you will be surprised at how low a shutter speed you can go to get a picture. A tripod on a ship or zodiac is useless because of vibration and movement. Ditch the tripod and get to know how your gear performs handheld so when you need to shoot that way you know what to expect. Challenge yourself and your gear.
For me, with this shoot of the iceberg with penguins, I couldn’t be happier. Under difficult conditions, I was able to capture a number of good images that will be one of the defining moments of this trip to Antarctica.
Download Full Size Images
Kevin Raber
March 2020
Indianapolis, IN
Photography is my passion and has been for 50 plus years. My career in photography has allowed me to travel the world, meet some of the most interesting people on the planet and see things I could never have dreamed of. My goal is to share the passion of picture taking through photographs and teaching with as many people as I can, hoping it brings them as much joy and happiness as it has me. I do this through photoPXL.com, this site, as well as Rockhopper Workshops, and other projects, as well as teaching as Artist In Residence at the Indianapolis Art Center.


