How I Photograph Birds
When people ask me if I take pictures of birds, I say, “Yes, I do – if there aren’t any animals around…!”
I’m only joking (mostly!), but it’s true that there are a lot of ‘birders’ out there, and getting good shots of birds – particularly birds in flight (BIF) – is not that easy.
So where should you begin?
Location

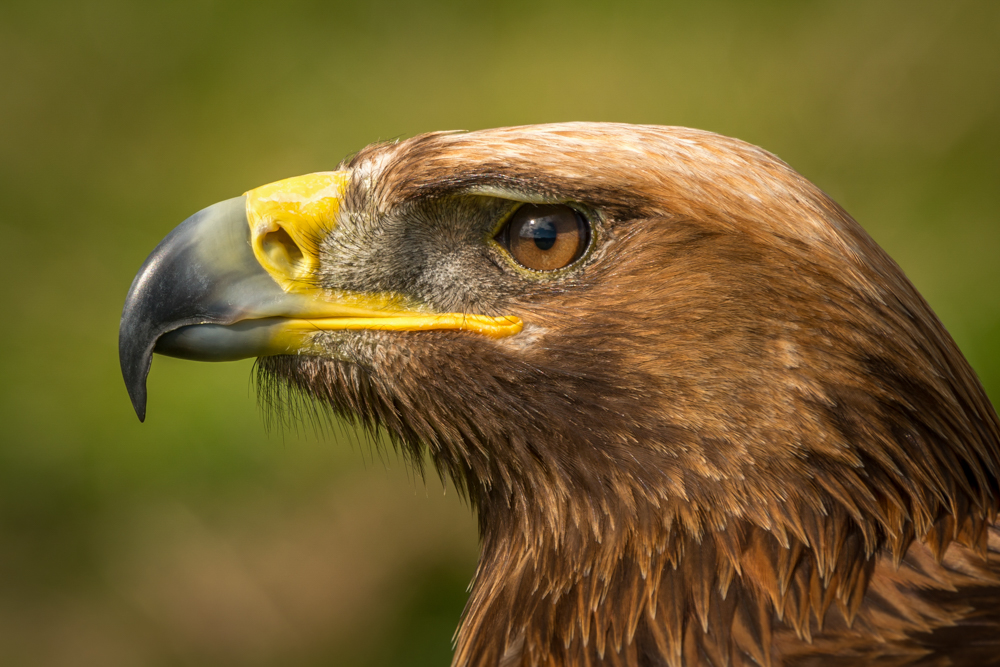
Well, the first thing to do is to go to the right place. I could spend hours and hours on my balcony with my camera in my hand, and I’d never see a golden eagle or a lilac-breasted roller. Sadly, the most colorful, beautiful, and powerful birds tend to live at least a long-haul flight away from London, so it does cost money to get there.
I’ve been lucky enough to go on over 250 game drives in Africa, and that’s the kind of place where you can see a different species of bird every day. When I spent four months working as a Resident Photographer in Tanzania and Kenya in 2019, I spotted 60 different species of animals, but 208 species of birds! A lot of them were admittedly ‘Little Brown Jobs’ (or LBJs) that were there and then gone again so quickly that the guides wouldn’t even bother trying to work out what they were. However, I’ll never forget all the colorful rollers and wonderful birds of prey.

Everybody’s different, so I’m sure you have your own favorite places to go around the world, but it’s worth doing a bit of research online to see which countries offer the best and most numerous species and at what time of year. In Africa, you tend to see a lot of the migratory birds in the ‘shoulder season’ in March or April, but you’ll have to go in September or October if you want to see the Carmine bee-eaters nesting in South Luangwa. Here are a few other ideas for you:
- Manu National Park, Peru
- The Caroni Swamp, Trinidad
- Kruger National Park, South Africa
- Cape May, New Jersey, USA
- Everglades National Park, Florida, USA
- Grand Isle, Louisiana, USA
- Pichincha Province, Ecuador
- Mount Desert Island, Maine, USA
- Varirata National Park, Papua New Guinea
- Point Reyes National Seashore, California, USA
- Bosque del Apache National Wildlife Refuge, New Mexico, USA
- Rift Valley, Kenya
Equipment

If you’re a keen birder and/or photographer, then you’ll probably have a DSLR and one or two long lenses, but it’s worth thinking about exactly what you need just in case you need to borrow, rent or buy something. You don’t want to miss a rare Stresemann’s bristlefront or Bahama nuthatch because you only had a 200mm lens with you!
Cameras
Photography can easily turn into a money pit, and it’s very easy these days to spend upwards of £4,000 on the latest all-singing, all-dancing Nikon or Canon DSLR, but what do you really need?
Some professional bird photographers use crop frame cameras using Nikon’s DX-format or Canon’s APS-C in order to cut down on weight. If you have a crop factor of 1.3, for instance, that effectively makes a 100mm lens into a 130mm lens – or a 400mm lens into a 520mm one. However, that benefit comes at the cost of a smaller sensor, and I always want as many pixels as I can, so I’d still recommend a full-frame DSLR. Personally, I have a Nikon D810 and a D850. Mirrorless systems are also possible, but I want to see the world through an optical viewfinder in real-time, not watch a movie of what was happening a fraction of a second ago!
Most DSLRs (and mirrorless cameras) offer the same basic functions, and these are the ones you’ll probably need the most for bird photography:
- A large sensor
Size isn’t everything, of course, but having a large (35mm) sensor with at least 20 megapixels is pretty much essential. The larger the sensor, the better your low light performance and the less noise you’ll have in the image. The more pixels you have, the more detailed the image can be, and the more you can crop in on your subject. My D810 has 36.3MP, and my D850 has 45.7MP. ‘Nuff said. - A high frame rate
This allows you to take several bites at the cherry. Even if you’re only taking a portrait, it’s always worth taking a burst rather than just single shots. Birds behave erratically, so you need to make sure they don’t close their eyes or turn their heads at the crucial moment. That goes double for action shots. The higher your frame rate, the higher your chances of getting great shots – particularly when you’re using a slow shutter speed or when you’re taking pictures of a bird taking off from a branch.
I’m a Nikon man, but the frame rates on my cameras are dreadful! My old D800 could only manage 4fps, my D810 5fps, and even my D850 only 7fps unless I use my MB-D18 battery pack, which boosts it to 9fps. By comparison, the Canon EOS-1D X Mark II can give you 14fps with full autofocus. Sigh… - Back button focus
Having to press the shutter in order to activate your camera’s autofocus is not very convenient if you want to photograph a bird in flight or even just a Bird on a Stick (BoS). With back button focus, keeping your thumb pressed on the AF/AE lock button allows you to keep the autofocus active even while you’re shooting a burst of frames, and if you just press it once and let go, that will lock the exposure and focus so that you can reframe your shot. That’s particularly useful if the eye of the bird is outside the central focus point area as there’s no other way to focus on it. - Continuous autofocus (Nikon’s AF-C mode or Canon’s AI Servo)
There are lots of very complex autofocus systems out there now, some of which can even automatically track the eye of an animal in motion, but the very least you need is some sort of continuous autofocus. Bird photography would be a lot less interesting if you could never capture a bird in flight, and for that, you need your camera to update its focus constantly. There are many different options, but the one I prefer on my Nikon D850 is AF-C 3D, which, as you might imagine, allows a bird to be tracked in three dimensions while it’s in flight. - Exposure compensation button
Birds tend to spend a lot of time in the sky, so there’s a real danger of underexposure. One way in which you can stop that from happening is to use a stop or two of positive exposure compensation. There are other ways, too, but it’s always nice to know your camera can offer that as an option. - Auto ISO
My default wildlife shooting mode is Manual with Auto ISO. Unless I’m taking a slow pan shot in bright light, when I have to set the ISO manually to get the extended value of 31 on my D850, I use Auto ISO so that I can focus on the aperture and shutter speed. Those are the settings that really matter, so I just don’t have to worry about the ISO most of the time.
Lenses
If you’ve gone the full-frame DSLR route, then you’ll need a minimum of a 400mm lens to give you the chance of great bird shots. Birds are often small and far away, so the range of your lens is crucial. That focal length is a bit of a watershed in terms of weight and price: anything over 400mm is likely to be very heavy and very expensive!
Personally, my two favorite wildlife lenses are my Nikon 80-400mm f/4.5-5.6G VR and my Nikon AF-S 800mm f/5.6 E FL ED VR, which has a dedicated 1.25 teleconverter that increases the effective focal length to 1000mm. I put the 80-400mm on my D810 and the 800mm on my D850, and I’m good to go. The shorter lens gives me the flexibility to zoom in and out to get the best composition if the bird is large and/or nearby while the ‘big dog’ lets me make sure I fill the frame even if the bird is the length of a cricket pitch away.
The only downside to having these two lenses is the cost: I had to shell out over £1,000 for the 80-400mm, but the 800mm was over £15,000…! Price is obviously an issue here, and there aren’t many photographers who can easily afford such expensive lenses, but it’s easy enough to rent a long lens for a short trip, and that’s what I did for a number of years before buying my own. If you’re a Canon user, you might consider the Canon EF 200-400mm f/4L IS USM L Series with a built-in 1.4x Extender. That’s around £10,000 to buy new, but only £7,000 used, and you could rent one for a week from Lenses For Hire for £417.
Settings

You’ll need to use two completely different sets of settings for bird photography, depending on whether you’re taking portraits or birds in flight.
Portraits
I generally photograph birds wide open (f/5.6) at 1/1000 of a second with Auto ISO, but circumstances differ. The obvious difference between small birds and large is that the smaller ones tend to move more quickly – whether they’re flying through the air or just perching on a branch. That means you need to think carefully about your shutter speed if you’re shooting in low light. Can you afford to reduce the shutter speed, or would it be better to shoot at a higher ISO?
The other issue is exposure compensation. If the bird is backlit and you have to dial in a stop or two of positive exposure compensation, then that has to come from somewhere. A shot at ISO 1600 might be acceptably free of noise, but what about at 3200 or 6400? The general rule is that a noisy shot is always better than a blurred one, but you have to draw the line somewhere…
Fortunately, a solution has presented itself in the form of Topaz DeNoise AI and Sharpen AI. These software programs cover both bases. DeNoise AI allows you to ‘recover’ images shot at very high ISOs while Sharpen AI allows you to sharpen the image even if it suffers from motion blur. My recommendation, therefore, is that you err on the side of caution when it comes to your shutter speed. If you have time, then by all means start with a high shutter speed and gradually work your way down, taking plenty of shots in each burst so that you give yourself the best possible chance of a ‘keeper’. However, birds do have a habit of taking off at the most inconvenient times, so you may not get the chance to experiment! If that’s the case, try running your shots through DeNoise AI and/or Sharpen AI. That might just do the trick.
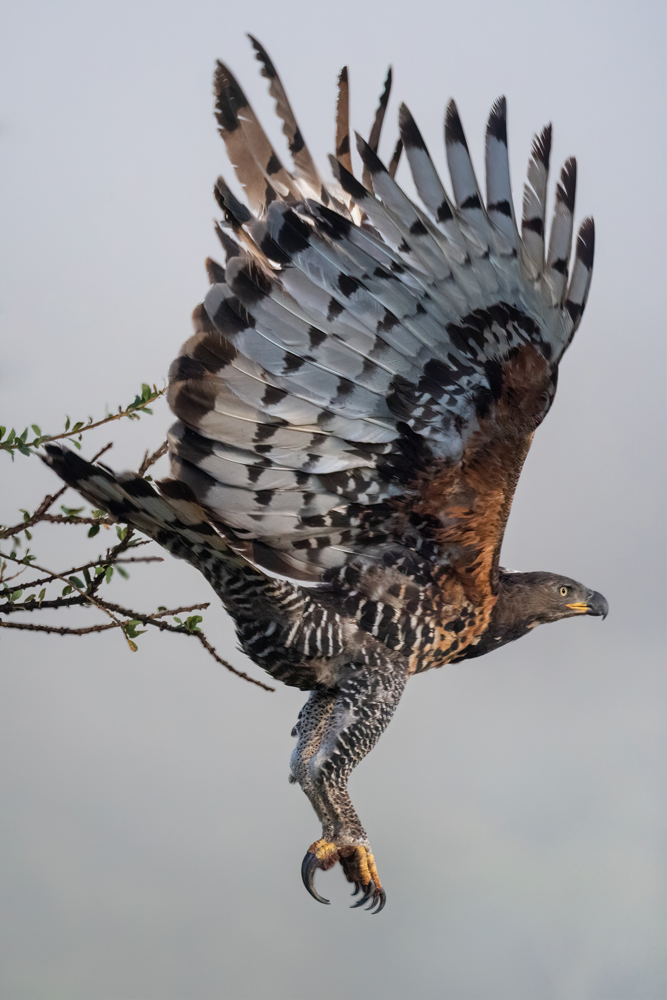
Birds In Flight

Taking pictures of a bird on the wing is a whole different kettle of fish, so to speak. Not only do you have to worry about the motion of the bird, which generally makes your autofocus system struggle a bit, but you’ll often have to cope with bright backlighting.
For a ‘standard’ shot of a bird in flight (rather than a slow pan), here’s what my settings would be:
- Shutter speed: 1/1000-1/4000 of a second, depending on the size of the bird
- Aperture: wide open (which happens to be f/5.6 with both my lenses)
- ISO: Auto
- Back button focus
- Vibration Reduction (Nikon) or Image Stabilisation (Canon) turned on.
I know some people suggest turning it off on the basis that your shutter speed will be high, so you don’t ‘need’ it, and it might even slow down focus acquisition, but I like the bird to stay in the same place in the frame rather than shaking about all over the place! - Set the focus limiter on your lens (to speed up autofocus)
- AF-C 3D continuous autofocus (for a large bird) or Group-Area AF (for smaller birds as it’s harder to keep a single focus point on the eye)
- One or two stops of exposure compensation, depending on the light conditions
However, this is not the only possible approach. Some photographers like to ‘simplify’ things by using shutter priority, some like to use the shutter release to focus and some like to pre-focus on a mid-tone object at a similar distance to the bird (to stop the autofocus from ‘hunting’) and then lock the ISO manually to avoid having to use exposure compensation. All I can suggest is that you experiment and take plenty of shots using different methods. Practice makes perfect.
For a slow pan shot, I’d probably set the ISO to 31 manually (as the Auto ISO setting only goes down to 64 with my Nikon cameras) and switch to shutter priority mode, leaving all the other settings the same.
A slow pan involves ‘panning’ round with the bird in order to track its motion. It’s called a ‘slow’ pan because you have to use a slow shutter speed in order to blur the bird’s wings and the background (while keeping the head sharp). It’s simply a way of making bird-in-flight shots more dramatic and dynamic. If you simply use a high shutter speed to freeze the action, then it’s hard to tell how fast your subject is going. Imagine taking a shot of a Formula 1 car going around Silverstone at 200mph. If you took that at 1/1000 or 1/2000 of a second, it would look like it was parked on the side of the track, wouldn’t it? However, if you used a tripod and shot it at 1/100 of a second, say, the driver’s helmet and the chassis would still be sharp, but the wheels and the background would be blurred. Imagine the colorful stripes of the advertising hoardings in the background. Anyway, the point is that a slow pan can very effectively turn a good shot into a great one. Try it sometime…
Technique
ISO 450, 400mm, f/8, 1/500
There are a couple of constants that apply whatever shot you’re trying to get.
- Find a place where there are plenty of birds flying around.
It sounds obvious, I know, but still…! - Go out around sunrise or sunset.
That’s when you’ll find the best light, and that’s always the most important variable in photography, which is simply ‘painting with light’.
Portraits
ISO 125, 400mm, f/8, 1/640
You’re probably going to be using a long lens for bird photography, so one of the most important things to remember is what I’d call ‘camera technique’. It’s very easy to end up with a slight camera shake when you have to hold a big lens steady, and that’s magnified by the long focal length, so it’s important to make sure that it’s well supported and that you gently press the shutter release. Imagine you’re a sniper: take a deep breath, let it out halfway, and gently squeeze the trigger…
I go to Africa for most of my photographic trips, and that means I’m usually in a jeep, resting my camera on a beanbag either on the window sill or the edge of the roof. Beanbags are very good at keeping a heavy camera and lens stable, so you should make sure you use one if you can. (You can always buy one yourself and fill it with beans or something when you get to your destination.)
ISO 64, 800mm, f/5.6, 1/500
The other thing to bear in mind is etiquette. I’m not talking about holding the door open for anyone here. What I mean is that birds can be very skittish, so moving very slowly and keeping the noise down is crucial. I’ve missed goodness knows how many shots because some idiot has spoken too loudly or dropped a lens cap and frightened off the bird.
Birds in flight

This is where it gets tricky. There are various general rules, but it all depends on your particular circumstances:
- Try to start out upwind of the bird.
Birds tend to take off and land into the wind, so that gives you the best chance of photographing the head rather than the tail feathers. - Try to keep the sun directly behind you to minimize shadows on the bird.
- Choose what type of shot you’re going to take and make sure all your settings are correct
- If your lens has a collar, make sure it’s twisted up above the lens so that it doesn’t get in the way.
- Pre-focus on an object a similar distance away to where you think the bird will be.
- If you’re panning with the bird (either with a slow or fast shutter speed), there are a few things to remember:
- Keep your elbows in.
- If you’re using a bean bag, support the lens hood with it and hold the camera with both hands (like the tail gunner in a Lancaster bomber!).
- Press the camera firmly against your forehead.
- Move around with your big muscles (your legs and torso) rather than with your arms and neck in order to keep the movement as smooth as possible.
- Practice beforehand to make sure you have enough room (if you’re in a jeep) and to get a feel for it.
- Follow the bird for a second or two before taking any shots to get used to its speed of movement.
- Take a burst as the bird flies past.
- Stop taking shots as soon as the bird starts to fly away from you, but keep panning smoothly across for a moment or two.
- If you lose focus, let go of the back button and try again.
- Rinse and repeat.
In other words, check your shots on the back of the camera, make any adjustments you think you need to make and have another go.

ISO 125, 800mm, f/5.6, 1/2000
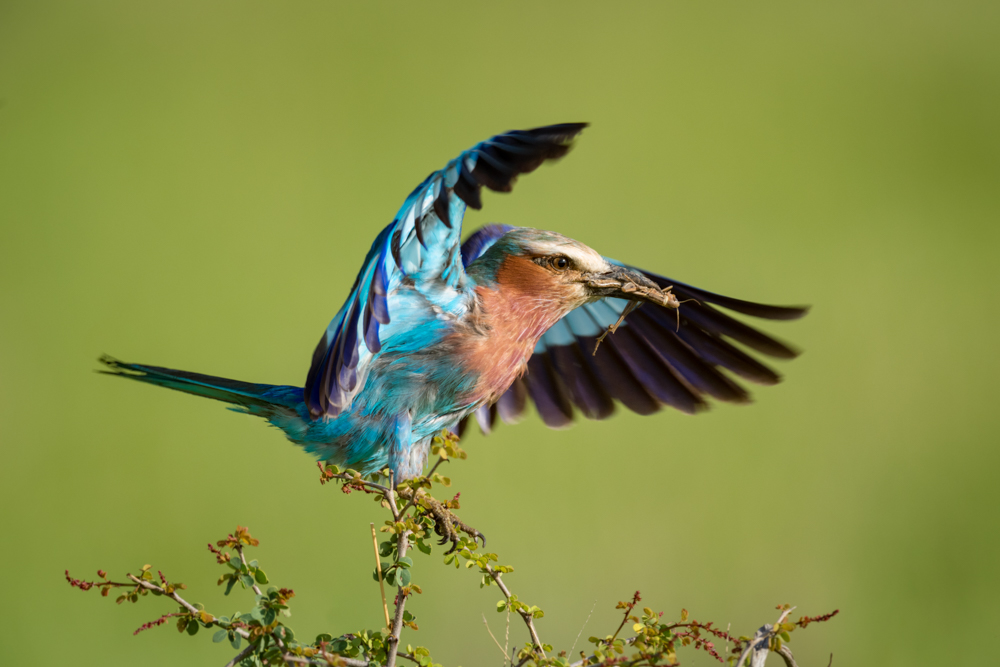
One way of getting good shots of birds in flight is to find a bird that’s perched on a branch and simply wait for it to fly away. I’ve done this plenty of times with lilac-breasted rollers in Africa. They have a habit of perching on dead trees by the side of the road, so it’s quite easy to pull over about 20 yards away – which is about the ‘minimum safe distance’ for those birds – and set up shop.
I make sure I’m in a comfortable, rock-steady position with the bird facing me, and I dial in these basic settings:
- Shutter speed: 1/2000 of a second
- Aperture: f/16
- ISO: Auto
The point here is to catch the bird just taking off from its perch when its wings are likely to be raised. This works particularly well for rollers as they have such beautifully iridescent turquoise and blue coloring. However, they take flight very suddenly and unpredictably, so having good reactions and a high frame rate help enormously! It’s impossible to try and track them with your camera. All you can do is lean on the shutter release as soon as the bird takes off and hope you catch it with its wings in the perfect position.

ISO 200, 135mm, f/5, 1/640
Occasionally, birds don’t take off when you want them to. Very frustrating. If that’s the case, then I leave it to you and your conscience to decide what methods you use to ‘encourage’ it to do so…!
Post-processing

I use Lightroom to edit all my images. There’s not much to say that’s specific to shots of birds, but I’m a great fan of technology, so I’m happy to use whatever software ‘fixes’ I can in order to get the perfect image. I know some people are ‘purists’ and refuse to clone anything out of a wildlife image, and it’s true that some competitions simply don’t allow you to do that. However, my goal is to produce the very best shots I can, so I don’t care what methods that might involve. I obviously won’t break the rules if I’m entering a competition, but everything else is fair game.
Most of my best shots have had a huge helping hand from Lightroom (as you can see from some of these examples), and I’ve recently started using Topaz DeNoise AI and Sharpen AI. I’ve been very impressed with both products, and they help solve two problems that are common with wildlife shots in general and bird shots in particular:
- High noise levels in low light conditions
- Motion blur or lack of sharpness caused by camera shake or a moving subject
They’re not cheap to buy, unfortunately, but I’m an affiliate for Topaz Labs these days, and you can get 15% off if you click here and quote discount code nickdale15.
DeNoise AI is the best software on the market for reducing noise in your images. Lightroom does all right with color noise, but it’s far inferior when it comes to luminance noise.
Sharpen AI is also the best sharpening software on the market because it does exactly what it says on the tin! If you try to ‘sharpen’ an image in Lightroom, all it does is play around with the contrast. That’s not real sharpening. Sharpen AI, on the other hand, actually reduces blur in the image with three different options:
- Motion blur (for camera shake or moving subjects)
- Out of focus (when the camera has focused just before or just behind the subject)
- Too soft (when the image is not sharp enough for any other reason)

ISO 100, 500mm, f/8, 1/500
If you choose the four-pane comparison view, you can see the original image and compare each style of sharpening. You can then pick the best one and play around with the settings. The auto option is the place to start, but feel free to tweak the Remove Blur and Suppress Noise sliders to try and get the perfect result. It’s always a trade-off between sharpening and noise reduction, so you’ll just have to take a view on what balance works best.
Topaz has recently updated the software so it’s much quicker to render the previews and save the final image.
It’s always important to get as much as possible right in camera, but let’s not forget what the wonders of technology can do for us!
Good luck…!
Nick Dale
April 2020
https://www.nickdalephotography.com
London, England
I wanted to be a photographer when I was 15, but my mother said I could always take it up later as a hobby – so that was that for 30 years! I ended up reading English at Oxford and working as a strategy consultant for a few years before retiring at the age of 29. I then traveled around the world for seven years, doing four ski seasons and working on an internet start-up in San Francisco before finally returning to London in 2005. At that point, consulting work felt too stressful, so I decided to go 'quality of life. I'm now a private tutor and an internationally award-winning wildlife photographer.