An Essential Manual For The Travel Photographer – Part 2
Continued from Part 1
Photographing People – The Approach
Photographs of people are an essential part of a travel portfolio or a travel album, but many photographers can feel a little awkward about photographing other people.
It’s not uncommon even for seasoned photographers to be a little nervous when approaching a subject, but generally, the worst thing that can happen is that your prospective subject says ‘No’.
Candid or Posed?
Photojournalists pride themselves on capturing unposed photographs and candid moments. They consider their images to be found, not created.
There’s nothing to stop a travel photographer from working in the same way. If you choose to photograph people from a safe distance or shoot photographs from the hip, there’s probably nothing stopping you from doing so. (Obviously you don’t want to do this in airports or military areas – we’re talking generally here.)
However, candid photography can be very hit and miss, and it can take a lot of time to get really good photos. Many travelers don’t have this amount of time and so better photographs are often produced by engaging with your subject.
Ask yourself this question: are your travel photographs about capturing real moments and reporting as a journalist; or are you a storyteller who is happy to interact with the subjects and show portraits to the people back home?
Both approaches are valid, but being a storyteller is probably a little easier and it opens up many more opportunities.
Gaining Trust
Language can be a barrier, but it can also be an advantage.
There are so many tourists and so many cameras in the world today that most people are not fearful of being photographed. If you smile, point to your camera and say ‘please’, chances are you will get a positive response. If you do, just take two or three quick frames, say thank you and let your subject move on.
Of course, some subjects will invite you to sit down and have a chat or offer you tea. These opportunities can be a gold mine for photographs as your subject will not only allow you to take more photos of him or her, but may introduce you to other people as well.
Some photographers find letting the subjects come to them is a better approach. If you can spend an hour or so in a market or cafe, sit down and have a cup of tea or coffee and make yourself available for conversation.
Don’t hide your camera, rather ask to take photos of people even though they might not be your perfect subjects. By spending time in an area, people will see that you’re not dangerous and may eventually warm to you.
There’s no single way to take photographs of people, but the most successful photographers tend to be quiet and modest when they are in the field
Photographing People – Is Payment Okay?

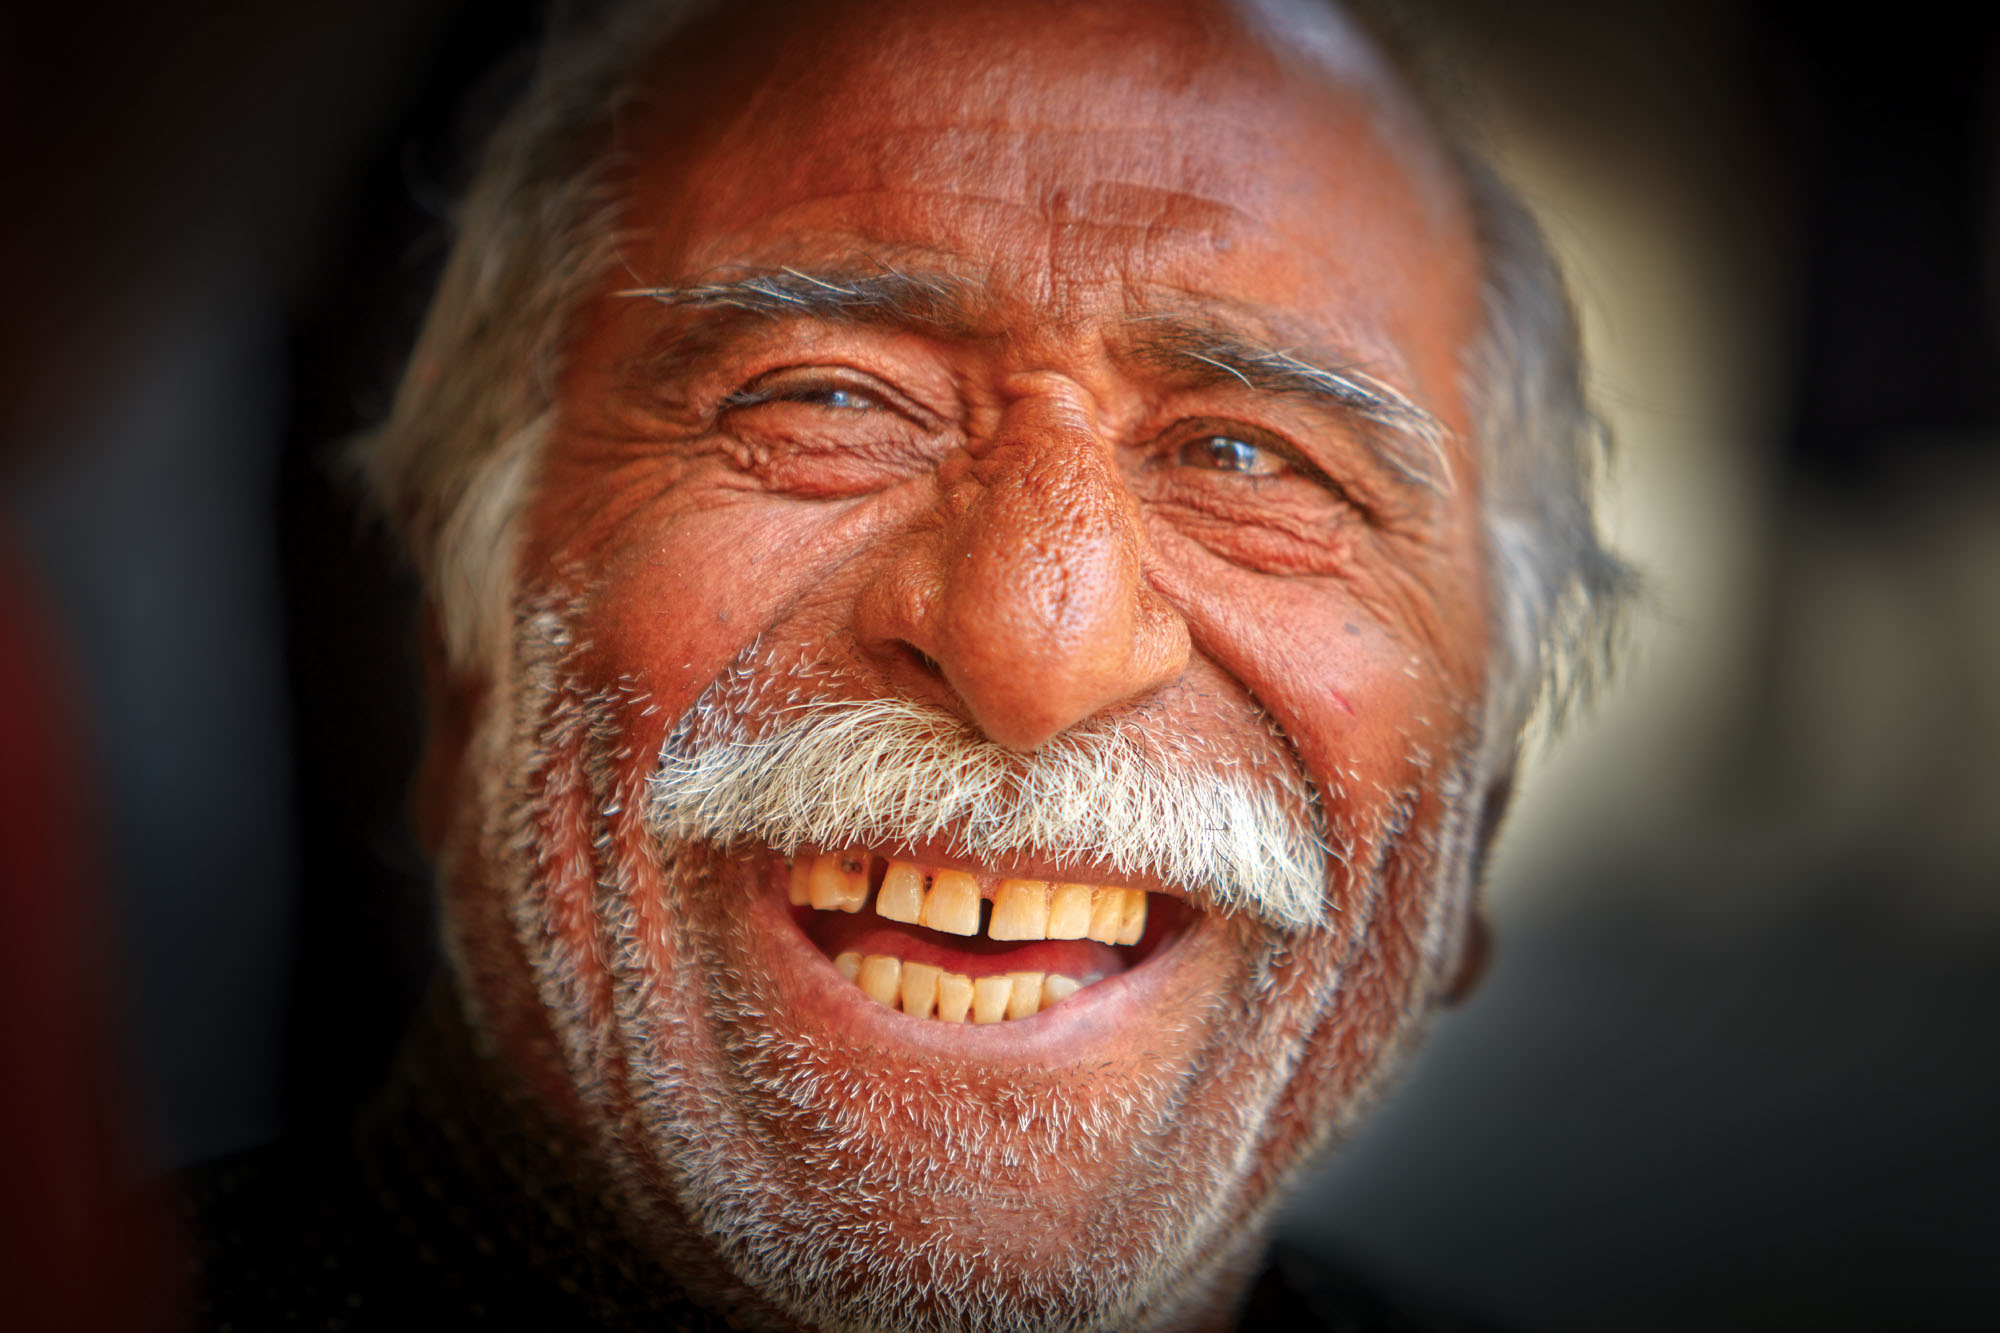
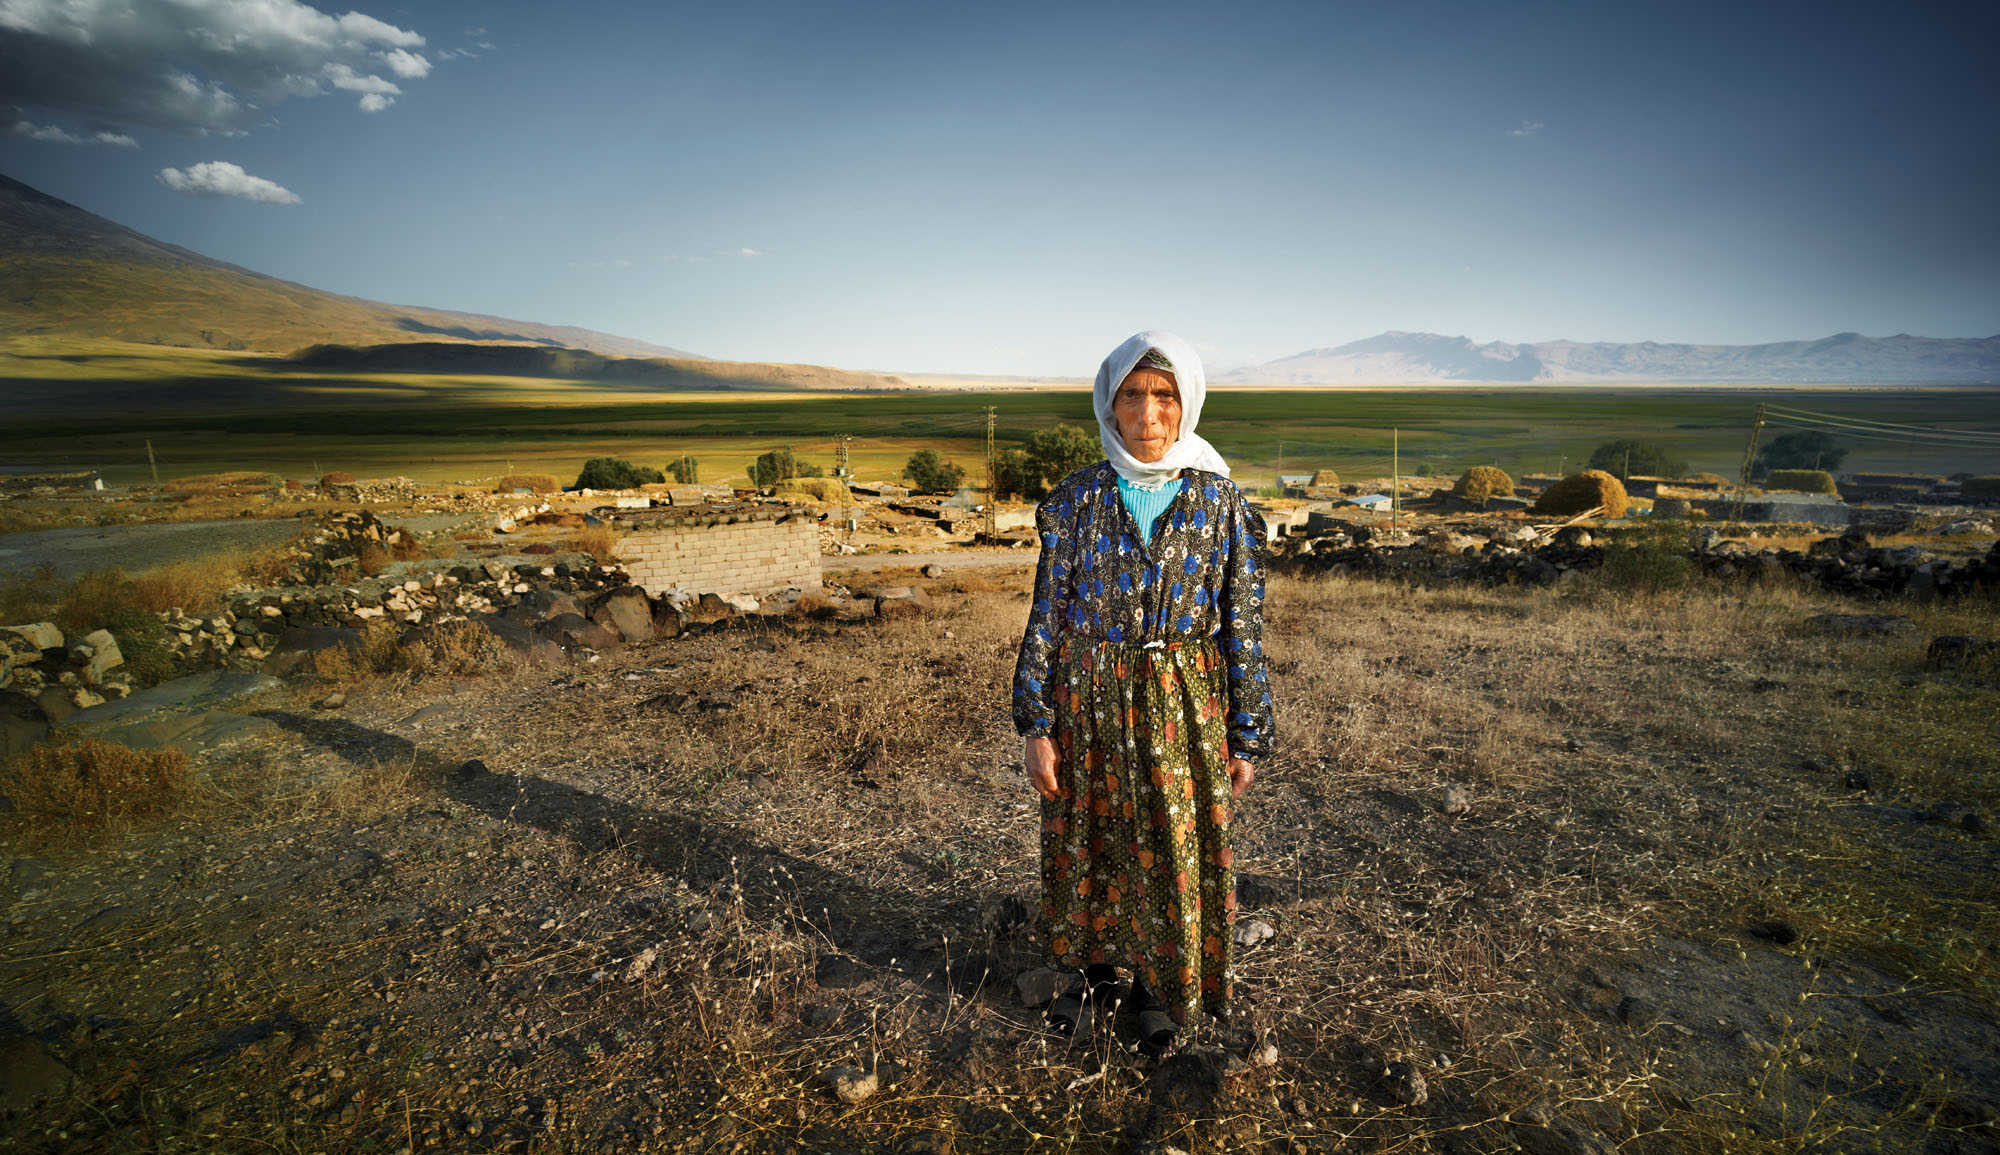
I paid this woman to take her portrait. Should I have? Or have I broken an unwritten law of street and travel photography?
I don’t want to dip into the murky distinctions that separate photojournalism and documentary photography from the rest of the world. Documentary used to embrace many aspects of photography, but today the term has been hijacked by purists who believe that a documentary photograph must be found, not created.
When I photographed this woman from the other side of the courtyard before she was aware of me, that was a documentary photograph. However, once I had asked permission, and even worse, paid her, the image was no longer a documentary capture. It became something else – a travel photograph, perhaps.
National Geographic and Australian Geographic magazines have no trouble publishing photographs like this. The images are genuine in that the person is real and not an actor. In fact, the interaction between the subject and the photographer is often applauded because images like this don’t always just happen without that interaction.
For travel photographers, asking someone to pose is not a problem. Hopefully, we’re capturing something of the destination as reflected in the subject’s face, clothing, and disposition. But should we pay them? Does the act of commerce change the resulting image?
Bhutan is different from India is different to Peru is different from the USA. In America, I often find that if I open my mouth, then my Australian accent breaks the ice and I can usually take a portrait. In Bhutan, the locals know that tourism is good for their economy (and their happiness), so, generally speaking, I didn’t pay anyone to take their portrait, but I did promise to send a few prints when I returned home.
I wanted to photograph the lady praying. I saw her holding her hands up to her face, but every time I went to take a photograph, she’d change her pose and ask for money. I didn’t quite understand at first, so I made donations to the temple, which she saw me do, but no, she was quite adamant. Although we didn’t speak each other’s language, I was made aware that if I wanted to photograph her, I needed to compensate her financially.
And once I did, she was very helpful.
Why didn’t I just pay her upfront? Because up until this point, no one had wanted payment before. It didn’t seem to be a part of the Bhutanese culture and after spending a couple of weeks there, I can confidently say it isn’t a part of the culture and this is the only person I paid.
However, I don’t have any philosophical problems in paying someone to pose for me. It seems like a fair exchange. Of course, if they ask for a lot of money, I may decide the photograph isn’t worth it, but a small fee of a few dollars is most acceptable.
What about young kids? Well, the problem there is if you pay one, soon you have a whole schoolyard in front of you wanting some of the same. That’s only natural, so I find I am less likely to pay children than adults.
Hmmm. First I pay people for photographs, then I don’t pay children. Is that exploitation? Am I going from bad to worse?
What Camera Gear?
What’s in your camera bag will depend on where you are travelling, what you are photographing and how you want to use the photos when you get home.
However, probably the best way to ruin a holiday or photography trip is to have a really heavy camera bag on your back or over your shoulder. Nothing kills enjoyment more quickly!
A good suggestion is to choose a camera bag that is a little smaller than normal and limit yourself to what you can fit in it. If it feels even slightly heavy when you try it on for a couple of minutes at home, imagine how heavy it will feel at the end of eight hours walking around the sights?
If you really must take more equipment, and assuming you’re living out of a hotel, apartment, bus, or car, you can pack a second camera bag inside your main luggage (being mindful of excess luggage charges at the airport).
The first rule of travel photography is to travel comfortably.
One way to reduce weight it to choose your equipment carefully. There are some very small and compact DSLR cameras that are ideal for travelers, or you might choose one of the new CSC cameras that have most of the features of a DSLR except they use an electronic viewfinder instead of an optical one.
You can also save a lot of weight by choosing your lenses carefully. Your tripod and computer (if you take them) definitely add to the weight penalty, so once again, careful choices can save you literally kilograms in unwanted weight.
Essential Equipment
It seems that everyone in the world travels and takes photos. How do you ensure that your travel photos are a little bit better than all the rest?
Most people use a compact digital camera or their mobile phone. At best, these cameras have a ‘standard’ zoom range, say 35mm to 100mm. This is a useful range for general photography, but it’s not particularly exciting.
A much more useful range for travel photography is 28mm to 300mm (or 18-200mm for an APS-C size DSLR). The 28mm is great for wide landscapes and tight interiors, while the 300mm can isolate details and capture people from a distance. There are some excellent compact digital cameras with this zoom range and they aren’t a bad solution for the travel photographer who wants to travel lightly.
However, given you’re reading this magazine, chances are you have a DSLR or CSC camera and enjoy the extra versatility it offers.
You should still take a mid-range zoom lens as it will cover much of your photography needs, but consider as wide a zoom range as possible.
In addition to this essential mid-range zoom lens, take an ultra-wide-angle lens and maybe a super-telephoto.
While ultra wide-angles can be small and light enough not to be noticed, super telephotos are large and heavy, so a better option might be a teleconverter if it will work with your zoom lens.
However you decide to configure your lens selection, the trick is to have the right lenses to create different looks for what can be very popular and much photographed subjects.
With this in mind, another useful lens is a macro lens. It lets you photograph insects and flowers, but also small details in buildings or table settings in restaurants, plus it doubles as a useful portraiture lens as well.
An ideal range of focal lengths would be from 17mm to 400mm including a 100mm macro lens (or 12mm to 300mm for APS-C size DSLR cameras).
More enthusiastic photographers will throw in a lightweight tripod (because it’s fun to shoot at night) and a small laptop computer (so you can see your work as the trip progresses and transfer your files to backup drives).
However, there will be some locations where there’s not much point in taking a laptop if there’s no power – chances are you’ll need the space for food and sleeping gear instead!
Two Camera Bags
Assuming you will have a base from which you can work (a hotel room, a car, etc), it’s possible to take two bags with you, the second bag residing inside your main luggage. This means there’s less room for clothes and souvenirs you pick up along the way, but it means you can take a couple of extra lenses.
This approach can be quite sensible. You pack the essential equipment into the bag you take with you on the plane and put less essential equipment with your unaccompanied baggage.
This way, if your luggage doesn’t arrive when you do, at least you have a working camera outfit. It’s a lot easier to buy new clothes than a new camera.
Of course, you still have too much gear to fit into one bag, so each day you’ll need to work out what you can fit into your main bag. It might be that the computer and charger come out, making way for an extra lens. Or you might take the large telephoto lens and leave the macro lens behind.
The two-bag approach gives the serious travel photographer a few more options; the sensible travel photographer would say leave some of the gear at home.
Two Cameras, Two Cards
Two final suggestions. Take a second camera body or a compact digital camera with you as well as your main DSLR. The second camera body can be an older or cheaper model, or the compact camera can act as a back-up should your DSLR break or be stolen.
Second, keep a spare memory card and battery in your pocket. There can be times when you’ll run out of storage space and need to replace the card quickly.
If the card is in an easily accessible trouser or shirt pocket, it makes the changeover that much quicker and, hopefully, you won’t miss any great opportunities.
Computers For Travel

There’s no reason a photographer should ever lose a photo because it is so easy to make multiple copies.
Professional travel photographers capture images on a card, then as soon as practicable, make a copy to a backup drive. That backup might be on a laptop computer or an external hard drive – what the backup is recorded on isn’t as important as having the backup!
Many travel photographers consider multiple copies essential, holding two copies of their files at all times.
How do you do it?
These days, the solution is to travel with a small, lightweight laptop computer, a card reader if necessary, and a number of small external hard drives.
These hard drives can weigh as little as 100 grams each, are not much bigger than a pack of cards and can hold up to 2 TB (and counting). Best of all, you can buy these drives at a modest cost.
If there’s a choice, opt for the hard drives with a longer guarantee (such as five years) and a more robust casing ( like the LaCie Rugged range). There’s not much point in buying a drive to act as a valuable backup device if the device itself isn’t up to the task!
With two of these drives, you can probably keep your entire trip duplicated. One drive can spend its life in the bottom of your camera bag, underneath a lens for instance. The second drive can live in your pocket or handbag, so you need never be separated from one of these drives, meaning if your gear were to be stolen, you’d still have your valuable images with you.
Some drives have lots of moving parts, which means a knock or a drop can render the drive inoperable. Take care of these drives at all times (and even take care of the LaCie Rugged drives because although they are rated for a drop of one to two meters, why risk it)?
Solid-state drives are becoming popular and, although they shouldn’t be thrown around the room either, they are claimed to be a lot more stable.
Laptop computers also come in many configurations and sizes. For very basic travel photography, the most important aspect is weight. You don’t need an all-singing laptop with a huge screen while you are traveling if it weighs three or four kilograms (some weigh much, much more). All you need is a basic unit that can transfer files from your card reader to your external hard drives. If it can open your files in Lightroom or Bridge, so much the better.
However, one of the great enjoyments of travel photography is sitting in your hotel room or restaurant at night and reviewing your work. If you can do a little post-production as well in Photoshop, Lightroom or Capture One, so much the better! And it is possible to buy a powerful, lightweight laptop.
In a perfect world, your laptop should be reasonably fast, have at least 8 GB RAM (16 GB is better), and operate USB 3.0 or faster (USB-C and TB3 are becoming the standards these days). And it shouldn’t weigh more than 1.5 kilograms.
Often the hard drive on a small laptop won’t be able to hold all the photos from a travel shoot as their capacity is generally limited, so you should plan on taking some external hard drives as well.
Travel Photography – File Management and Workflow
On the assumption you have a number of storage cards, a laptop computer, and two backup drives, here’s a suggested workflow.
Begin the shoot on the assumption you won’t delete any files from your storage cards. You might like to label each card so you know which is which and start with Card A, then B, then C, and so on.
At the end of each day, transfer your files from the card to both the external hard drives (or to your computer’s hard drive and one external drive). You now have three copies of all your files.
If you have to leave your equipment or luggage, you can always put the storage cards or the external drive in a pocket or handbag and take it with you. At least if your luggage were to be stolen, your photos would remain safe with you.
If you don’t have sufficient storage cards for the whole shoot, recycle the cards in order. However, the files on the laptop or external drives are your only complete copy and so care should be taken.
Rotating Memory Cards
The best workflow is to copy your memory cards onto your laptop computer and two backup storage devices at the end of every day, but this isn’t always possible.
To maximize your chances of having backup images if you’re not able to backup every day, and you don’t have enough cards to cover your requirements, try this approach: Label your cards A, B, C, etc. Start with Card A, then B and so on. When you download Card A to your computer, don’t use it again until you have come to the end of your cards. Keep shooting to card E or Z, and only when all cards are full go back to Card A. This way the cards become a backup for your computer or storage device, for as long as possible.
Download Methodically
There’s nothing worse than arriving home and realizing you haven’t saved some of your best shots. Unfortunately, it can happen if you’re not methodical about the way you transfer your photographs from your memory cards to your computer or storage device.
One suggestion is to label each card (A, B, C, D, etc) and shoot each in order. However, don’t clear off the cards until you have checked all files are backed up to your laptop and possibly both of your backup drives.
If you are shooting for two or more days without being able to download your files, you need more cards and so having them labeled is one way to ensure you don’t over-write the wrong one.
Take-Two Backup Drives
The latest backup drives cost only a few hundred dollars each, weigh a tad over 100 grams, yet store up to 2 TB (possibly more by the time you read this!). Storage today is so cheap compared to the cost of travel that you’re mad not to take at least two storage devices.
Why two storage devices? If you have to leave your equipment in a hotel room or a bus, one of these drives will easily slip into a pocket or handbag. As the trip progresses, the drive will hold more and more of your precious images. Stolen or lost camera equipment can be replaced, but not the images you have already taken. Protect them with a second drive and feel safe all the time!
Before You Go
In all the excitement of traveling, there’s nothing worse than running out of battery power. Make sure you start a trip with a fully charged battery and always have a spare, fully charged battery as well. Most cameras only take a specific battery size and where you’re visiting might not have a camera shop that stocks one, or the shop might not be open when you need it.
And don’t forget your battery charger so each night you can top up your batteries. Different cameras have different power requirements, so you might not need to charge your batteries every day, but you should always have the spare battery fully charged for when you walk out of the hotel (or leave your tent) in the morning.
Take Plenty of Cards
The cost of memory cards means that it’s possible to take sufficient cards for the entire trip. You can buy 64 GB Sandisk cards for around $50 each, so for $400 you could have 500 GB of storage which should last you quite some time!
Of course, you can buy even cheaper memory cards, but the cheapest isn’t always best. Do you want to risk your images to a no-name card? Maybe you’re better off with a brand you can trust? The number of memory cards you need depends on the size of the raw files produced by your sensor, how long you will be traveling, and how many photos you think you will take.
Clean Your Sensor
Assuming you’re confident about cleaning your own sensor, take a purpose-designed sensor cleaning brush or kit. A brush will remove most of the larger, problematic spots, while a proper clean with fluid and a swab might be needed if you’re working in difficult conditions. It’s a good idea to ensure your sensor has been properly cleaned before you leave on a trip. Either that or be prepared to spend a lot of time in post-production spotting your work!
Full Kit for Hand Luggage
If you’re traveling by air or train and you are separated from your luggage at any time, you need to ensure your essential camera equipment remains with you. Most photographers take their gear in a single case or backpack and, assuming it meets airline restrictions, there should be no reason you are ever parted from your gear.
However, if you have to pack some equipment separately, try to ensure it is extra equipment you can get by without. In the unfortunate event, your luggage goes missing, you don’t want to arrive at your destination without a camera. Essential equipment includes not just the camera and a lens, but memory cards, batteries, battery chargers, laptop computers, and backup devices.
Synchronize Dates
If you’re taking two (or more) cameras, make sure you synchronize the date and time. There are many programs, like Adobe Lightroom and Adobe Bridge, which can sort your photographs by the capture time, so if you want to see your photos in the order in which they were taken (and this will apply to most travel photographers), double-check that they have the same date and time before you leave. If you’re unsure how to change the date and time on your camera, refer to your camera manual for details.
Some Final Thoughts
Edit On The Road
Half the fun of travel photography is looking at the images you have captured.
You can do this on the back of your camera or on your laptop.
Viewing on a laptop is the best option and even though few laptops provide a properly color corrected screen, the image quality is certainly good enough to give you a good idea of your success or otherwise.
If there are a few flops and you have a second chance the following day to retrace your steps, isn’t it better to know while you’re there, rather than returning home empty-handed?
We recommend reviewing your files at night!
Collect Information
People want to know about your travels, but chances are you’ll forget a lot of what happens unless you take notes or keep brochures, tickets, and momentoes as you go.
Also, seeing photographs and having them put into context can really enhance the experience for people looking at your images. Give them lots of background information.
Think of making notes as writing a blog or creating a diary entry. Write down the names of places you visit and the people you meet. Jot down your impressions – the smells, the sounds, the tastes, and the quotes that people say. Use these notes to create informative captions for your photo books or blog entries.
Lightroom on Backup Drive
If you’re using a laptop on your travels, but you don’t have enough space to keep the entire trip on your local hard disk, you could create your Lightroom catalog file on one of your backup drives.
This way, when you transfer all your working files to your studio/home computer for later editing, the Lightroom catalog will travel with the files, plus it will know where to find the high-resolution files without you having to re-instruct it or re-import the images.
Make a folder for the trip, and inside this main folder, keep each shoot or day in separate folders. Your Lightroom catalog can then be kept in the main folder as well, ensuring your catalog will know where to look when you transfer your files around.
Upload Edit To iPhone
If you’ve had your computer with you on your travels, there’s no reason not to do a preliminary edit of your best shots and upload them to your iPhone or even to your website.
The real excitement of a trip away is when you first come home and friends and family ask what it was like. Rather than telling them, show them!
A program like Lightroom, Photoshop or Capture One can be used to generate low-resolution files with basic post-production. Use the Batch or Image Processor features to tackle lots of images at once.
Once you’ve selected your edit and applied a basic (or automatic) adjustment, preparing the files for uploading should only take a couple of mouse clicks. It’s really that easy!
Peter Eastway
May 2021
Sydney, New South Wales
Peter Eastway is an Australian photographer known internationally for his landscape photography and creative use of post-production. He has been involved in photo magazine publishing for over 30 years, establishing his Australia's Better Photography Magazine, in 1995. As a result, Peter and his websites are a wealth of information on how to capture, edit and print, offering tutorials, videos and inspiration for amateur and professional photographers. Peter was the author of the Lonely Planet’s Guide to Landscape Photography. His photography has featured on the cover of the Lonely Planet’s guide to Australia, in articles in the Qantas inflight magazine, and in an international Apple television commercial. And he has worked with Phase One researching and promoting its high-end medium format cameras and Capture One raw processing software. He has also published The New Tradition, an anthology of 100 award winning images with accompanying techniques and discussions. He was one of the featured photographer in the first Tales By Light television series aired on the National Geographic Channel in Australia and produced in partnership with Canon Australia. It can currently be viewed on Netflix around the world. Peter Eastway is a Grand Master of Photography, a Fellow and an Honorary Fellow of the Australian Institute of Professional Photography, and a Master and Honorary Fellow of the New Zealand Institute of Professional Photography. He won the 1996 and 1998 AIPP Australian Professional Photographer of the Year Award. He is a WPPI Master of Photography. He was more recently the 2019 AIPP NSW Epson Professional Photographer of the Year (Australia). Peter is just over 60, rides a short surfboard, believes two skis are better than one, and in case you're buying him lunch, he is vegetarian.


